The following options are available in the Modeling Toolkit window and let you select components in your scene:
- Pick/Marquee
-
Marquee select draws a rectangular box over the components you want to select. You can interactively adjust marquee selections by dragging a marquee box, and then Alt + dragging it to a new position.Note: You can quickly toggle between the two selection styles using Tab. Holding Tab after making a marquee selection temporarily activates Tab Drag select, letting you quickly add and remove components from your existing marquee selection. See Resize a marquee selection with drag select.
- Drag
-
Drag select is like Paint Selection without a brush size. This selection style lets you drag the cursor over components you want to select.
Drag select also lets you select components when your cursor isn't touching them, making selections fast and easy. By default, Maya's preselection highlight and Drag select highlight the component that is closest to the cursor.
- Tweak/Marquee
-
Lets you tweak a component or make a marquee selection. When you drag a component, Maya uses Tweak mode. When you drag your cursor in the empty space around the object, Maya uses the Marquee tool. See Move components with Tweak mode.
Tip: Holding ` activates tweak mode until the key is released. Pressing ` activates tweak mode until you press ` again. - Camera Based Selection
-
 When turned on, you can only select components that are not obstructed by other components relative to the current camera. If set to Auto, camera-based selection will automatically be turned on when in shaded mode and turned off when in wireframe or x-ray modes.
- Highlight Backfaces
- When on, backfacing components are highlighted for preselection and are selectable. When this option is disabled, backfacing components are still selectable, but they are not highlighted for preselection.
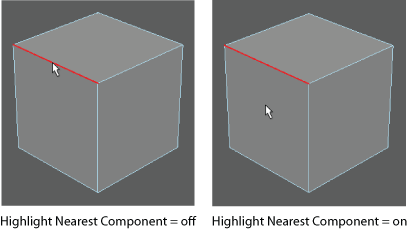
- Highlight Nearest Component
-
When on, highlights the closest component to the cursor before you select it. By default, Highlight Nearest Component is turned on in the Modeling Toolkit and the Select Tool settings. When Highlight Nearest Component is turned off, components are only highlighted when your cursor is placed on top of them.

- Highlight Backfaces
- When on, backfacing components are highlighted for preselection and are selectable. When this option is disabled, backfacing components are still selectable, but they are not highlighted for preselection.
- Soft Selection
- When
Soft Select is enabled, the falloff region around your selection receives a weighted transformation based on the falloff curve. If this option is enabled and nothing is selected, moving your cursor over polygon components displays a preview of the soft selection. See
Sculpting with Soft Selection.
Tip: Use the b hotkey to toggle soft selection mode. Hold b and drag to resize the soft selection falloff area.
- Falloff mode
- Sets the shape of the falloff region.
- Volume
- Extends a spherical radius around your selection and gradually influences all the vertices that are within the spherical range.
- Surface
-
When the Falloff Mode is set to Surface, the falloff is based on a circular region that conforms to the contours of the surface. Surface mode is useful when you want the soft selection falloff to conform to a surface. For example, you can separate the upper lip from the bottom lip on a characters face using the surface-based falloff mode.
- Global
-
When Falloff Mode is set to Global, the falloff region is determined in the same way as the Volume setting except that the Soft Selection influence will affect any mesh within the Falloff Radius, including meshes that are not part of the original selection.
- Object
-
When Falloff Mode is set to Object, you can translate, rotate, or scale objects in the scene with falloff, without deforming the objects themselves.
- Falloff radius
- Determines the area of deformation. Enter a value in the falloff radius field to adjust the area.
Tip: B + middle-drag to resize the size of the falloff area.
- Falloff curve
- Lets you modify the shape of the falloff. The shape of the curve indicates the shape of the falloff around the selected components. You can add additional points to the curve by clicking on the graph and you can modify the position of existing points by click-dragging.
- Reset Curve
- Resets all Soft Selection settings to their default values.
- Symmetry
- Turns on symmetry. See
Symmetry Settings.
Tip: Middle-click the
 button to toggle between the last selected
Symmetry setting and
Off.