Controls Menu
| Function | Flame Shortcut | Smoke Classic Shortcut |
|---|---|---|
| Create Circle GMask Selective Preset | Space - S | Not assigned |
| Create Square GMask Selective Preset | Ctrl - Space - S | Not assigned |
| Create Horizontal Line GMask Selective Preset | Shift - Space - S | Not assigned |
| Create Vertical Line GMask Selective Preset | Shift - Ctrl - Space - S | Not assigned |
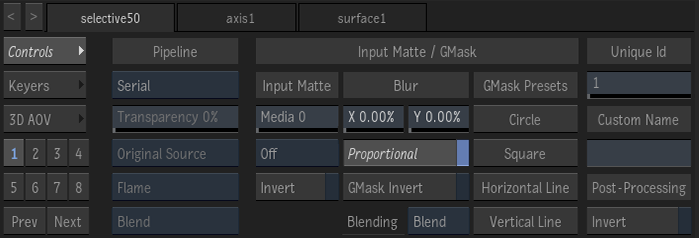
- Pipeline Selection box
- Select Serial to create a linear pipeline of Matchbox Selective FX, based on the order defined in the Priority Editor. Select Comp for a single Comp operation, regardless of the number of Matchbox nodes, with control on transparency and source. Select Parallel to blend parallel Selective nodes, grouped in the Priority Editor, in an additive process.
- Transparency field
- Displays the transparency of the composition. 0 is transparent, 100 is opaque. Enabled if the Pipeline Selection box is set to Comp.
- Original box
- Select Original to apply the effects of the selective to the original source. Select Previous Result to apply the effects of the selective to the previous result. Use the Priority Editor to set rendering order. Enabled if the Pipeline Selection box is set to Comp.
- Blend Mode box
- Select the blend mode to use. A blend mode defines the types of blending available in the Blend Selection box. Enabled if the Pipeline Selection box is set to Comp.
- Blend Selection box
- Select how the front and matte clip, or the front and back clip, are combined. Enabled if the Pipeline Selection box is set to Comp.
- Matte Selection field
- Set the Input Matte used by the selective. The value displayed is a layer index from the Media list.
- Input Matte Channel Selection box
- Select Off to disable the Input Matte. Select a channel to use the Input Matte: RGB is from the front of the layer, Alpha is the matte of the layer, and luminance is the RGB luma value.
- Invert Matte button
- Enable to invert the Input Matte.
- X Blur field
- Blur the input matte and the GMasks along the x-axis. Editable.
- Y Blur field
- Blur the input matte and the GMasks along the Y-axis. Editable.
- Proportional button
- Enable to affect the Blur x- and y-axis proportionally.
- GMask Invert button
- Enable to invert the GMasks.
- Blending Mode box
- Select the blending mode to blend the Input Matte and Gmask together with the selective Keyer and 3D AOV matte. Blend constrains the Keyer and the AOV matte, Add expands, Multiply subtracts.
- Create a Circular GMask
- Adds to the Selective a circular GMask at the center of the image, with a softness.
- Create a Square GMask
- Adds to the Selective a square GMask at the center of the image, with a softness.
- Create an Horizontal Line GMask
- Adds to the Selective an horizontal GMask at the center of the image, with a softness.
- Create a Vertical Line GMask
- Adds to the Selective a vertical GMask at the center of the image, with a softness.
- Unique Id Field
- Identifies the selective. This is the ID used in the Selective Manager, the Schematic, the HUD, and the Priority Editor. An ID is unique to each surface and camera. Editable.
- Custom Name field
- Displays the custom name of this Selective node. The Custom Name is displayed next to the Unique ID in the Schematic, the HUD, and the Priority Editor. Editable.
- Post-Processing Invert button
- Enable to invert the overall result of the selective, blending together GMasks, Input Matte and Keyer.
Keyers Menu
Diamond Keyer
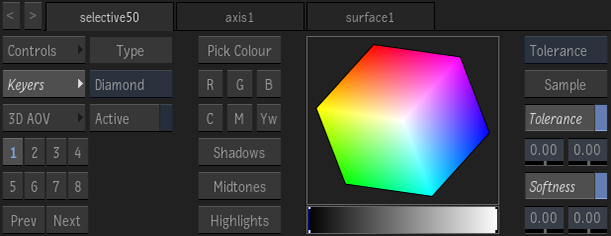
- Key Selection box
- Select the keyer to create a matte for the selective.
- Active button
- Enable to apply the key to the selective.
- Pick Colour button
- Define the matte based on a sample from the image. Drag the cursor over the image to define initial matte.
- Red button
- Define the matte range based on the red channel.
- Blue button
- Define the matte range based on the blue channel.
- Green button
- Define the matte range based on the green channel.
- Cyan button
- Define the matte range based on the cyan channel.
- Magenta button
- Define the matte range based on the magenta channel.
- Yellow button
- Define the matte range based on the yellow channel.
- Shadows button
- Define the matte range based on the dark areas in the image.
- Midtones button
- Define the matte range based on the midlevel areas in the image.
- Highlights button
- Define the matte range based on the light areas in the image.
- Adjustment box
- Select Tolerance to add tolerance to the matte, +Softness to add softness to the matte, or -Softness to remove softness from the matte using the Sample button.
- Sample button
- Define the Tolerance, +Softness, or -Softness. The edited value depends on the selection in the Adjustment box.
- Tolerance button
- Enable to apply the grey tolerance indicator on the hue cube.
- Low Tolerance field
- Displays the minimum value for the tolerance range. Editable.
- High Tolerance field
- Displays the maximum value for the tolerance range. Editable.
- Softness button
- Enable to apply the black softness indicator on the hue cube.
- Low Softness field
- Displays the minimum value for the softness range. Editable.
- High Softness field
- Displays the maximum value for the softness range. Editable.
Tracer Keyer
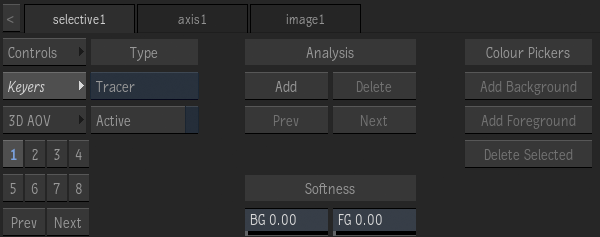
- Key Selection box
- Select the keyer to create a matte for the selective.
- Active button
- Enable to apply the key to the selective.
- Add Tracer button
- Add a tracer at a specific frame.
- Delete Tracer button
- Delete an existing tracer.
- Previous Tracer button
- Jump to the previous tracer.
- Next Tracer button
- Jump to the next tracer.
- Background Softness field
- Displays the amount of 3D colour volume around the background colour range. Editable.
- Foreground Softness field
- Displays the amount of 3D colour volume around the foreground colour range. Editable.
- Add Background Sampling button
- Add more background colour sampling boxes to define the background 3D colour volume.
- Add Foreground Sampling button
- Add more foreground colour sampling boxes to define the foreground 3D colour volume
- Delete Selected Sampling button
- Delete the current colour sampling box selection, and remove it from either the foreground or background 3D colour volume.
Semantic Keyer
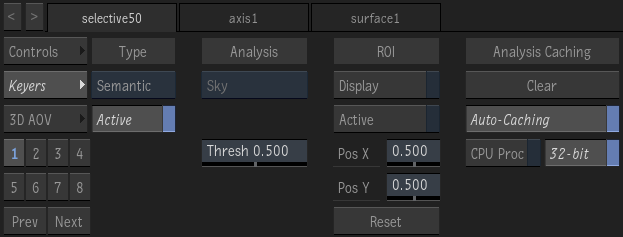
The Semantic keyer uses a machine learning model to automatically extract a matte out of skies, human bodies or heads.
- Analysis Mode box
- Select the feature to detect: sky, human body, human head, or human face feature.
- Feature Selection box
- The face feature to detect. If there is more than one talent in the shot, use the Selective Input view (F9) to select the talent with the widget.
- Threshold field
- Default value (0.5) has no effect. Move toward 0.0 to fill semi-transparent regions with black. Move toward 1.0 to fill with white.
- Target Selection button
- All creates a matte with every human head or body in the surface. Selected allows you to choose the human head or body to include in the matte. Use the Selective Input view (F9) to display the widget and select the subject.
- Minimum Brightness field
- The minimal brightness to include in the matte. Clean up the matte by removing semi-transparency from undesirable features. Enabled when Target Selection is set to Selected.
- Maximum Brightness field
- The maximal brightness to include in the matte. Clean up the matte by strengthening the transparency of the selected subject . Enabled when Target Selection is set to Selected.
- Display the ROI button
- Display the region of interest (ROI). The ROI can only appear in a viewport set to Object (F8) or Selective (F9) view.
- Enable the ROI button
- Enable to analyze only the area defined by the Region Of Interest (ROI). A well-defined ROI can improve performance, caching, and the quality of the analysis.
- X Position field
- Position of the center of the Region Of Interest along the x-axis.
- Y Position field
- Position of the center of the Region Of Interest along the y-axis.
- Reset the ROI button
- Reset the Region Of Interest (ROI) to the full image and delete any ROI key frame.
- Clear the Analysis Cache button
- Reset the cache.
- Automatically Cache the Analysis button
- Enable to cache the analysis as each frame is displayed, making scrubbing or playback faster. Turn off Auto-Caching if you run out of space on your framestore.
- CPU Processing button
- Enable to perform the analysis with the CPU instead of the GPU. Using the CPU helps with stability on computers equipped with minimal amounts of VRAM.
- 32-bit Processing button
- Enable to analyze with 32-bit floating point precision. Disable this option if you run out of framestore space because of caching--the cache will use less space, but use 16-bit floating point precision.
Keyers Common Controls
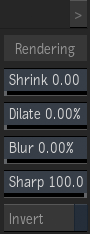
- Shrink Tracer field
- Use to reduce the spatial extent of the keyer's result. Editable.
- Dilate Tracer field
- Use to increase the spatial extent of the keyer's result. Editable.
- Blur field
- Use to blur the keyer's result. Editable.
- Sharpness field
- Use to control the sharpness of the Diamond keyer's key. Editable.
- Invert button
- Enable to invert the result of the key.
3D AOV Menu
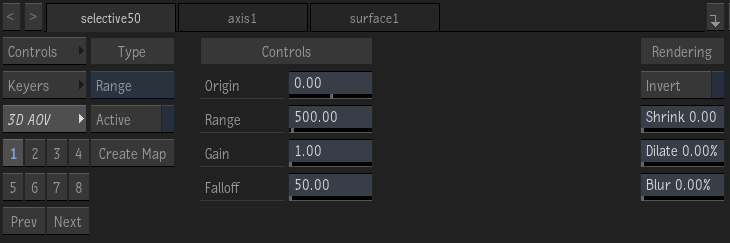
- 3D AOV Mode box
- Set the 3D AOV image segmentation type. Each type requires a specific AOV data pass, such as Distance requires a Z-depth map.
- Active button
- Activate the image segmentation. Automatically turns on when you edit any of the Controls.
- Create Map button
- Attach to the surface the map required by the 3D AOV Mode box, such as Z-depth for Distance, and set the map to the Analysis mode.
Controls - Range
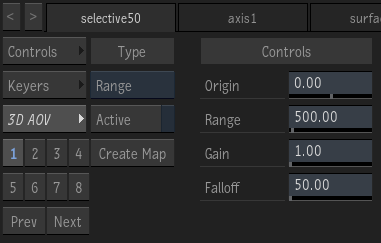
- Origin field
- Set where the segmented volume starts in the camera space.
- Range field
- Set the depth of the segmented volume.
- Gain field
- Apply a gain to control the intensity of the output segmentation.
- Falloff field
- Control the smoothness of the transition to and from the segmented volume.
Controls - Distance
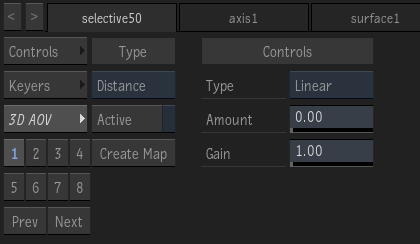
- Type box
- Select the algorithm that decays the transition between the near and far clipping planes.
- Amount box
- Modulate the rate at which the transition decays for the chosen decay algorithm.
- Gain box
- Apply a gain to control the intensity of the output segmentation.
Controls - Near/Far

- Near field
- Set the near clipping plane for the depth segmentation.
- Far field
- Set the far clipping plane for the depth segmentation.
- Gain field
- Apply a gain to control the intensity of the output segmentation.
- Falloff field
- Control the smoothness of the transition to and from the segmented volume.
Controls - Normals
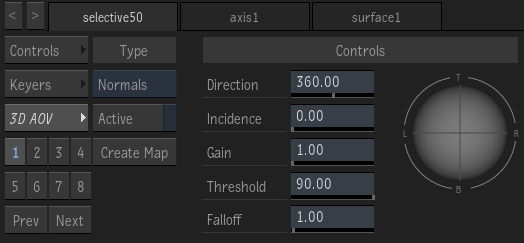
- Direction field
- Set the direction of the incoming light.
- Incidence field
- Set the slant, from the z-axis, of the incoming light. The higher value, the more oblique the incoming light is.
- Gain field
- Apply a gain to control the intensity of the output segmentation.
- Threshold field
- Set the range of the normals used to segment the image. Matches the dark area on the trackball.
- Falloff field
- Control the smoothness of the transition to and from the segmentation.
Controls - Motion
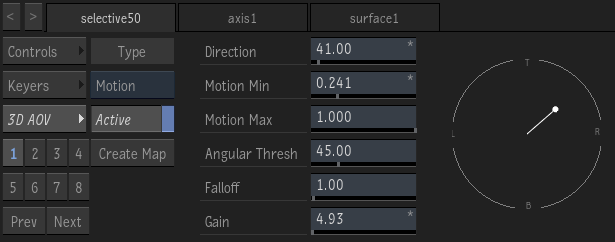
The Motion mode requires access to Motion Vector data. The data can come from a Motion Vector texture map (if connected to the Surface) or from the Action Motion Vector output (if connected to the Camera). The Motion mode isolates part of the Motion data using direction and motion min/max fields, and then create a matte out of it.
- Direction field
- Control what direction of the motion is included in the resulting matte.
- Motion Min field
- Filter out smaller motions from the selected direction the resulting matte.
Since the process of creating Motion Vector results includes a lot of small motion, you'll probably need to increase this value to get a precise motion segmentation result.
- Motion Max field
- Filter out the larger motions from the selected direction in the resulting matte.
- Angular Threshold field
- Define the angle of the motion range included in the defined Direction.
- Falloff field
- Set the shape of the curve that defines the motion range from the centre of the define direction and the limit of the Angular Threshold. While Linear interpolation is the default, increasing the Falloff creates a logarithmic-type interpolation.
- Gain field
- Apply a gain to control the intensity of the output segmentation.
- Motion Vector widget
- Control the Direction and Motion Min settings.
Controls - Primitive
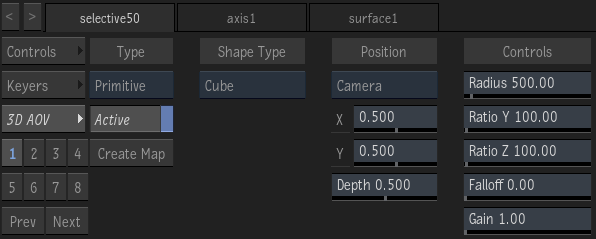
Use a primitive to precisely extract an object from the depth, something that cannot be done with other depth-based segmentation tools.
- Shape button
- Set the shape used to isolate part of the depth data. Grey in the shape indicates areas that do not circumscribe any depth information. Yellow indicates areas that circumscribe some depth information. Use the F8 or F9 views to display the shape.
- Position button
- Use World to position the shape using absolute XYZ coordinates. Use Camera to position the shape relative to the camera.
- X Position field
- Center of the shape along the x-axis.
- Y Position field
- Center of the shape along the y-axis.
- Z Position field
- Center of the shape along the z-axis.
- Relative X Position field
- Center of the shape relative to the camera, along the x-axis.
- Relative Y Position field
- Center of the shape relative to the camera, along the y-axis.
- Relative Depth field
- Normalized distance from the camera to the center of the shape.
- Shape Radius field
- Set the size of the shape
- Shape Y-axis Ratio field
- Change the 3D Shape along the y-axis.
- Shape Z-axis Ratio field
- Change the 3D Shape along the z-axis.
- Falloff field
- Control the smoothness of the transition to and from the segmented volume.
- Gain field
- Apply a gain to control the intensity of the output segmentation.
Selectives Navigation Panel
- Go To Selective button
- Click a blue number to display the Selective. Click a grey number to create Selective.
- Previous Selectives button
- Displays the previous set of eight Selectives.
- Next Selectives button
- Displays the next set of eight Selectives.