Working with the Scene Graph
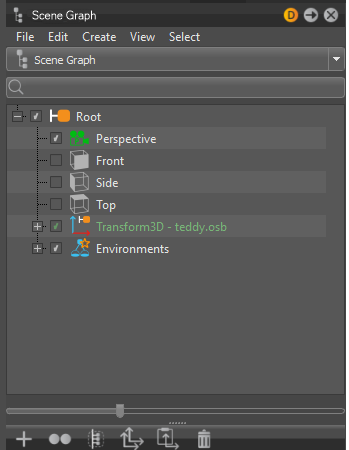
The Scene Graph shows all the nodes of a scene, organized in a tree structure. Imported files are highlighted in green. The root node is at the top of the structure and is a parent to all other nodes in the scene. The root node is a group node and cannot be deleted, renamed, or otherwise edited.

We added the importing of native CAD file assembled in the Alias Reference Manager into VRED 2022. A new Reference Manager group will be created in the Scene Graph to mimic the Alias Reference Manager and layers. See Importing Alias Reference Assemblies for more information.
How to Display the Scene Graph
There are two ways to display the Scene Graph:
- From the Menu Bar, click Scene > Scene Graph.
- In the Quick Access Bar, click
 Graph.
How to Dock and Undock the Scene Graph
In the Scene Graph, click the docking icon  in the top right to dock and undock it.

How to Rename a Node
In the Scene Graph, click the node and enter a new name.

How to Move a Node
In the Scene Graph, drag a node to a new location.
How to Open a Node in the Viewport
- Drag a node from the Scene Graph into the Viewport to see the node and its respective objects.
- To restore the whole scene, drag the Root node into the Viewport.
How to Find All Parent Nodes
When you select a node in the Scene Graph, all its parent nodes turn light blue.

How to Display Scene Graph in Split View
The dotted line at the bottom of the Scene Graph is a splitting tool. Drag it to show a second view of the Scene Graph. You can drag and drop items between views. Use its drop-down menu to change one view to Scene Tags.

How to Search the Scene Graph
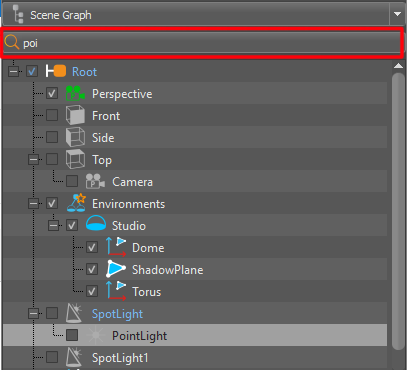
Use the Search field at the top of the Scene Graph to find nodes. Regular expressions are supported.

How to Access Other Scene Graph Functions
Do either of the following:
Use the toolbar at the bottom of the Scene Graph for quick asset to other functions, such as creating, copying, and grouping items.

Use the Scene Graph Menu Bar to load, edit and create, view and select items, and to work with the Scene Graph view.

How to Create a Node
In the toolbar at the bottom of the Scene Graph, click ![]() to create a node. Generally, the node will be inserted below the currently selected node. Choose from the following options:
to create a node. Generally, the node will be inserted below the currently selected node. Choose from the following options:
Create Geometry - Creates lines, planes, boxes, cylinders, cones, spheres, tori, and domes.
Create Light - Creates directional, point, spot, spherical, disk, rectangular, and ray lights.
Create Camera - Creates cameras, cameras and aims, cameras with aims and ups, and orthographic cameras.
Group - Creates a Group node in the tree below where your cursor was. Try the keyboard shortcut Ctrl+G.
Shell - Creates a Shell node.
Matrix Transform - Creates a Matrix Transform node.
MaterialGroup - Creates a MaterialGroup node.
Environment - Creates an Environment node.
Switch - Creates a Switch node.
StereoSwitch - Creates a StereoSwitch node.
HostSwitch - Creates a HostSwitch node.
Billboard - Creates a Billboard node.
ClipPlane - Creates a ClipPlane node.
DistanceLOD - Creates a DistanceLOD node.
Sound - Creates a Sound node.
SoundObstructor - Creates a SoundObstructor node.
Custom... - Creates a custom node. Select the type from the Create custom node dialog that appears.
How to Duplicate a Node
In the toolbar at the bottom of the Scene Graph, with one or more nodes selected, click  to duplicate a node or nodes. Generally, the node will be inserted somewhere below the currently selected node.
How to Group a Selection of Nodes
In the toolbar at the bottom of the Scene Graph, with nodes selected, click  to create a group and add the selected nodes to it.
How to Copy Transformations
In the toolbar at the bottom of the Scene Graph, with a node selected, click  to copy all transformation information from the selected node to the clipboard. A transformation contains information on the position and orientation of an object within 3D space. It also provides information on the position and orientation of the object's coordination system. Use
  Paste Transformation, then select an option, to apply the copied transformation information to something.
How to Paste Transformations
In the toolbar at the bottom of the Scene Graph, with one or more nodes selected, click  to paste copied transformation information onto the selected node or nodes. All transformation information, that is, translation, rotation, scale, and pivot are pasted. If you want to select one attribute to paste, used Edit > Paste Transformation to access paste options for transformations. Paste the pivot to apply the location and orientation from the object's local coordinate system.
How to Delete a Node
In the toolbar at the bottom of the Scene Graph, with one or more nodes selected, click  to delete the selected node or nodes.