Fusion has a well-defined concept of what a command is. At a high level, a command is exactly what you would expect; a user clicks a command button to execute it, a dialog guides them through the process of collecting the required input, it often provides a preview of the expected result, and then it creates the final result, which can be undone.
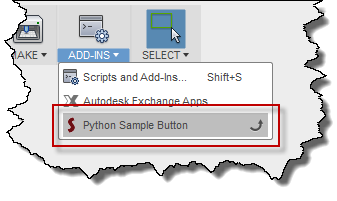
Both scripts and add-ins can create commands but most commonly they are created by add-ins. There are cases where you might want to take advantage of some of the command functionality within a script too, which is discussed later. The reason that commands are used more with add-ins is because an add-in can be automatically loaded when Fusion is started and as part of the loading process they can add buttons for their commands into the Fusion user-interface, making the commands much easier for the user to access. The user can now execute the custom command by clicking the button, just as they do for any other Fusion command. A user executes a script through the Scripts and Add-Ins command, so it's not as convenient to execute a command implemented by a script.
An add-in is typically run automatically by Fusion at start-up where in the run function of the add-in you create a command definition. This is exactly what the name implies; it's the definition of a command. A command definition primarily defines how the command will look in the user-interface. For example, the most common type of command definition is a button and it defines all of the information needed to display a button in the user-interface; the icon, tool tip, enabled state, visibility, etc.). In addition to a button, there are also other types of command definitions that are used to create other types of controls you see in the user interface; a single check box, list of radio buttons, check boxes, and text. These are all described in more detail in the User Interface Customization topic.
Once the command definition has been created, you then use it to create a button in the user interface by defining a location in the user interface and providing the command definition. The new button references the command definition to get the information it needs to displays itself, (icon, tool tip, etc.). This is also discussed in the User Interface Customization topic. The add-in now runs passively in the background waiting for the button to be clicked and then responds appropriately.
Any command (standard Fusion or API created commands) can be run by the user clicking a button or by a program calling the command definitions execute method. In either case, Fusion creates a new Command object and fires the commandCreated event where it passes the Command object to your add-in. Your add-in reacts to this event by connecting to other command related events and defining the contents of the command dialog, if it has one.
Below is the full Python code for a basic add-in that does the bare minimum for a command that doesn't have a dialog. The result of this command is very simple in that it just displays a message box but it could do anything in the execute event. There are a few important things to notice in the program:
import adsk.core, adsk.fusion, adsk.cam, traceback

# Global list to keep all event handlers in scope.
# This is only needed with Python.
handlers = []

def run(context):
    ui = None
    try:
        app = adsk.core.Application.get()
        ui  = app.userInterface

        # Get the CommandDefinitions collection.
        cmdDefs = ui.commandDefinitions

        # Create a button command definition.
        buttonSample = cmdDefs.addButtonDefinition('MyButtonDefIdPython',
                                                   'Python Sample Button',
                                                   'Sample button tooltip',
                                                   './Resources/Sample')

        # Connect to the command created event.
        sampleCommandCreated = SampleCommandCreatedEventHandler()
        buttonSample.commandCreated.add(sampleCommandCreated)
        handlers.append(sampleCommandCreated)

        # Get the ADD-INS panel in the model workspace.
        addInsPanel = ui.allToolbarPanels.itemById('SolidScriptsAddinsPanel')

        # Add the button to the bottom of the panel.
        buttonControl = addInsPanel.controls.addCommand(buttonSample)
    except:
        if ui:
            ui.messageBox('Failed:\n{}'.format(traceback.format_exc()))


# Event handler for the commandCreated event.
class SampleCommandCreatedEventHandler(adsk.core.CommandCreatedEventHandler):
    def __init__(self):
        super().__init__()
    def notify(self, args):
        eventArgs = adsk.core.CommandCreatedEventArgs.cast(args)
        cmd = eventArgs.command

        # Connect to the execute event.
        onExecute = SampleCommandExecuteHandler()
        cmd.execute.add(onExecute)
        handlers.append(onExecute)


# Event handler for the execute event.
class SampleCommandExecuteHandler(adsk.core.CommandEventHandler):
    def __init__(self):
        super().__init__()
    def notify(self, args):
        eventArgs = adsk.core.CommandEventArgs.cast(args)

        # Code to react to the event.
        app = adsk.core.Application.get()
        ui  = app.userInterface
        ui.messageBox('In command execute event handler.')


def stop(context):
    try:
        app = adsk.core.Application.get()
        ui  = app.userInterface

        # Clean up the UI.
        cmdDef = ui.commandDefinitions.itemById('MyButtonDefIdPython')
        if cmdDef:
            cmdDef.deleteMe()

        addinsPanel = ui.allToolbarPanels.itemById('SolidScriptsAddinsPanel')
        cntrl = addinsPanel.controls.itemById('MyButtonDefIdPython')
        if cntrl:
            cntrl.deleteMe()
    except:
        if ui:
            ui.messageBox('Failed:\n{}'.format(traceback.format_exc()))
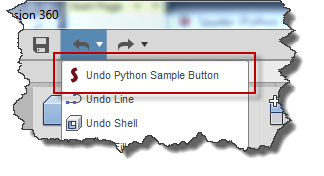
There are several features of a command that your add-in or script can take advantage of. The simple example above takes advantage of the ability to add a button to the user-interface and have the user execute the associated command. This capability is typically used by add-ins. A capability that is very useful for both add-ins and scripts, and that's not shown in the code above, is that any creation or edits that are done within the execute event handler are automatically grouped into a single transaction. This means that you can perform multiple creation and edit operations within the execute handler but the user will be able to undo all of it with a single undo operation. Also, the undo list will show the name of the command as the operation to be undone, as shown below.
As described above, everything you do in the execute event handler is bundled within a single transaction and can be undone with one undo. This capability is a big reason to use a command within a script. Without this, every API call that causes a change within Fusion will show up as a separate operation in the undo list. For example, if you write a simple script that draws three lines to create a triangle in a sketch, there will be three operations listed in the undo list and the user will need to run the Undo command three times to revert the process. However, if you call that same code that draws the three lines from the execute event handler, there will be a single operation in the undo list and a single undo will revert all of the changes.
As mentioned before, it's possible for a script to create a command but because a script is run from the Scripts and Add-Ins command, it doesn't create a button in the user-interface so the command definition can't be executed by the user clicking a button. For a script to use a command, it still creates a command definition like an add-in but it executes the command itself by calling the command definition's execute method, which starts the command process.
Below is a simple script example that demonstrates how this is done. Most of the code is similar to the add-in code above except it's missing the user interface code and it does two additional things, which are highlighted in yellow in the code below. First, it calls the execute method of the command definition it just created. Second, it sets a property to stop the script from automatically terminating. By default, a Python script will automatically terminate after the run function is finished. This is unique to Python scripts. When running a command from a script, the script needs to continue running so that it can handle the command related events. In the handler for the execute event it calls the terminate method to finally terminate the script.
import adsk.core, adsk.fusion, adsk.cam, traceback

# Global list to keep all event handlers in scope.
# This is only needed with Python.
handlers = []

def run(context):
    ui = None
    try:
        app = adsk.core.Application.get()
        ui  = app.userInterface

        # Get the CommandDefinitions collection.
        cmdDefs = ui.commandDefinitions

        # Create a button command definition.
        buttonSample = cmdDefs.addButtonDefinition('SampleScriptButtonId',
                                                   'Python Sample Button',
                                                   'Sample button tooltip')

        # Connect to the command created event.
        sampleCommandCreated = SampleCommandCreatedEventHandler()
        buttonSample.commandCreated.add(sampleCommandCreated)
        handlers.append(sampleCommandCreated)

        # Execute the command.
        buttonSample.execute()

        # Keep the script running.
        adsk.autoTerminate(False)
    except:
        if ui:
            ui.messageBox('Failed:\n{}'.format(traceback.format_exc()))


# Event handler for the commandCreated event.
class SampleCommandCreatedEventHandler(adsk.core.CommandCreatedEventHandler):
    def __init__(self):
        super().__init__()
    def notify(self, args):
        eventArgs = adsk.core.CommandCreatedEventArgs.cast(args)
        cmd = eventArgs.command

        # Connect to the execute event.
        onExecute = SampleCommandExecuteHandler()
        cmd.execute.add(onExecute)
        handlers.append(onExecute)


# Event handler for the execute event.
class SampleCommandExecuteHandler(adsk.core.CommandEventHandler):
    def __init__(self):
        super().__init__()
    def notify(self, args):
        eventArgs = adsk.core.CommandEventArgs.cast(args)

        # Code to react to the event.
        app = adsk.core.Application.get()
        des = adsk.fusion.Design.cast(app.activeProduct)

        if des:
            root = des.rootComponent
            sk = root.sketches.add(root.xYConstructionPlane)
            lines = sk.sketchCurves.sketchLines
            l1 = lines.addByTwoPoints(adsk.core.Point3D.create(0,0,0),
                                      adsk.core.Point3D.create(5,0,0))
            l2 = lines.addByTwoPoints(l1.endSketchPoint,
                                      adsk.core.Point3D.create(2.5,4,0))
            l3 = lines.addByTwoPoints(l2.endSketchPoint, l1.startSketchPoint)

        # Force the termination of the command.
        adsk.terminate()


def stop(context):
    try:
        app = adsk.core.Application.get()
        ui  = app.userInterface

        # Delete the command definition.
        cmdDef = ui.commandDefinitions.itemById('SampleScriptButtonId')
        if cmdDef:
            cmdDef.deleteMe()
    except:
        if ui:
            ui.messageBox('Failed:\n{}'.format(traceback.format_exc()))
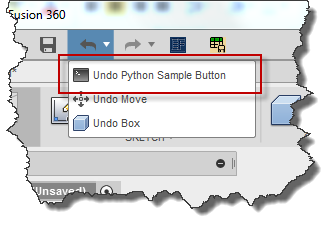
In the execute event handler of the script above, it creates a new sketch and draws three lines. Because this creation is done in the execute event handler they're grouped into a single transaction and the undo command shows a single operation with the title of the command name, as shown below. Because we didn't assign an icon to the command definition, it's using a default icon in the undo list.
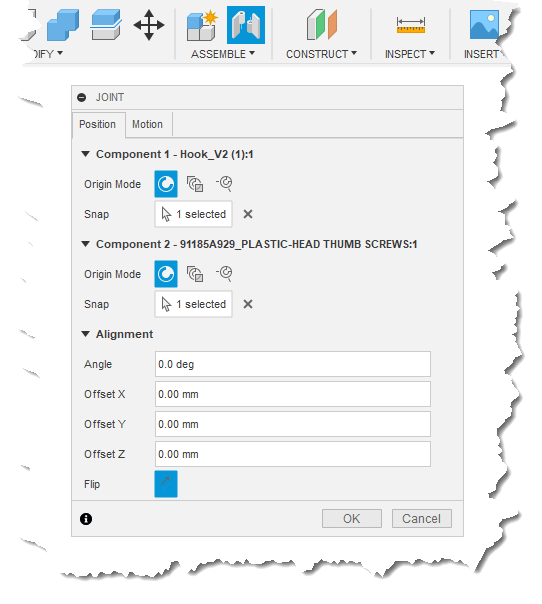
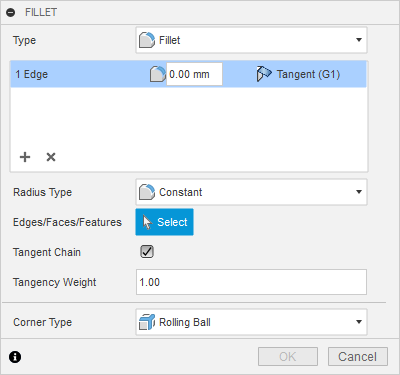
A command dialog is displayed whenever you create any command inputs within the commandCreated event. This is discussed in more detail below. A standard command dialog displays a vertical stack of command inputs, along with OK and CANCEL buttons. Below is the command dialog for the Fillet command. It contains several types of inputs to get the necessary information from the user.
By default, the position and width of the dialog is the shared by all commands and the height is automatically set based on the number of command inputs. This means if the user runs a command and moves or resizes the command dialog the next command will display in the same location and have the same width. In general it's best for your command to have this same behavior to have consistency between commands. However there are cases when you need specific behavior. Using the setDialogInitialSize, you can override the default and specify the size for your dialog. However, if the user changes the size, Fusion will remember the change and that will become the new default initial size for your dialog. There is also the setDialogMinimumSize that lets you specify the minimum size your dialog can be resized to. These settings only apply to your dialog and do not affect any other commands.
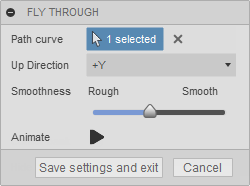
There is also some other customization you can do to on the dialog. You can use the isOKButtonVisible property of the Command object to specify if the OK button should be shown or not. You can also specify your own text for the OK and CANCEL buttons using the cancelButtonText and okButtonText property of the Command object. Overriding the OK button text is demonstrated below.
In the previous samples, nothing was done in the commandCreated event except for connecting to the execute event. This is ok for a command that doesn't need to interact with the user but most commands need to get additional information from the user through the use of a dialog. The primary use of the commandCreated event is to define the contents of the dialog associated with the command. This is done by creating command inputs using the Command object that Fusion created and passes to you through the commandCreated event handler. If you create any command inputs, a command dialog is displayed with the created command inputs. The execute event is fired when the user clicks the OK button on the dialog. The OK button isn't enabled until the user has provided valid input to the command inputs. You can use the information collected by the command inputs to do whatever the command is supposed to do. A complete list of the different types of command inputs is available in the Command Inputs topic.
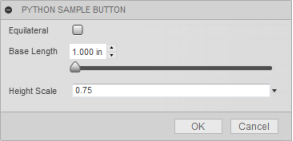
Below is a new version of the SampleCommandCreatedEventHandler from the add-in example above. It still connects to the execute event but it also creates three command inputs which results in the dialog shown below.
# Event handler for the commandCreated event.
class SampleCommandCreatedEventHandler(adsk.core.CommandCreatedEventHandler):
    def __init__(self):
        super().__init__()
    def notify(self, args):
        eventArgs = adsk.core.CommandCreatedEventArgs.cast(args)

        # Get the command
        cmd = eventArgs.command

        # Get the CommandInputs collection to create new command inputs.
        inputs = cmd.commandInputs

        # Create a check box to get if it should be an equilateral triangle or not.
        equilateral = inputs.addBoolValueInput('equilateral', 'Equilateral',
                                               True, '', False)

        # Create the slider to get the base length, setting the range of the slider to
        # be 1 to 10 of whatever the current document unit is.
        app = adsk.core.Application.get()
        des = adsk.fusion.Design.cast(app.activeProduct)
        minVal = des.unitsManager.convert(1, des.unitsManager.defaultLengthUnits, 'cm' )
        maxVal = des.unitsManager.convert(10, des.unitsManager.defaultLengthUnits, 'cm' )
        baseLength = inputs.addFloatSliderCommandInput('baseLength',
                                                       'Base Length',
                                                       des.unitsManager.defaultLengthUnits,
                                                       minVal, maxVal, False)

        # Create the value input to get the height scale.
        heightScale = inputs.addValueInput('heightScale', 'Height Scale',
                                           '', adsk.core.ValueInput.createByReal(0.75))

        # Connect to the execute event.
        onExecute = SampleCommandExecuteHandler()
        cmd.execute.add(onExecute)
        handlers.append(onExecute)
The execute event if fired when the user completes the command by clicking the OK button on the dialog and it's where the add-in will do the work that the command does. You need to connect to the event by adding the code below into the commandCreated event. It can be anywhere within the function.
     # Connect to the execute event.
     onExecute = SampleCommandExecuteHandler()
     cmd.execute.add(onExecute)
     handlers.append(onExecute)
The highlighted code below can be added to the commandCreated event to check to make sure that a sketch is currently active and abort the command if one is not.
    def notify(self, args):
        # Verify that a sketch is active.
        app = adsk.core.Application.get()
        if app.activeEditObject.objectType != adsk.fusion.Sketch.classType():
            ui = app.userInterface
            ui.messageBox('A sketch must be active for this command.')
            return False

        eventArgs = adsk.core.CommandCreatedEventArgs.cast(args)
Below is code for the execute event for this example where it gets the values from command inputs and then calls a function that draws an isosceles triangle in the active sketch.
# Event handler for the execute event.
class SampleCommandExecuteHandler(adsk.core.CommandEventHandler):
    def __init__(self):
        super().__init__()
    def notify(self, args):
        import math
        eventArgs = adsk.core.CommandEventArgs.cast(args)

        # Get the values from the command inputs.
        inputs = eventArgs.command.commandInputs

        length = inputs.itemById('baseLength').valueOne

        if inputs.itemById('equilateral').value == True:
            # Specify a scale that will result in an equilateral triangle.
            scale = math.sqrt(length**2 - (length/2)**2) / length
        else:
            # Get the scale from the command input.
            scale = inputs.itemById('heightScale').value

        drawTriangle(length, scale)


def drawTriangle(baseLength, heightScale):
    # Get the active sketch.
    app = adsk.core.Application.get()
    sketch = adsk.fusion.Sketch.cast(app.activeEditObject)
    sketch.isComputeDeferred = True
    if sketch:
        # Draw the three lines for the triangle.
        lines = sketch.sketchCurves.sketchLines
        l1 = lines.addByTwoPoints(adsk.core.Point3D.create(0,0,0),
                                  adsk.core.Point3D.create(baseLength,0,0))
        l2 = lines.addByTwoPoints(l1.endSketchPoint,
                                  adsk.core.Point3D.create(baseLength/2, baseLength*heightScale, 0))
        l3 = lines.addByTwoPoints(l2.endSketchPoint, l1.startSketchPoint)
        return True
    else:
        return False

    sketch.isComputeDeferred = False
The above demonstrates the basic workflow of a command that uses a dialog. However, there are a lot of other command related capabilities that you can choose to take advantage of to make your command easier to use and more interactive. You can pick-and-choose which of the events below you want to implement depending on what functionality your command needs.
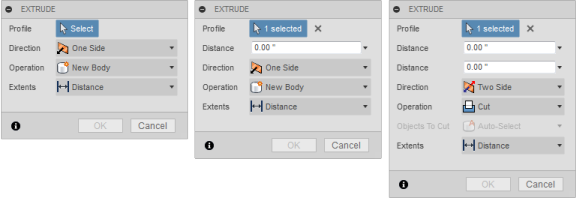
The input changed event is another event supported by the Command object and which you should connect to in the commandCreated event. This event is fired by Fusion whenever the user makes a change to any of the inputs. The primary reason for listening to this event is if you want to make changes to other inputs based on the current input values. The Extrude command in Fusion is a good example of how this is used. The three pictures below show the Extrude command dialog in various states. The extrude command is turning the visibility of inputs on and off based on other settings in the dialog. It's also enabling and disabling inputs as you can see with the "Objects To Cut" input in the picture to the right.
When the inputChanged event is fired, it passes in the command input that the user just interacted with and then in response to that event you can change properties of other command inputs. Besides changing the isVisible and isEnabled properties you can also do other things like set values and populate lists. This makes the dialog dynamic so the user is presented with up to date information and the set of inputs that make sense at that moment.
In the command we've been looking at, we can add support for another command input that lets the user choose to create an equilateral triangle instead of an isosceles triangle. If they choose that option then there's no need to define the height percentage because the length is all that's needed. By reacting to the inputChanged event you can toggle the visibility of the scale input based on the check box value, as shown below.
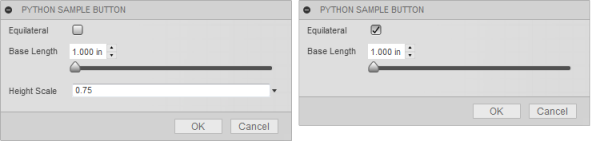
Below is a modified version of the program that creates the check box input to get if they want an equilateral triangle or not and it also connects to the inputChanged event and changes the visibility of the scale command input based on the value of the check box. The execute event is also slightly modified to check the value of the check box and do the correct action based on that. These additions are highlighted in yellow in the code below.
# Event handler for the commandCreated event.
class SampleCommandCreatedEventHandler(adsk.core.CommandCreatedEventHandler):
    def __init__(self):
        super().__init__()
    def notify(self, args):
        # Verify that a sketch is active.
        app = adsk.core.Application.get()
        if app.activeEditObject.objectType != adsk.fusion.Sketch.classType():
            ui = app.userInterface
            ui.messageBox('A sketch must be active for this command.')
            return False

        eventArgs = adsk.core.CommandCreatedEventArgs.cast(args)

        # Get the command
        cmd = eventArgs.command

        # Get the CommandInputs collection to create new command inputs.
        inputs = cmd.commandInputs

        # Create a check box to get if it should be an equilateral triangle or not.
        equilateral = inputs.addBoolValueInput('equilateral', 'Equilateral',
                                               True, '', False)

        # Create the slider to get the base length, setting the range of the slider to
        # be 1 to 10 of whatever the current document unit is.
        app = adsk.core.Application.get()
        des = adsk.fusion.Design.cast(app.activeProduct)
        minVal = des.unitsManager.convert(1, des.unitsManager.defaultLengthUnits, 'cm' )
        maxVal = des.unitsManager.convert(10, des.unitsManager.defaultLengthUnits, 'cm' )
        baseLength = inputs.addFloatSliderCommandInput('baseLength', 'Base Length',
                                                       des.unitsManager.defaultLengthUnits,
                                                       minVal, maxVal, False)

        # Create the value input to get the height scale.
        heightScale = inputs.addValueInput('heightScale', 'Height Scale',
                                           '', adsk.core.ValueInput.createByReal(0.75))

        # Connect to the execute event.
        onExecute = SampleCommandExecuteHandler()
        cmd.execute.add(onExecute)
        handlers.append(onExecute)

        # Connect to the inputChanged event.
        onInputChanged = SampleCommandInputChangedHandler()
        cmd.inputChanged.add(onInputChanged)
        handlers.append(onInputChanged)


# Event handler for the inputChanged event.
class SampleCommandInputChangedHandler(adsk.core.InputChangedEventHandler):
    def __init__(self):
        super().__init__()
    def notify(self, args):
        eventArgs = adsk.core.InputChangedEventArgs.cast(args)

        # Check the value of the check box.
        changedInput = eventArgs.input
        if changedInput.id == 'equilateral':
            inputs = eventArgs.firingEvent.sender.commandInputs
            scaleInput = inputs.itemById('heightScale')

            # Change the visibility of the scale value input.
            if changedInput.value == True:
                scaleInput.isVisible = False
            else:
                scaleInput.isVisible = True


# Event handler for the execute event.
class SampleCommandExecuteHandler(adsk.core.CommandEventHandler):
    def __init__(self):
        super().__init__()
    def notify(self, args):
        eventArgs = adsk.core.CommandEventArgs.cast(args)

        # Get the values from the command inputs.
        inputs = eventArgs.command.commandInputs

        length = inputs.itemById('baseLength').valueOne

        if inputs.itemById('equilateral').value == True:
            # Specify a scale that will result in an equilateral triangle.
            scale = math.sqrt(length**2 - (length/2)**2) / length
        else:
            # Get the scale from the command input.
            scale = inputs.itemById('heightScale').value

        drawTriangle(length, scale)
You should not make any changes to the model in response to the inputChanged event. This will cause any selections to be cleared. All creation and edit operations should be in the Execute and ExecutePreview events.
Fusion automatically does some basic command input validation. For example, if you have a selection input, there must be something selected before the OK button is enabled. Or if you have a value input and the user has enters a string that cannot be evaluated, for example, they've entered "5 mmm" instead of "5 mm" the text will be highlighted in red and the OK button will be disabled. But there are often other validations that are unique to the logic of your command that Fusion can't do automatically. To handle this, there is the validateInputs event. In your handler for this event, you can check the values of the command inputs to see if they have valid data and then set the areInputsValid property to indicate if the inputs are valid or not. If you indicate they are not valid, Fusion will disable the OK button.
Below is a validateInputs event handler that can be used in the previous program. This checks whether the equilateral check box is checked or not or not, and if it is it makes sure the scale value is greater than 0.1.
# Event handler for the validateInputs event.
class SampleCommandValidateInputsHandler(adsk.core.ValidateInputsEventHandler):
    def __init__(self):
        super().__init__()
    def notify(self, args):
        eventArgs = adsk.core.ValidateInputsEventArgs.cast(args)
        inputs = eventArgs.firingEvent.sender.commandInputs

        # Check to see if the check box is checked or not.
        checkBox = inputs.itemById('equilateral')
        if checkBox.value == True:
            eventArgs.isValid = True
        else:
            # Verify that the scale is greater than 0.1.
            scaleInput = inputs.itemById('heightScale')
            if scaleInput.value %lt; 0.1:
                eventArgs.areInputsValid = False
            else:
                eventArgs.areInputsValid = True
A useful feature for any command is to provide the user with a preview of what will happen when the command finishes. Most of Fusion's commands provide a preview and you can also provide a preview of your command. The main factor to consider in whether to provide a preview is how long it will take to generate the preview. Each time the user makes any changes to the command's inputs the preview will need to be re-generated so it's a trade-off on the benefit of seeing the expected result vs. waiting to see the preview with each command input edit.
Providing a preview is accomplished through the executePreview event. In the simple case, and also the most typical, you perform the same action in response to this event that you do in response to the execute event. This means that with every change to a command input you're creating the final result. As discussed earlier, any creation or edits done within a command are grouped within a single undo operation. Internally, this means they are all grouped within a single transaction and a transaction corresponds to an undo. When you do any creation or edit operations in response to the executePreview event, all of those changes are captured within a single transaction. The next time the executePreview event is fired, Fusion automatically aborts the previous transaction which means the document goes back to its state before any of those changes, and then you perform the creation or edit actions all over again.
Sometimes, creating the complete final result might be too expensive and you can get by with something simpler for the preview. This is possible by creating the simpler geometry in reaction to executePreview and then creating the full result in reaction to the execute event. The transaction that captured any work you did in the executePreview is aborted before the execute event, so the execute event is always starting from scratch too. If you are creating the final result as the preview, then re-creating the same geometry in response to the execute event is redundant. You can avoid this extra work by setting the isValidResult property of the CommandEventArgs object in the executePreview event to True. If the isValidResult property is True, Fusion won't fire the execute event when the OK button is clicked but will use whatever was created in the executePreview event as the final result.
Below is the code for the executePreview event where it's doing the same thing as the execute event with the exception that it's also setting the isValidResult property to True, which means the execute event won't be fired at all.
# Event handler for the executePreview event.
class SampleCommandExecutePreviewHandler(adsk.core.CommandEventHandler):
    def __init__(self):
        super().__init__()
    def notify(self, args):
        eventArgs = adsk.core.CommandEventArgs.cast(args)

        # Get the values from the command inputs.
        inputs = eventArgs.command.commandInputs
        length = inputs.itemById('baseLength').valueOne

        if inputs.itemById('equilateral').value == True:
            # Specify a scale that will result in an equilateral triangle.
            scale = math.sqrt(length**2 - (length/2)**2) / length
        else:
            # Get the scale from the command input.
            scale = inputs.itemById('heightScale').value

        drawTriangle(length, scale)

        # Set the isValidResult property to use these results at the final result.
        # This will result in the execute event not being fired.
        eventArgs.isValidResult = True
The activate event is fired after the command has been created and the command dialog has been displayed but before the user has had a chance to interact with it. If you want to pre-populate a selectionCommandInput with any entities, that needs to be set in the activate event rather than the commandCreated event. You can do that using the addSelection method of the selectionCommandInput object.
It's also possible for the activate event to be fired multiple times while a command is running. This can happen if the user executes a non-terminating command while your command is running. For example, if they execute a view command like Pan or Orbit, your command will temporarily be deactivated while that command is active, then once it's finished you'll get the activate event again telling you that your command is now active and receiving inputs. When most commands are executed they will cause the current command to be terminated, but there are a few Fusion commands that do not terminate the active command but just deactivate it temporarily.
The deactivate event is fired as your command becomes inactive. This can happen as explained above; when a non-terminating command is executed causing your command to be temporarily deactivated. The deactivate event is fired to let you know your command is going into this deactivated state.
The destroy event is the last event fired as your command is completed and finally destroyed. This is fired regardless of how the command is terminated. For example, it could be because the user clicks OK, or they click Cancel, or they execute another command that forces yours to terminate. Any final clean-up of code associated with the command can be done here.
The selectionEvent event is a command event but only applies when you have added selectionCommandInput objects to your dialog. This event provides two capabilities; dynamic filtering and adding additional entities to the curent selection.
An example of filtering is if you need the user to select two parallel planes. You add two SelectionCommandInput command inputs to your dialog; one for each plane. You also set the selection filter to "PlanarFaces" and "ConstructionPlanes" using the addSelectionFilter method on the SelectionCommandInput to allow the user can select any planar entity. For the selection of the first plane, any planar entity is valid but for the second one you want to limit the selection to planes that are parallel to the already selected plane. As the user moves the mouse over the model, any entity that is valid for selection will pre-highlight indicating it can be selected. The SelectionEvent event is fired as the user moves the mouse over an entity that is valid for selection but before it is pre-highlighted. The event passes you a SelectionEventArgs object where you can get the entity the mouse is currently over through the "selection" property. You can examine this object and apply whatever logic your command needs and then set the isSelectable property to False if you don't want that entity available for selection.
The code below is the handler for the selectionEvent and demonstrates controlling the selection to get two parallel planes. It assumes that two SelectionCommandInput inputs have been added to the command and they are named "plane1" and "plane2".
class MySelectionEventHandler(adsk.core.SelectionEventHandler):
    def __init__(self):
        super().__init__()
    def notify(self, args):
        eventArgs = adsk.core.SelectionEventArgs.cast(args)

        # Check which selection input the event is firing for.
        activeSelectionInput = eventArgs.firingEvent.activeInput
        if activeSelectionInput.id == 'plane1' or activeSelectionInput.id == 'plane2':
            # Get the command input of the other plane selection.
            if activeSelectionInput.id == 'plane1':
                otherPlaneId = 'plane2'
            else:
                otherPlaneId = 'plane1'
            inputs = eventArgs.firingEvent.sender.commandInputs
            otherPlaneInput = adsk.core.SelectionCommandInput.cast(inputs.itemById(otherPlaneId))

            if otherPlaneInput.selectionCount == 1:
                # Get the normal of the plane already selected.
                otherplaneEnt = otherPlaneInput.selection(0).entity
                otherPlane = adsk.core.Plane.cast(otherplaneEnt.geometry)
                otherPlaneNormal = otherPlane.normal

                # Get the normal of the current plane available for selection.
                currentPlaneEnt = eventArgs.selection.entity
                currentPlane = adsk.core.Plane.cast(currentPlaneEnt.geometry)
                currentPlaneNormal = currentPlane.normal

                # Check to see if the normals of the planes are parallel.
                if otherPlaneNormal.isParallelTo(currentPlaneNormal):
                    eventArgs.isSelectable = True
                else:
                    eventArgs.isSelectable = False
            else:
                eventArgs.isSelectable = True
The ability to add additional entities is used by a few Fusion commands. For example, when selecting edges for a fillet, all of the edges that are tangent to the selected edge are also selected. This is done in a custom command by using the additionalEntities property of the SelectionEventArgs. You can create an object collection that contains the other entities you want to group with the currently selected entity.
There are also several command related event handlers to listen for various mouse events; mouseClick, mouseDoubleClick, mouseDown, mouseDrag, mouseDragBegin, mouseDragEnd, mouseMove, mouseUp, and mouseWheel. And two events for listening for keyboard activity (keyDown and keyUp). Remember that these are command related events and are only fired when your command is running.