Add and Verify Domains
This section explains how to add domains to your Autodesk Account and verify them so that they can be used for SSO, as well as other admin features such as Directory Sync. Verifying your domain lets us know you are the owner or admin for your organization’s domain name. You will need to add the email domain or domains that your Autodesk users use to sign in to your organization.
Note: Domains that have already been verified (whether by your team or another team) will not be available to verify in your Autodesk Account. (A team is a way to organize subscriptions and users in your Autodesk Account according to company divisions, projects, work, or other organizational needs. For more information, see Autodesk Account teams.)
Add and verify your organization's domains (video: 4:47 min.)
Add Domains
Go to User management > By user or By group.
Select your team from the drop-down list and click the Team Settings ⚙️ icon in the upper right-hand corner.
Go to the section Single sign-on (SSO) and select Manage SSO.
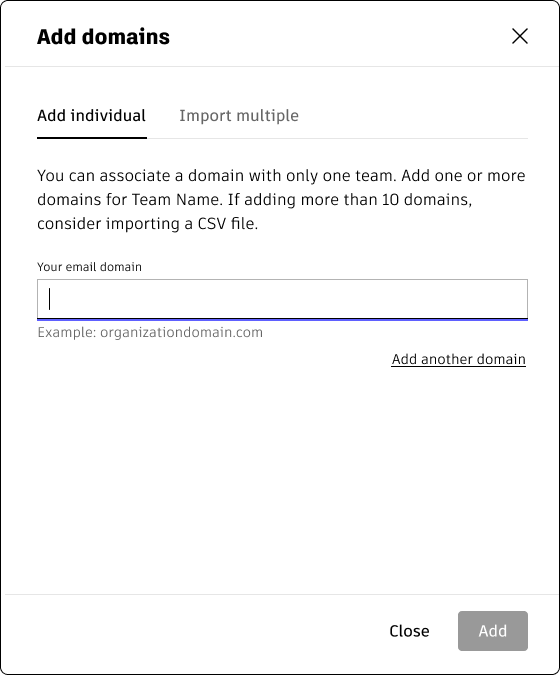
Select Add and verify domains tab > Add domains.
Here, you can add individual domains manually or import multiple domains from a comma-separated values (CSV) file (recommended for more than 10 domains).
Add Individual Domains
On the Add individual tab, enter your email domain in the format organizationdomain.com. (The domain name should be entered exactly as it appears after the @ symbol in email addresses for your organization, e.g. for user@example.com, the domain is example.com. Note that your domain may end in a suffix other than .com, such as .org, .gov, or .fr.)
To add another domain, select Add another domain.
When you have finished entering all your domains, click Add.
Import Multiple Domains
Note:To prepare the CSV file, add the domains to Microsoft Excel, starting with your first domain on row 2 (row 1 will be ignored). Enter each additional domain in a separate row. For example:
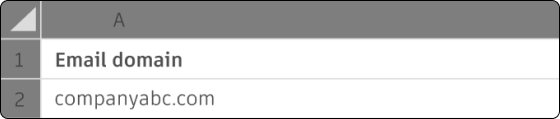
You can add up to 1,000 domains. Existing domains won’t be imported. When your list is complete, save the document as a CSV file.
Go to the Import multiple tab, then select Upload CSV file. The number of domains found will appear.
Select Continue to import the domains.
If there are errors in the CSV file (such as a spelling error or a domain that's already added to your team), you will be able to download the error log for details. Once you have corrected the errors, select Upload corrected file to continue.
Once you have successfully added a domain, it will appear in Single sign-on in the domains list.
Verify Domain
The domains you added will be listed on the Add and Verify Domains tab, along with the domain status (Not verified). To verify a domain, click Verify domain > next to the domain you want to verify. You can verify a domain by uploading an HTML file or creating a DNS TXT record.
Upload HTML File
For this method, you’ll download an HTML file from Autodesk, then upload it to your website root directory (the folder where the website files for your domain name are stored). This verification method works instantly.
- Go to Verify domain > Upload HTML file. Click the link in Step 1 in the screen below to download the HTML verification file.
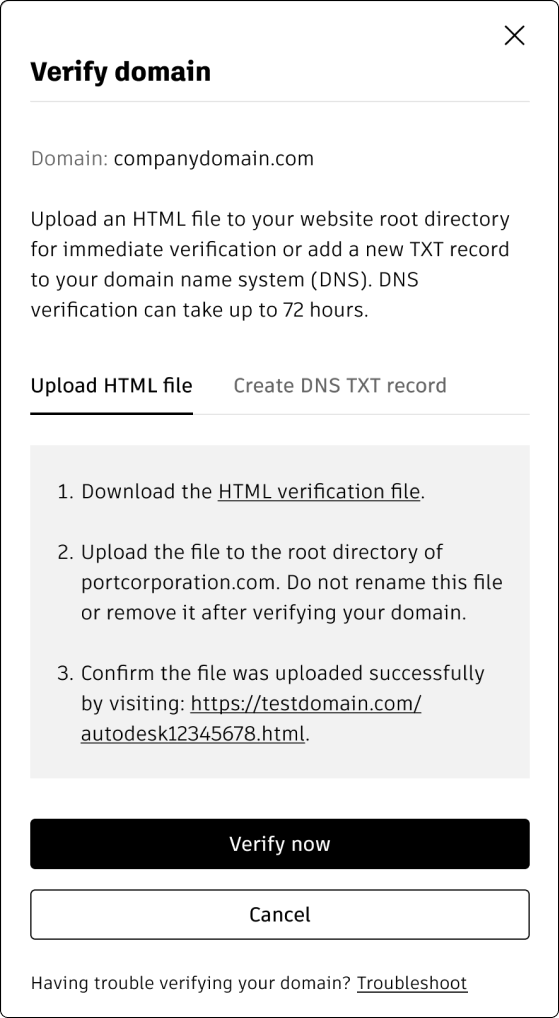
Upload this file to your website root directory. Do not rename (or modify) the file or remove it after verifying your domain.
Return to the Verify domain panel and confirm that the file was uploaded successfully by visiting the link provided in step 3 in the above screen. Then click Verify now to instantly verify your domain. Once your domain is verified, the domain status will appear as Verified in your domains list.
Create DNS TXT Record
For this method, you’ll copy information from Autodesk and paste it into a new TXT record in your domain name system (DNS) server. This verification method can take up to 72 hours.
A DNS TXT record can hold any text strings, including machine-readable data that can be used for domain ownership verification. For instructions on creating a TXT record in your DNS server, refer to the documentation for your domain host.
Go to Verify domain > Create DNS TXT record.
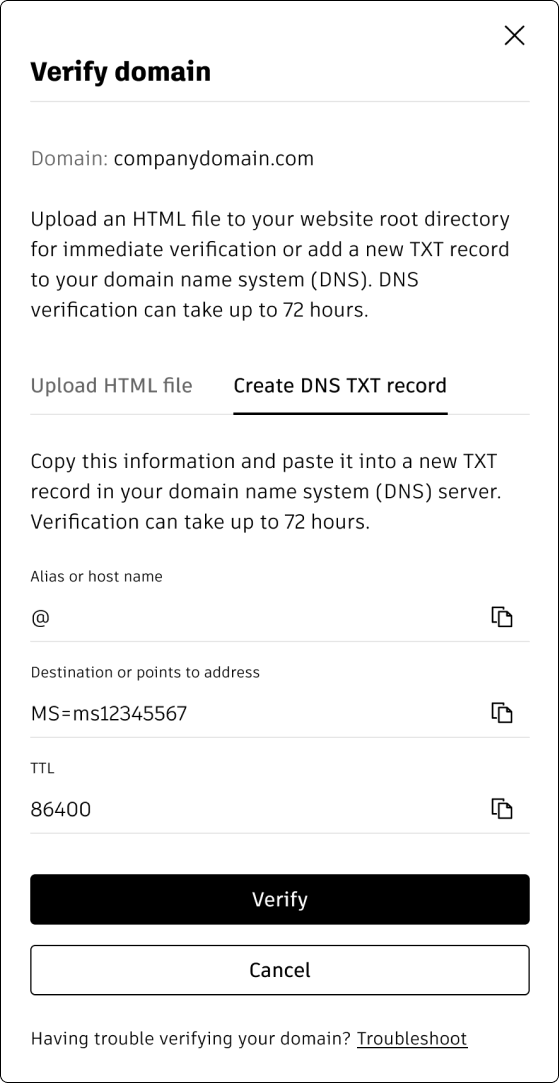
Copy these information provided and paste it into a new TXT record in your domain name system (DNS) server.
- Alias or host name
- Destination or points to address
- TTL
Paste the information into a new TXT record in your domain name system (DNS) server.
- Click Verify. Verification can take up to 72 hours. To check if your domain has been verified, you must go to Verify domain and click Verify to refresh the status.
Once the domain is verified, the domain status will appear as Verified in your domains list. In the meantime, you can continue setting up your SSO connection by going to Manage SSO in the "Domain" table.
Note: You will need to make sure your domains are verified before turning on SSO.
Previous: Implementing SSO
Next: Set up your connection