Ensure that no users are connected to the vault or library before performing any maintenance. Users are blocked from accessing the Autodesk Vault server during maintenance procedures (Autodesk Vault Collaboration and Professional allow backups while users are connected).
Back Up Your Vault Data
Backing up vault data is essential. Autodesk recommends that you back up your Vault using the following methods.
Back up your vault
Use the supplied backup-restore utility to back up your Vault data.
Use the server console to back up all data necessary to restore a server if a failure occurs. When you back up the server, all users are blocked from accessing the system. In addition, server console backs up or restores all vaults on the server. There is no way to select individual vaults to back up or restore.
Develop a backup schedule
- Use the Windows Task Scheduler. This process uses the backup tools included with the server console as part of a standard Windows batch file.
- Include the backup as part of a tape backup set. This process uses a tape back up system to back up the vault directly or to use a method like the Windows Task Scheduler.
The next step is to automate the process. Two common methods are:
With the server console command line options, you can create a script to automate the backup process. The following script is intended for a default Autodesk Vault server installation. Edit the backup paths and installation paths as needed.
The preferred and most reliable method for backing up a vault is to integrate the server console backup tools into your tape backup plan.
Automate backup using Microsoft Windows Task Scheduler
- Create a text file called Backup.txt.
- Insert the following text:
@ECHO OFFREM DELETE B AND CASCADE A BACKUP SUBDIRECTORIESRMDIR /Q /S "C:\Backup\Vault\B"REN "C:\Backup\Vault\A" "B"REM CREATE A NEW DIRECTORY FOR THE BACKUPMKDIR "C:\Backup\Vault\A\"REM START THE BACKUP PROCESS (THIS IS ONE LINE OF TEXT)"C:\Program Files\Autodesk\Data Management Server 2009\ADMS Console\Connectivity.ADMSConsole.exe" -Obackup -B"C:\Backup\Vault\A" -VUadministrator -VP[YourPassword] -S
- Change the name of the text file to Backup.bat to convert it to a batch file.
Windows Vista User Account Control
- On the Windows Start menu, select Run.
- In the Run dialog box, enter secpol.msc and then click OK.
- If you are prompted to allow the security policy application to run, click Continue.
- In the Local Security Policy dialog box, expand Security Settings
 Local Policies Security Options.
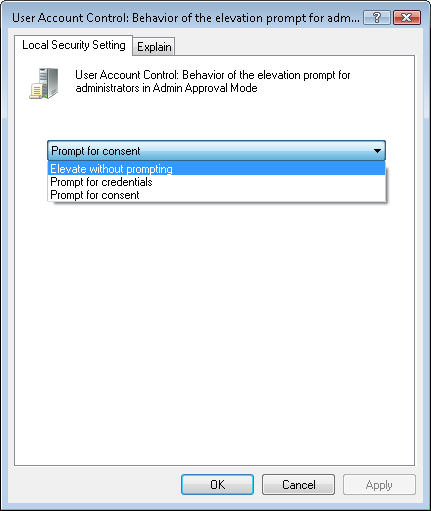
 - Locate the policy User Account Control: Behavior of the elevation prompt for administrators in Admin Approval Mode. Right-click the policy and then select Properties.
- In the Properties dialog box, select Elevate without prompting, and then click OK.
- Locate the policy User Account Control: Run all administrators in Admin Approval Mode. Right-click the policy and the select Properties.
- In the Properties dialog box, select Disable and then click OK.
If you want to schedule automatic backups using the Autodesk server console, User Account Control settings in Windows Vista must be configured to allow applications to run without prompting for administrator permission.
Create tape backups
- Run the following script before your tape backup job starts: @ECHO OFF
- REM THIS WILL STOP THE WEB SERVER AND "CYCLE" THE SQL SERVER REM PROVIDING THE BEST RESULTS FOR BACKING UP THE VAULTIISRESET /STOPNET STOP MSSQL$AUTODESKVAULTNET START MSSQL$AUTODESKVAULTREM START THE BACKUP PROCESS (THIS IS ONE LINE OF TEXT)"C:\Program Files\Autodesk\Data Management Server 2009\ADMS Console\Connectivity.ADMSConsole.exe" -o backup -B"C:\Backup\Vault\A" -VUadministrator -VP -S
- Run the following script after your tape backup job completes: @ECHO OFFREM DELETE THE BACKUP SET AFTER THE TAPE SET COMPLETESRMDIR /Q/S C:\Backup\Vault\A"REM START THE WEB SERVERIISRESET /START
- Validate the Tape Backup To ensure that your backup set restores properly, test both the backup and the backup procedures. We recommend that you install the Autodesk Vault server on a separate computer. Test a full restore of the data using the Restore command in Autodesk Vault server console.
There are different ways to use a tape backup system to back up a vault. We recommend integrating the Server Console backup tools into your tape backup plan. Many systems allow you to run a script before and after the tape job executes. To back up a vault using a tape backup system, use the following scripts before and after the job runs.
Restore Vault Data
- In the Autodesk Data Management Console, click Tools ► Restore.
- Restoring a vault deletes the current data sets and file store. This action cannot be undone. You are prompted for confirmation before proceeding. Click Yes.
- Specify whether to restore a directory or a file.
- In the Restore from directory field, specify the location of the backed up data. To browse for a location, click ... and locate a directory using the file browser.
- Select whether to restore the database to the original location or to a different location. If you choose Select Restore Location, specify a target directory for the database. This selection is sometimes necessary when restoring data to a different machine that does not have the same drive letters or locations available.
- Select whether to restore the file to the original location or to a different location. If you choose Select Restore Location, specify a target directory for the file store.
- Click OK.
The vault data is automatically migrated when it is restored using Autodesk Vault server console. If you restore the data using the command line, migrate the data after it is restored.
Re-Index the Server
- Add new properties to the vault that were previously unknown to the system.
- Remove unwanted properties from the vault that are no longer needed, in turn saving space in the SQL Sever database.
The Autodesk Vault server utilizes a technology created by Microsoft called iFilters. iFilters are small applications that exist on the server containing a set of instructions on how to open and extract property data from files. A few iFilters are installed with Autodesk Vault server by default and other exist with the operating system. There are also many third-party iFilters available for other file formats. An Internet search for iFilter returns some of the filters that other software developers have published.
- AutoCAD® .dwg
- Autodesk Inventor®
- Autodesk® 3D Studio Max®
- Microsoft® Office
Full Content Indexing
Full content indexing provides the means to index the actual file contents of many different document types. For example, reading simple text on a .dwg file or finding all occurrences of a word in Microsoft Word documents.
By default, full content indexing is not enabled. Full content indexing can be enabled for each vault on the Autodesk Vault server.
Maintain Content Center Libraries
In addition to hosting vaults, Autodesk Vault server hosts Content Center libraries. Use the server console to perform Content Center Library administrator tasks.
A Content Center library is contained within a SQL Server database. The database comprises of a pair of files with the extensions MDF and LDF. These files together make one library and need to be maintained together.
The console displays the list of Content Center libraries currently installed on the server. Using the Backup command, you can create a back-up of an existing library on the server. Select a library from the list to manage it.
The following is the list of content which can be installed with the Autodesk Inventor products. In the Select Content Center Libraries window of the Installation Wizard, check boxes are selected for the libraries installed by default.
List of Content Center Libraries
|
ANSI Standard Content |
ANSI Fasteners, Shaft parts, Steel shapes, more |
|---|---|
|
DIN Standard Content |
DIN Fasteners, Shaft parts, Steel shapes, more |
|
GOST Standard Content |
GOST Fasteners, Shaft parts, Steel shapes, more |
|
ISO Standard Content |
ISO Fasteners, Shaft parts, Steel shapes, more |
|
JIS & GB Standard Content |
Standard parts for JIS and GB - Fasteners, Shaft parts, Steel shapes, more |
|
Feature Generators Standard Content |
General features in metric and imperial units |
|
Other Standard Content |
Standard parts for AFNOR, AS, BSI, CNS, CSN, GOST, IS, KS, PN, SFS, SS, STN, and UNI |
|
Parker Standard Content |
Standard content supplied by Parker Hannifin for tube and pipe fittings ( Autodesk Inventor Professional and Autodesk Professional Routed Systems only) |
|
Routed Systems Standard Content |
Standard content for Cable & Harness and Tube & Pipe parts ( Autodesk Inventor Professional and Autodesk Professional Routed Systems only) |
|
Sheet Metal Standard Content |
Standard content for Sheet Metal parts |
|
Mold Metric Standard Content |
Standard content for Metric Mold components |
|
Mold Imperial Standard Content |
Standard content for Imperial Mold components |
|
Mold Meusburger Standard Content |
Standard content for Mold Meusburger components |
Create Libraries
You can create a read-write or read-only Content Center library. You can configured it for use in either a local or Autodesk Inventor project that accesses the Content Center libraries from a central server.
- In the server console, select the Libraries folder in the navigation pane.
- Click Actions Create Library.
- Enter a name for the new library.
- Select a library partition from the drop-down list.
- Enter a name for the library database.
- Click OK.
Delete Libraries
Deleting a library detaches the selected library from the database server, and deletes the data files (.mdf and .ldf) from the hard disk. All data contained in the library is permanently deleted.
- In the server console, select a library you want to delete in the navigation pane.
- Click Actions Delete Library.
- Click OK.
Attach Libraries
Use Attach to make a Content Center library available on the server from a pair of existing .mdf and .ldf data files already on the computer.
- In the server console, select Libraries in the navigation pane.
- Click Actions Attach Library.
- Click the browse button, and locate the .mdf file you want to attach. The .ldf file is automatically attached.
- In the Attach Library dialog box, click OK.
Detach Libraries
Detaching a library removes a Content Center library from the list of available libraries in the server console. Detach does not delete its data files (MDF and LDF) from the server. The data files can be reattached and made available at a later time using the Attach command. They can also be manually copied to another location to be backed up, or moved to another machine.
- In the server console, select Libraries in the navigation pane.
- Click Actions Detach Library.
- Click the browse button, and locate the .mdf file you want to detach.
- Click OK.
Copy Libraries
- On the local machine if the Content Center libraries are installed locally.
- On the remote server if the Content Center libraries are being hosted by a remote server.
- In the navigation pane, expand the Libraries folder.
- In the Libraries folder, right-click the library to copy and then select Copy.
- In the Copy Library dialog box, the display name, partition, and database name associated with the library to copy are displayed.
- Enter a name for the new copy of the library.
- From the Partition drop-down list, select a partition for the new copy of the library. The partition associates the copied library with a particular release of Autodesk Inventor. Only Inventor users using the corresponding version of Inventor can access the libraries in the matching partition.
- Enter the database name for the copy of the library.
- Click OK.
You must be a Content Center Editor to make edits to Content Center libraries in Autodesk Inventor.
You must be a Content Center Administrator to perform Content Center administrative task in the server console.
Copy Libraries During Migration
If you chose to migrate existing libraries, the Copy Libraries dialog displays. The Copy Libraries dialog lists the custom and standard libraries that require migration. Standard content libraries can be either kept and migrated for use with the new version of the data management server or deleted. Custom content libraries can be kept and migrated for use with the new version of the data management server, deleted, or copied forward for use with a newer version of Autodesk Inventor. By default, all libraries are set to be kept and migrated for use with the new version of the server and custom libraries are set to be copied forward to the latest version of Autodesk Inventor.
- To delete either a standard library or a custom library, turn off all of the check boxes for the corresponding library. If all check boxes for a library are turned off, the library is deleted during migration.
- To copy a custom library forward to a new version of Autodesk Inventor, turn on the check box for the library corresponding to the new version of Inventor.
- If the current version of the custom library is also checked, the existing library is both migrated for use with the new version of the server, and copied forward for use with the new version of Autodesk Inventor. Choosing to keep the original library and copy the library forward requires additional disk space. The amount of disk space required and the amount of disk space available is displayed in the dialog box.
- If the current version of the current library is turned off, the existing library will be copied forward for use with the new version of Autodesk Inventor and then the original library is deleted. Note: To return the dialog to the default settings, click Reset.
- Click OK. A summary of the migration operations to be performed is presented. If the summary matches your expectations, click Yes to proceed with library migration or click No to return to the Copy Libraries dialog box and change the migration settings.
Export Libraries
Export copies a set of library files (.mdf and .ldf) that are in the server console to a specified location. You can specify a folder on the same machine, or a location available on the network.
- In the server console navigation pane, select a library you want to export.
- Click Actions Export Library.
- In the Browse for Folder dialog box, specify the location you want to export the .mdf file to, and click OK.
Import Libraries
Import copies library files (a pair of MDF and LDF files) into the standard SQL Server data files directory. Then it performs an attach operation to register them with SQL Server and make them available as a Content Center Library. For example, use Import to copy library files from a third party supplier to the Content Center Library you are administrating.
- In the server console navigation pane, select a library you want to import.
- Click Actions Import Library.
- In the Browse for Folder dialog box, locate the .mdf file you want to export, and click OK.
Display Library Summary
Highlight a library to display high-level information about the library and its data files in the main pane.
Control Library Status
To turn the status of a library to Read-Only or Read-Write, right-click a library in the browser and select Read-Only. You cannot change the status of a default read-only libraries installed with Autodesk Inventor.
Grant Content Center Permissions
If you require editing permissions for one or more Content Center libraries, you must have a Content Center Editor account set up for you in the data management server console.
Accounts are not required if you use only read-only access to the Content Center library.
- In server console, click Tools Administration.
- In the Administration dialog box, click Users.
- In the User Administration dialog box, click New users.
- In the New User dialog box, enter the desired information for the user. Click the Roles button to assign the user a Content Center role.
- Select Content Center Editor to assign editing permissions.
- Click Vaults to assign the user to a vault. Assign a user to a vault, even if you are not using Autodesk Vault Explorer. This assignment is required to log into the Autodesk Vault server in Autodesk Inventor to access the Content Center libraries.
- If necessary, click Groups to assign the user to a group (optional).
- Click OK.
- In the User Management dialog box, and then in the Administration dialog box, click Close.
- Communicate user account information and the Login procedure to each member in the team.
Add New Properties
SQL Maintenance Plans
Maintenance plans can be used to schedule tasks required to make sure that the database performs well, such as keeping database and transaction log file sizes small and checking the database for inconsistencies. Autodesk recommends that the plan be run at least once per week, during out of office hours.
In a Connected Workgroup Environment, this should be configured on each SQL Server.
Part of the Administrators tasks should be to regularly check that the plan ran successfully.
If the plan was configured for an earlier release of Vault Server, ensure that you check and update the plan in accordance with this article.
The following steps are universal across all versions of SQL in use with Vault Server (Express and Full SQL). The complete list of supported database engines is located in the product readme file.
- Login to the SQL Management Studio.
- Expand Databases, expand System Databases.
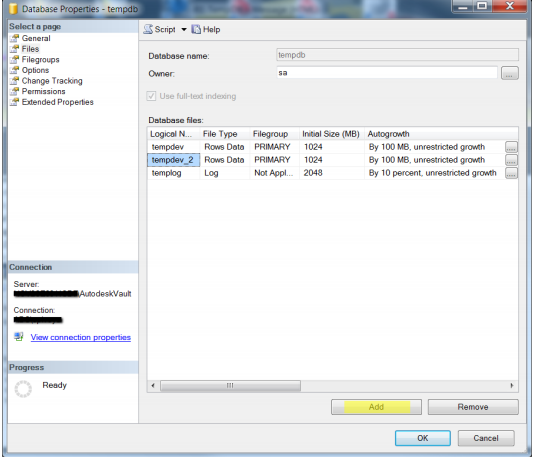
- Right Click on tempdb and select properties.
- Select the Files page.
- If using a multi-core system, additional data files should be configured, using the guidelines below. If using a single-core system, skip to step d below.
- Data file totals should equal half of the available physical processing cores - up to a maximum of 8 data files. (example; 8 physical cores would equal 4 total data files, tempdev, tempdev_2, tempdev_3, tempdev_4)
- Click the Add button to add additional data files.
- Name the new file(s) tempdev_2, tempdev_3, … as needed.
- Set initial size of each data file to 1,024 MB. If using a total of 8 datafiles, an initial size of 512 MB can be used.
- Set Autogrowth to 100 MB, unrestricted growth for each data file.
- Set the LDF log file to combined data file total. (example; if there are 2 data files total, the resulting LDF should be set to an initial size of 2048 MB)
- The results will appear similar the image below.
- Under the Options page, set the Recovery model to Simple and the Compatibility level to SQL Server 2008 (100).
- Select OK.
Create a SQL Maintenance Plan for Full SQL
Maintenance plans can be used to schedule tasks required to make sure that the database performs well, such as keeping database and transaction log file size small and checking the database for inconsistencies.
SQL Standard/Enterprise 2008 and 2008 R2
- Verify that the vaults have been backed up with the Autodesk Vault Server Console before proceeding.
- Make sure that all users are logged out of the vault server.
- From the Control Panel, double-click Administrative Tools and then double-click the Services icon.
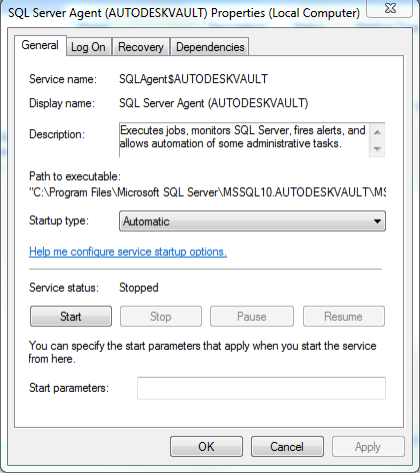
- Locate the SQL Server Agent (AUTODESKVAULT) service
- Right-click on the SQL Server Agent (AUTODESKVAULT) and select Properties.
- . Change the Startup Type to Automatic and start the service.
- Open the Microsoft SQL Management Studio and connect to the AutodeskVault instance. Use <ComputerName>\AUTODESKVAULT as the server name and press Connect.
- Right-click on the Vault database and select properties.
- On the Files page set:-
- the Autogrowth value for all <Vault> databases to by 100MB, unrestricted growth
- the Initial Size value of all <Vault>_log files to 500MB
- the Autogrowth value for an <Custom_Library> files to 25MB
- the Autogrowth values for all _log files to By 10 percent, unrestricted growth
Or, in table form:
Logical Name
Initial Size (MB)
Autogrowth
KnowledgeVaultMaster
By 10MB, unrestricted growth
KnowledgeVaultMaster_log
By 10 percent, unrestricted growth
<Vault>
By 100MB, unrestricted growth
<Vault>_log
500
By 10 percent, unrestricted growth
<Custom_Library>
By 25 MB, unrestricted growth
<Custom_Library>_log
By 10 percent, unrestricted growth
<Standard_Library>
By 25 MB, unrestricted growth
<Standard_Library>_log
By 10 percent, unrestricted growth
Note: A blank cell in the above table indicates that the default setting should not be changed.Grey cells, indicate default values and should be set to the above if they are different.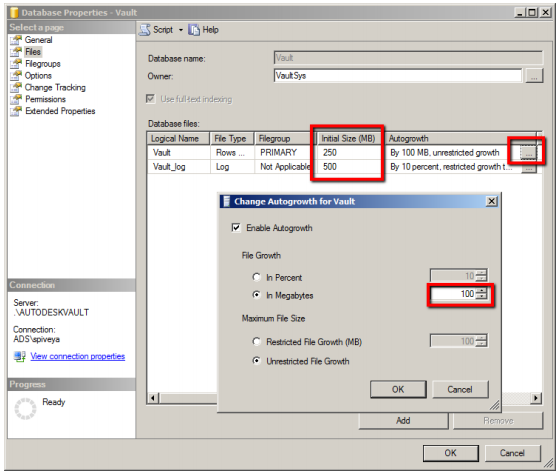
- On the Options page, change the Recovery Model to Simple, Compatibility Level to SQL Server 2008 (100) and change the Auto Shrink drop-down list to False. All values under the Automatic heading should be set as shown below.
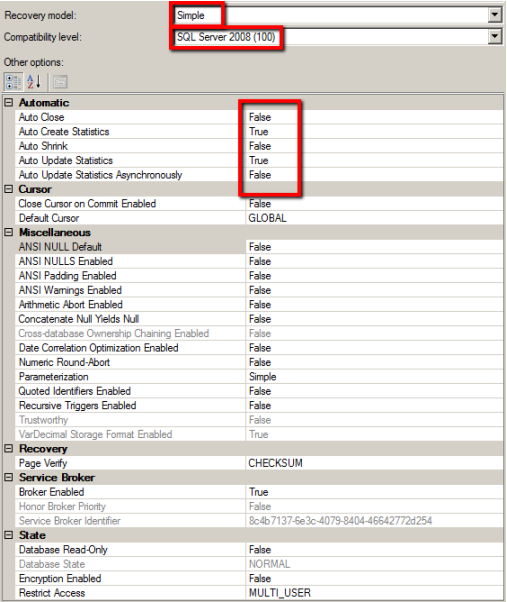
- Perform these same steps for all of the KnowledgeVaultMaster, Vault, and Library Vault databases (steps 8 – 10).
- Expand the Management folder and select the Maintenance Plan folder.
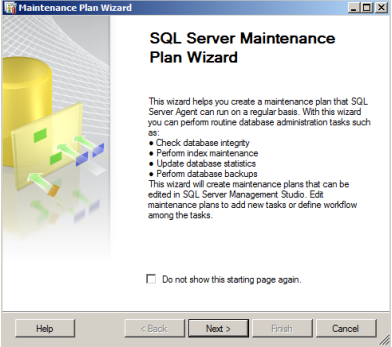
- Right-click on the Maintenance Plan folder and select Maintenance Plan Wizard, hit next if the following dialog appears.
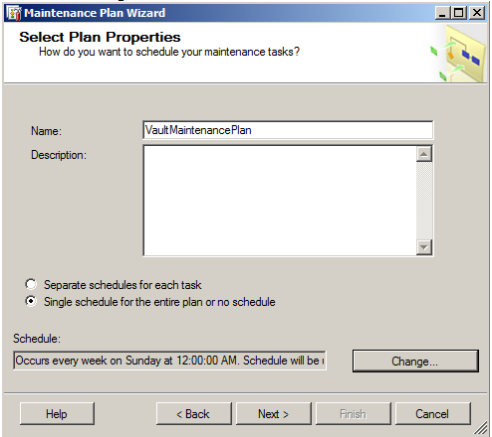
- In the Select Plan Properties dialog, enter Vault Maintenance Plan for the name and then click on the Change button to set the schedule.
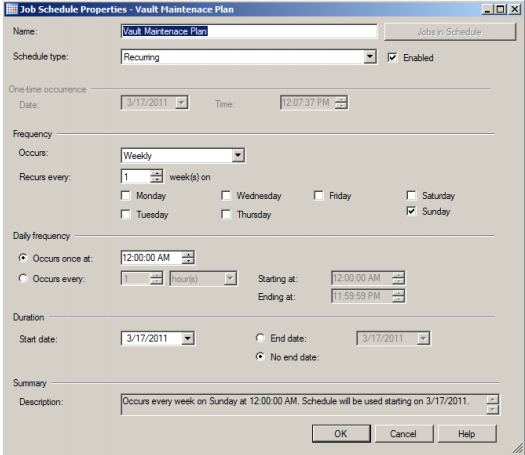
- In the Job Schedule Properties dialog, set the plan to run after an Autodesk Vault Server Console backup has completed. Depending on the size of your dataset, this schedule may have to be run on a different day and time of the week. You may want to run this task on a Saturday to determine the amount of time it will take to complete and then decide the best day and time to run this job on a regular basis.
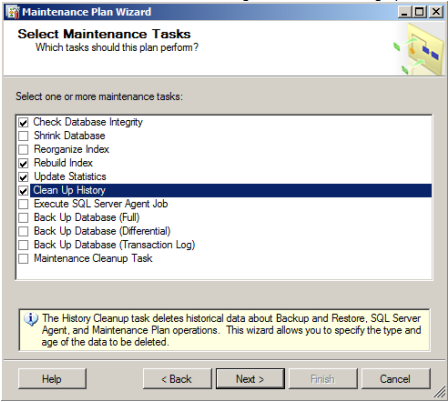
- In the Select Maintenance Task dialog, check the following options:
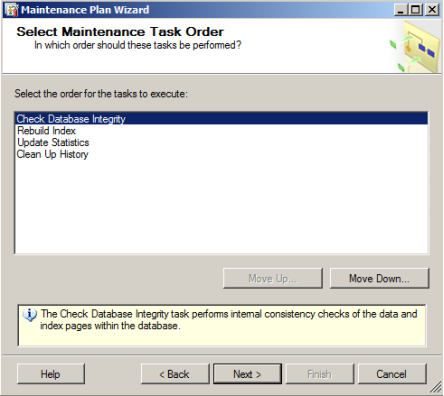
- In the Select Maintenance Task Order dialog, set the order to the following:
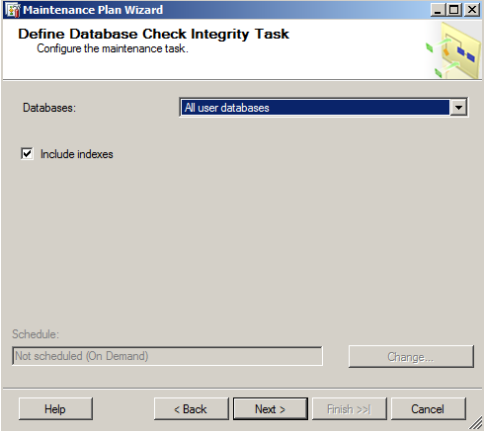
- In the Define Database Check Integrity Task dialog, select All user databases from the databases drop-down list and check the box next to Include Indexes.
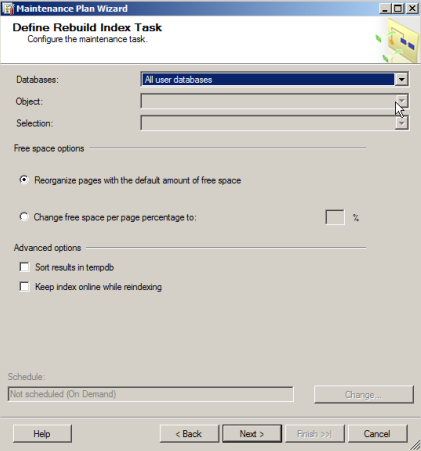
- In the Define Rebuild Index Task dialog, select All user databases from the Databases drop-down list.
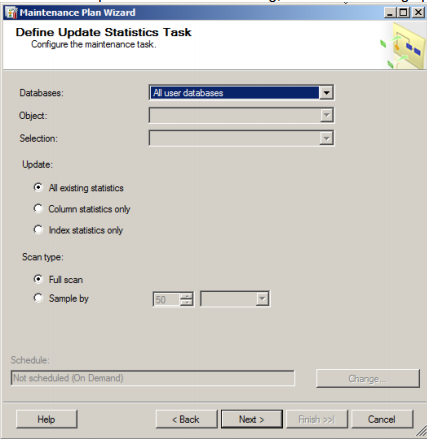
- In the Define Update Statistics Task dialog, select the following options.
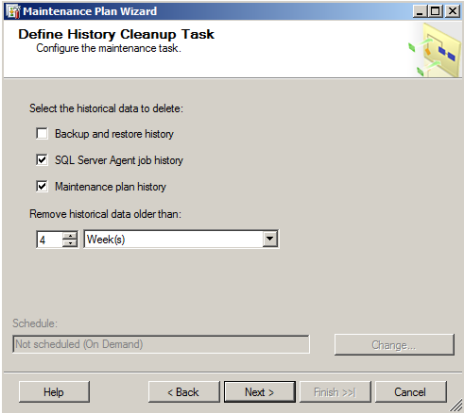
- In the Define Cleanup History Task dialog, select cleanup options as needed.
- In the Select Report Options dialog, specify the location for the maintenance reports.
- Click Next and then Finish.
Create a Maintenance Script for Microsoft SQL Express
Microsoft SQL Express does not allow you to create a maintenance plan inside of SQL Server Management Studio Express. Additionally SQL 2008 had a security model change from SQL 2005. You will also need to ensure the OS (Windows) user that is running the SQL maintenance plan has the sysadmin role inside of SQL.
Tempdb Modifications through the Command Prompt
- Open the Command Prompt as Administrator.
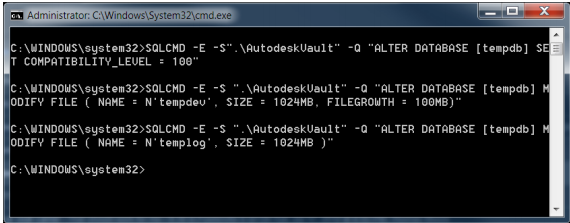
- Copy and Paste each line below into the command prompt and press Enter.
SQLCMD -E -S".\AutodeskVault" -Q "ALTER DATABASE [tempdb] SET COMPATIBILITY_LEVEL = 100"
SQLCMD -E -S ".\AutodeskVault" -Q "ALTER DATABASE [tempdb] MODIFY FILE ( NAME =
N'tempdev', SIZE = 1024MB, FILEGROWTH = 100MB)"
SQLCMD -E -S ".\AutodeskVault" -Q "ALTER DATABASE [tempdb] MODIFY FILE ( NAME =
N'templog', SIZE = 1024MB )"
- If using a multi-core system, additional data files should be configured using the guidelines below. **Note The file system path used under FILENAME = should be the same location as the SQL data directory. In the example below, it is N'C:\Program Files\Microsoft SQL Server\MSSQL10.AUTODESKVAULT\MSSQL\DATA. You will want to modify the script to list your correct path.
- Data file totals should equal half of the available physical processing cores - up to a maximum of 8 data files. If using a total of 8 datafiles, an initial size of 512 MB can be used instead of 1024 MB as shown below. (example; 8 physical cores would equal 4 total data files, tempdev, tempdev_2, tempdev_3, tempdev_4)
SQLCMD -E -S ".\AutodeskVault" -Q " ALTER DATABASE [tempdb] ADD FILE ( NAME =
N'tempdev_2', FILENAME = N'C:\Program Files\Microsoft SQL
Server\MSSQL10.AUTODESKVAULT\MSSQL\DATA\tempdev_2.ndf', SIZE = 1024MB,
FILEGROWTH = 100MB)"

- If additional data files need to be created, simply modify the above example to reflect tempdev_3, etc, for both NAME and FILENAME.
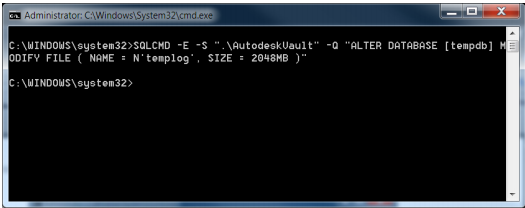
- Set the LDF log file to combined data file total. (example; if there are 2 data files total, the resulting LDF should be set to an initial size of 2048 MB).
SQLCMD -E -S ".\AutodeskVault" -Q "ALTER DATABASE [tempdb] MODIFY FILE (
NAME = N'templog', SIZE = 2048MB )"
- Data file totals should equal half of the available physical processing cores - up to a maximum of 8 data files. If using a total of 8 datafiles, an initial size of 512 MB can be used instead of 1024 MB as shown below. (example; 8 physical cores would equal 4 total data files, tempdev, tempdev_2, tempdev_3, tempdev_4)
As noted earlier in this section, if the SQL Server Management Studio is not installed, the tempdb database changes can be completed through the command prompt by performing the following:
Maintenance Plan
Copy the script below and paste it into a new file saved as VaultMaintenance.bat.
The following is an example of how to run the batch file from the root of C:\ against a database named Vault and output the results to a text file.
C:\VaultMaintenance.bat Vault > results.txt
REM This begins the maintenance plan.
@echo off
if "%1"=="" goto NOPARAM
set VAULTNAME=[%1]
set VAULTLOG=[%1_log]
@echo Setting %VAULTNAME% database compatibility to 100
sqlcmd -E -S ".\AutodeskVault" -Q "ALTER DATABASE %VAULTNAME% SET
COMPATIBILITY_LEVEL = 100"
@echo Setting %VAULTNAME% database recovery model to simple...
sqlcmd -E -S ".\AutodeskVault" -Q "ALTER DATABASE %VAULTNAME% SET RECOVERY
SIMPLE"
@echo Setting %VAULTNAME% database Autogrowth value...
sqlcmd -E -S ".\AutodeskVault" -Q "ALTER DATABASE %VAULTNAME%  MODIFY FILE
(NAME=%VAULTNAME%, FILEGROWTH=100MB)"
@echo Setting %VAULTNAME% database Log filesize...
sqlcmd -E -S ".\AutodeskVault" -Q "ALTER DATABASE %VAULTNAME% MODIFY FILE ( NAME =
%VAULTLOG%, SIZE = 512000KB )"
@echo Setting %VAULTNAME% database Autoclose to false...
sqlcmd -E -S ".\AutodeskVault" -Q "ALTER DATABASE %VAULTNAME% SET AUTO_CLOSE OFF
WITH NO_WAIT"
@echo Reindexing %VAULTNAME% database...
sqlcmd -E -S ".\AutodeskVault" -Q "USE %VAULTNAME% DECLARE tableCursor CURSOR FOR
SELECT NAME FROM sysobjects WHERE xtype in('U') DECLARE @tableName nvarchar(128)
OPEN tableCursor FETCH NEXT FROM tableCursor INTO @tableName WHILE
@@FETCH_STATUS = 0 BEGIN DBCC DBREINDEX(@tableName, '') FETCH NEXT FROM
tableCursor INTO @tableName END CLOSE tableCursor DEALLOCATE tableCursor"
@echo Updating Statistics on %VAULTNAME% database...
sqlcmd -E -S ".\AutodeskVault" -Q "USE %VAULTNAME% Exec sp_MSForEachTable 'Update
Statistics ? WITH FULLSCAN'"
goto EXIT
:NOPARAM
echo [FAIL] Please indicate Vault database
pause
:EXIT
REM This ends the maintenance plan.