The Job Processor is a separate application that reserves queued jobs and pulls them from the job server to process them. Since the job processor is installed along with the Vault client, any workstation with the appropriate edition of Vault can be used to process jobs.
Release Availability
| 2012 | 2013 | 2014 | |
|---|---|---|---|
| Autodesk Vault Basic |

|
||
| Autodesk Vault Workgroup |

|
|
|
| Autodesk Vault Collaboration |

|
|

|
| Autodesk Vault Professional |
|
|
|
Understand the Job Processor
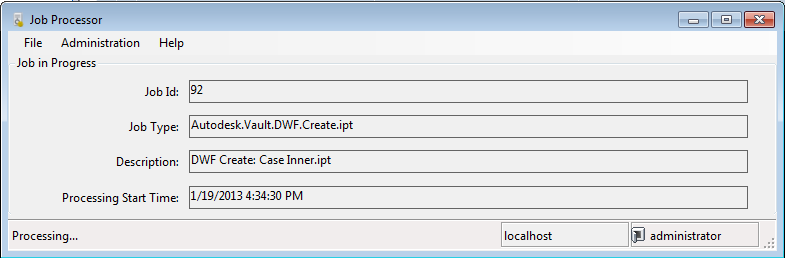
From the Job Processor dialog a user can pause and resume processing, set the Vault user account that is used to process jobs, and view the types of jobs that the Job Processor is configured to process.
Access the Job Processor
- Access the application by selecting . Note: The Job Processor can be configured to launch automatically when the workstation is started by accessing the Job Processor's Administration menu.
Job Processor Dialog Details
| Detail | Description |
|---|---|
|
Job ID |
Displays the number of the job currently being processed. |
|
Job Type |
Displays a description of the job being processed. |
|
Description |
Displays more information about the job in the queue. |
|
Status |
Displays the current state of the Job Processor. |
|
Status Bar |
Displays the server name and the user account. |
|
Processing Start Time |
Time at which the Job Processor began working on a job. |
How It Works
Jobs are submitted to the job server when:
- A user checks in a file which needs a visualization file created.
- A user invokes an Update View command inside of the Vault client application.
- Autoloader is used to load files into the vault and visualization files are needed.
- A status change occurs on a file and an updated visualization file is needed.
- A status change occurs on a file and properties need to be synchronized in the file.

Job Processor Licensing
The Job Processor consumes one Vault server license during the time it connects to the server to reserve a job. The Job Processor is not continuously logged into the Vault server while it processes the job and so the Vault server license it acquired is released. If a job being processed requires Inventor, an Inventor license is consumed while the job server processes the job and is released when the job finishes.
Perform Basic Job Processor Tasks
Following are basic tasks you can perform with the Job Processor.
Log into the Job Processor
The first time you access the job processor, you must specify the user name, password, and server name. The job processor will remember these login credentials each time you log in until changed through the Administration menu.
- On the workstation where you want jobs to be processed, select to launch the Job Processor application.
- Select to display the Settings dialog. Note: The Settings menu is only enabled if the Job Processor is Paused.
- Enter the User Name and Password of the user for this workstation.
- Specify the server from which you want the job processor to pull jobs for processing.
- Click OK to save your changes and close the Settings dialog.
- Select to log in to the specified server. Note: Select at any time to halt the job processor and prevent it from processing any new jobs. If the job processor is in the middle of processing a job, it will finish the job first.
Configure the Job Processor to Start Automatically
Configure the job processor to start automatically when the workstation on which it runs is started.
- On the workstation where you want jobs to be processed, select to launch the Job Processor application.
- Select on Windows Logon. The Job Processor will launch whenever the user logs into to Windows
View and Manage Job Types
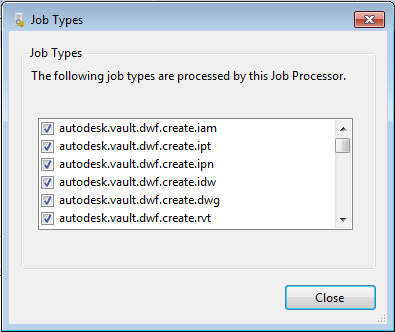
You can view the types of jobs that the Job Processor handles by accessing the Job Types dialog.
Access the Job Types Dialog
- On the workstation where you want jobs to be processed, select ] to launch the Job Processor application.
- Select to display the Job Types dialog. If the workstation does not have the necessary information to process a particular type of job, that type of file is unchecked.
The job types a workstation can process are indicated by a check next to the type in the Job Types dialog.
|
Type |
Required Application |
|---|---|
|
DWF creations of ipt, iam, idw, ipn |
Autodesk Inventor |
| DWF creations of dwg |
DWG TrueView |
| Sync Properties of ipt, iam, idw, ipn |
None |
| Sync Properties of dwg |
None |
|
Sync Properties of dot, doc, xls, xlt, xla, ppt, pot, ppa, mpp, mpt, vsd, vst |
Microsoft Office |
| Sync Properties of docx, dotx, xlsx, xltx, xlax, pptx, potx, ppax, mppx, mptx, vsdx, vstx |
None |
Customize the Job Processor
You can customize the job types list and configure job check frequency, task scheduling, and other Job Processor functions to suit your work environment my modifying the JobProcessor.exe.config file.
Individual jobs are processed by Connectivity.JobProcessor.Delegate.Host.exe, a separate application, but the jobs are controlled by JobProcessor.exe.
Configure the Time Limit for Restarting Jobs
- InventorUpdateRevBlockReleasePeriodInMinutes
- InventorDwfPublishReleasePeriodInMinutes
- TrueViewDwfPublishReleasePeriodInMinutes
Configure Use Limits for CAD Services
- UpdateRevBlockMigrateLatestINV
- InventorUpdateRevBlockCount
- InventorDwfPublishCount
- TrueViewDwfPublishCount
Customize the Job Types List
You can determine which job types are processed by a workstation by editing the Job Processor configuration file: JobProcessor.exe.config. This file is located in the <install dir>\Autodesk\Vault [edition]\Explorer\ directory.
- Navigate to the <install dir>\Autodesk\Vault [edition]\Explorer\ directory and open the JobProcessor.exe.config file with Notepad.
- Find the jobHandlers section.
- Comment out the line that contains the handler you do not want the workstation to process. Use <!--handler--> to comment out the line.
- Save the file and restart the Job Processor. Check the Job Types dialog to verify that the job type no longer appears in the list.
Configure the Job Check Period
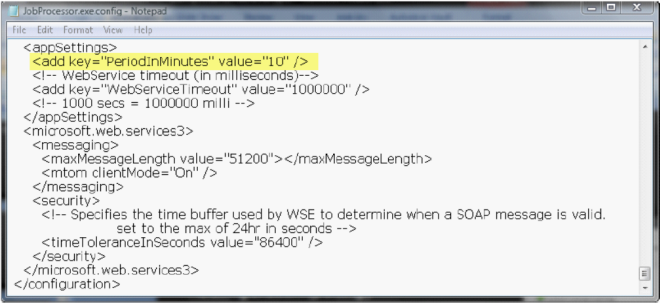
The Job Processor checks the server for a new job every 10 minutes by default. This time can be adjusted by editing the JobProcessor.exe.config file.
- Navigate to the <install dir>\Autodesk\Vault [edition]\Explorer\ directory and open the JobProcessor.exe.config file with Notepad.
- Find the appSettings section.
- Edit the line that has <add key="PeriodInMinutes value="10"/> to the desired time. The time can be set to a fractional value, such as 0.1 for 6 seconds or 1.5 for 90 seconds. Note: Setting this value below one minute will impact performance of the overall system. Larger values are recommended.
- Save the file and restart the Job Processor.
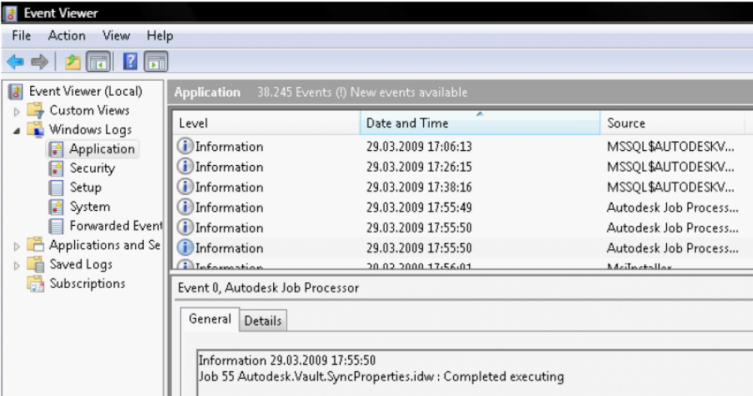
View Job Processor Logs
The Job Processor logs all jobs in the Event viewer Application log on the workstation. This log can be useful when troubleshooting failed or incomplete jobs.
Schedule the Job Processor
Use the Windows Task Scheduler to configure when and how often the Job Processor starts. You must be logged in with a Windows user account to schedule this task.
- Open the Windows Task Scheduler.
- Browse to the JobProcessor.exe file in the <install dir>\Autodesk\Vault [edition]\Explorer\ directory.
- Configure the frequency and time to start the Job Processor.
- Save the task.
This scheduling change only needs to be set once. The Job Processor will use this account each time it runs.
The Job Processor can also be started when a user logs into Windows. This is done by selecting Start on Windows Log in in the Administration menu of the Job Processor dialog.