If you are installing Autodesk Vault for the first time, then the Quick Start Installation described in these sections is the fastest way to get set up so that you can begin managing your design data.
If you are installing Autodesk Vault for the first time, then the Quick Start Installation described in these sections is the fastest way to get set up so that you can begin managing your design data.
Install the Autodesk Vault Server
Follow these steps to perform the default installation of the Autodesk Vault Server. The steps you must take depend on your Autodesk Vault edition.
- Autodesk Vault Basic–Start with Part 4.
- Autodesk Vault Workgroup–Start with Part 1.
- Autodesk Vault Collaboration–Start with Part 1.
- Autodesk Vault Professional–Start with Part 1.
Part 1. Install the Network License Manager
- From the installation screen select Install Tools & Utilities.
- Accept the license agreement and click Next.
- Check Network License Manager and click Install. If Sharing Inventor Content Center files is needed, check the Content Center Libraries for Inventor option as well. See Content Center Libraries for Inventor for more information.Note: All Inventor content libraries are checked by default when installing this feature. To remove any of these libraries you need to configure this feature.
Part 2. Obtain Your License File
- Go to http://register.autodesk.com .
- If you do not have a login you can create one. If you have a login continue to login.
- Choose the account to which to add your license.
- Enter your serial number and select your operating system for the Vault server then click next.
- Choose which license server type you plan on using.
- Enter the license server name and the license server ID (Mac address without dashes).

- Click Next.
- When presented with the license information click Save License File.

Part 3. Configure Your License Server
- In the LMTOOLS program, on the Service/License File tab, make sure the Configure Using Services option is active.

- Click the Config Services tab.

- In the Service Name list, select the service name you want to use to manage licenses. By default, the service name is Flexlm Service 1. If LMTools is managing other software on your computer in addition to Autodesk, you can change the service name to avoid confusion. For example, you can rename Flexlm Service 1 to Autodesk Server1.
- In the Path to Lmgrd.exe File field, enter the path to the Network License Manager daemon (lmgrd.exe), or click Browse to locate the file. By default, this daemon is installed in the C:\Program Files\Autodesk Network License Manager folder.
- In the Path to the License File box, enter the path to your license file, or click Browse to locate the file. This path is to the license file obtained using the previous section or the location where it moved the license file after saving it.
- In the Path to the Debug Log File box, enter a path to create a debug log, or click Browse to locate an existing log file. It is recommended that you save to the C:\Program Files\Autodesk Network License Manager folder. The log file must have a .log file extension. For new log files, enter the .log extension manually.
- To run lmgrd.exe as a service, select Use Services.
- To start lmgrd.exe automatically when the system starts, select Start Server at Power Up.
- Click Save Service to save the new configuration under the service name you selected in step 4. Click Yes when prompted if you would like to save the settings to the service.
- Click the Start/Stop/Reread tab and do one of the following:
- · If a service has not yet been defined for Autodesk, click Start Server to start the license server.
- · If a service for Autodesk is already defined and running, click Re Read License File to refresh the Network License Manager with any changes made to the license file or Options file.
The license server starts running and is ready to respond to client requests.
- Close LTOOLS.
Part 4. Install the Vault Server
- From the installation screen select Install.
- Accept the license agreement and click Next.
- Enter the following information on the Product Information screen:
- Serial Number
- Product Key
- Network License Server Type
- Network License Server Name
Note: The License Server Type and Name should match those used when setting up your license server in the previous parts. - Click Next.
- On the Configure Installation screen, check Autodesk Vault Server.
If Autodesk Office SharePoint Server Integration is needed, check the appropriate option for your SharePoint release. See SharePoint Integration for more information.
- To make any changes to the default configuration, click the little down arrows below the components title.
See Customize Your Installation for more information.
- Click Install.
-
The Vault Installation process performs a system diagnostic before proceeding with the installation. Perform one of the following tasks on the ADMS System Check Report screen:
- If all checks are successful, the progress will state that testing is complete and the Continue button is illuminated. Click Continue to proceed with the installation.
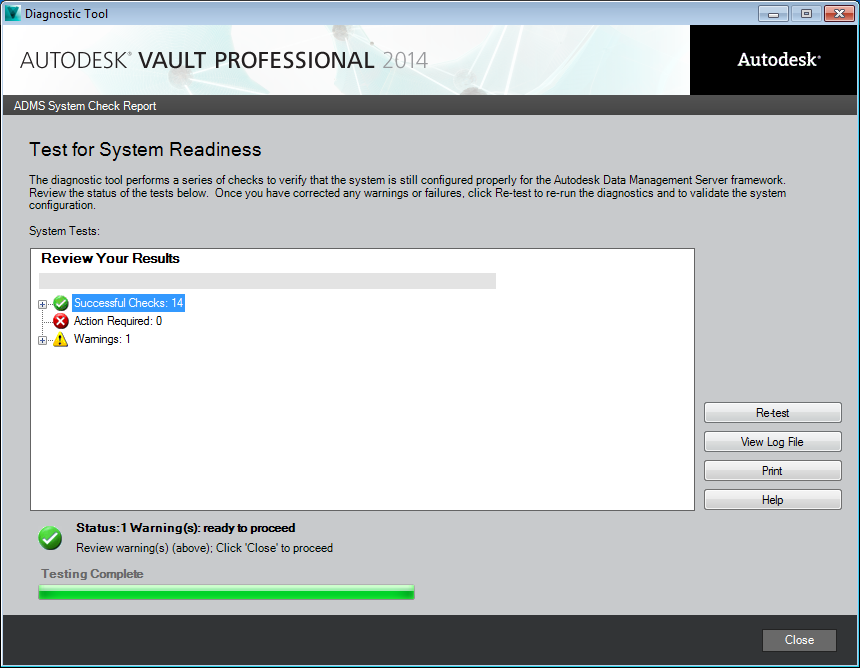
- If any pre-checks fail, the number beside Actions Required indicates the number of pre-checks that failed to pass the diagnostic process.
Links describing each failed pre-check are listed. Click on each link to learn more about the pre-check and how to make changes so that your systems passes the diagnostic. Make all necessary changes and click Re-Test. Once all checks are cleared, click Continue to complete the installation.
- If all checks are successful, the progress will state that testing is complete and the Continue button is illuminated. Click Continue to proceed with the installation.