Legacy tutorial posted on the old Alias Design Community site on February 7, 2008, by Dua Xiong.
This is the first part of a three-part series of articles that will attempt to illustrate the creative design process that an automotive designer might go through to develop a concept design proposal using Alias StudioTools software. We will start with ideation sketching, then surface development and finish with visualization. We will also be covering many of the latest tools added to version 13.
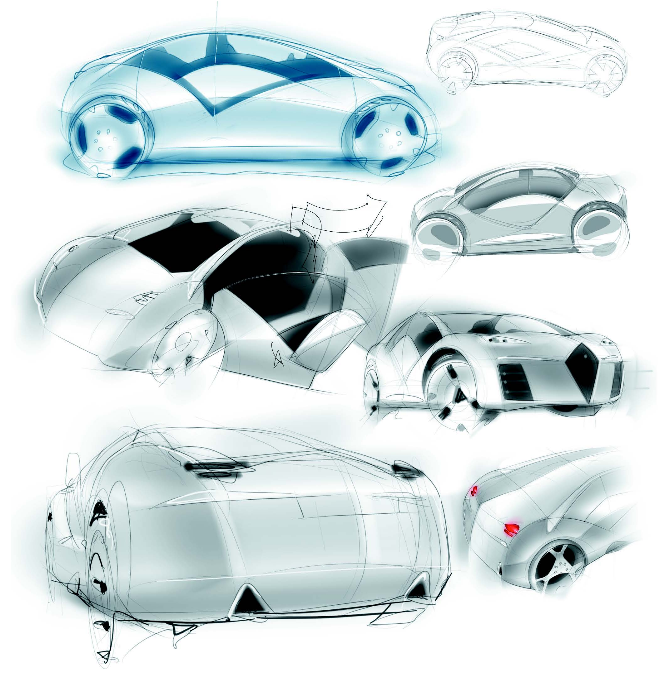
There really is no "right" or "wrong" way to make a sketch. Drawing is an art-form, and therefore very subjective. The essence of a sketch is simply to convey an idea. However you choose to most effectively achieve that goal is just a small part of the design process.
The real challenge for designers is to try to come up with the icon for the next big trend. Like couture, it is a never-ending search for a moving target. Good ideas can happen anywhere. Designers should always be prepared to jot something down wherever they may be.
Knowing your tool well, will help you focus on the task and not the tool. The advent of computers has added new tools and new possibilities for this purpose. This article will cover just a few possible methods using a specifi c software and offer some tips for you to expand upon.
User Interface
The first step is to get to know the software. For new users, the sheer number of tools and menus available to you can make this feel like a daunting task. In this short article, we can only just gloss over many of its aspects. Time and patience in learning the tool is recommended.
As StudioTools is best known for its modelling capabilities, many current users may not even be aware that there are painting tools embedded in the software. For version 13, much consideration has gone into making these tools more apparent and easier to access.
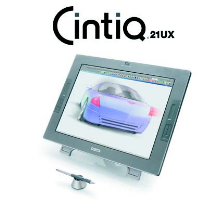
One indispensable tool that should be mentioned here before we start is the need for a pressure sensitive graphics/digitizing tablet. In our case, we will be using a Wacom Cintiq 21UX. This is an LCD display with an integrated tablet that allows you to draw directly on the screen.
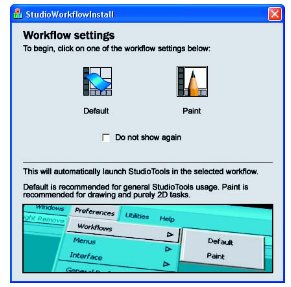
- In order to facilitate a simpler workflow for users who want to sketch, a new option box shows up on startup asking the user to choose between the "Default" or "Paint" workflows. Selecting the Paint workflow will automatically streamline the interface, showing only the tools necessary for painting.
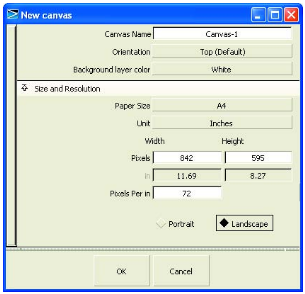
- While in the Paint workflow, the File->New function will open a New Canvas window allowing you to specify the canvas size, among other things. The maximum canvas size is 8000x8000 pixels. It is also important to note the Background Layer Color in case you want to sketch on a transparent or colored background. The default is opaque white
- This will create an orthographic Paint window with a new Canvas plane. At this point, you can just grab one of the painting tools and start scribbling. The Paint tab in the Palette contains Pencils, Markers, Airbrushes, Erasers and other tools.
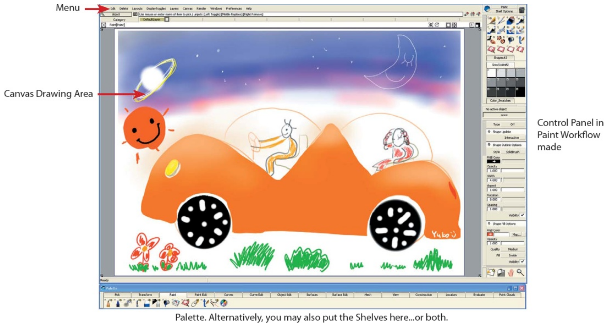
Important Components of the User Interface in Paint mode.
These are some of the more important paint specific parts of the interface. It can help to be familiar with these before start

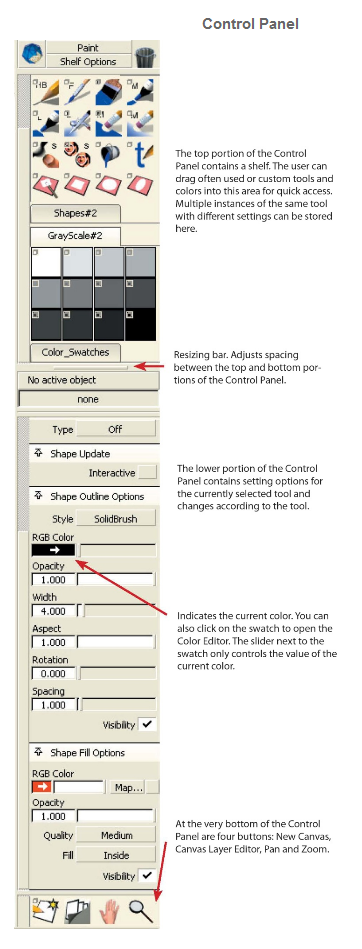
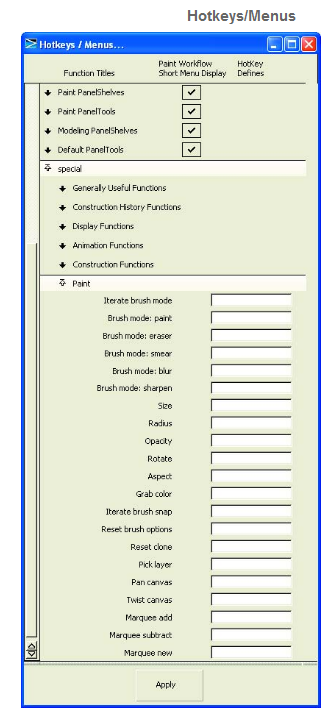
There is a Paint area in the Special section here for setting single-key hotkeys for use while painting.
Example: Setting a hotkey for Size will allow you to adjust the size of a brush by pressing the hotkey and dragging directly on the screen.
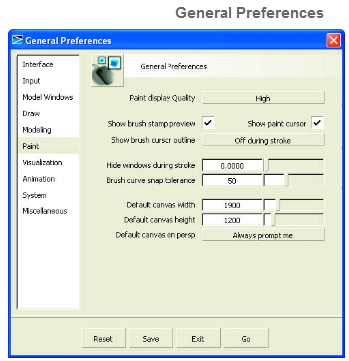
Set Paint Display Quality to High (in AliasStudio 2008 and greater, Paint Display are set to High Quality by default). Adjust Brush Curve Snap Tolerance to desired setting. The number of Undos are set in the Miscellaneous section.

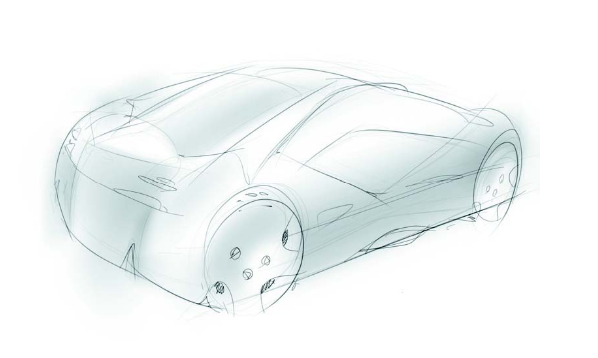
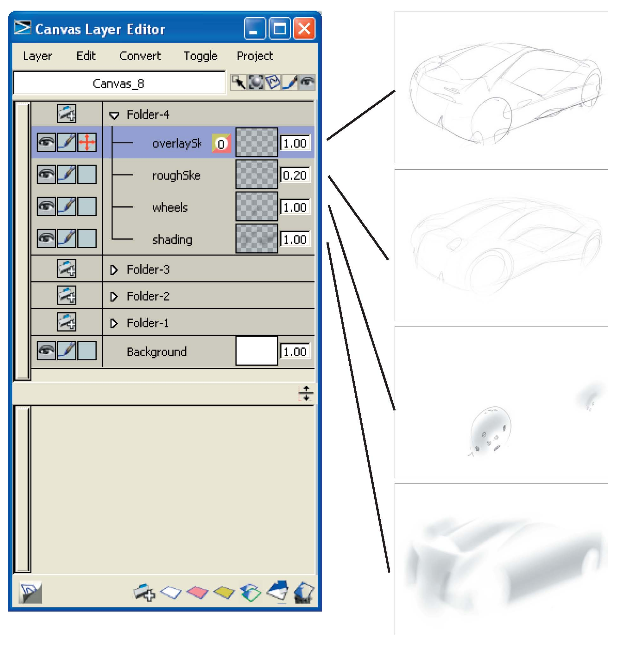
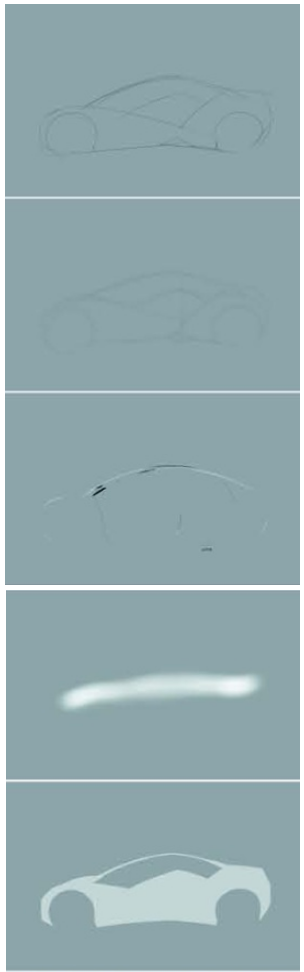
Step 1: Very rough freehand sketch, using just the pencil tool.
Step 2: The opacity of the rough sketch layer is decreased to lighten the line drawing.
Step 3: A new layer is created and an overlay sketch is drawn using the first rough sketch as a guide. Repeat as necessary.
Step 4: Another layer is created and the airbrush tool is used to add some shading underneath the line sketches
Step 5: Another layer for the wheels and the sketch is finished.
Using Layers
Layers can be very useful. They can be created, edited and re-ordered anywhere in the stack at any time. Use them to isolate parts of the sketch to your advantage. Create overlays to try different variations. As you can see in the example above, the order of the layer stack does not necessarily follow the progression of the sketch.
Ideation: Quick, Rough Sketching.
For putting ideas down quickly, a simple workflow works well. A combination of Pencils, Airbrushes, Erasers and Layers is usually enough to accomplish this task.
Rendering Workflow
-
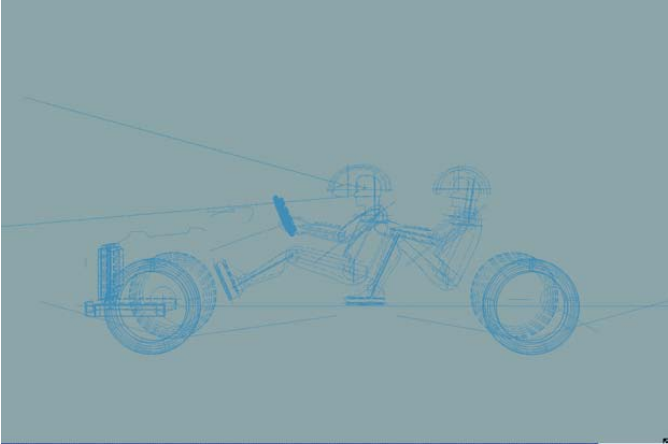
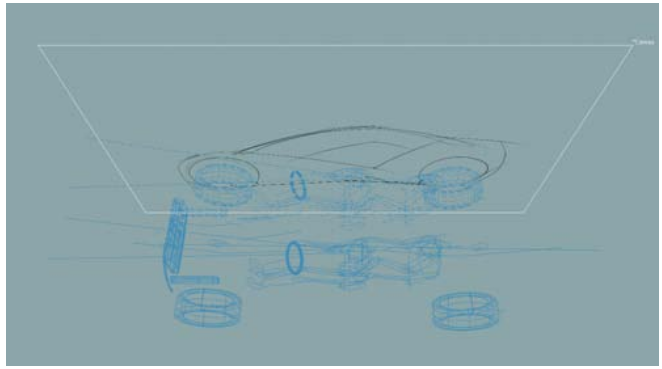
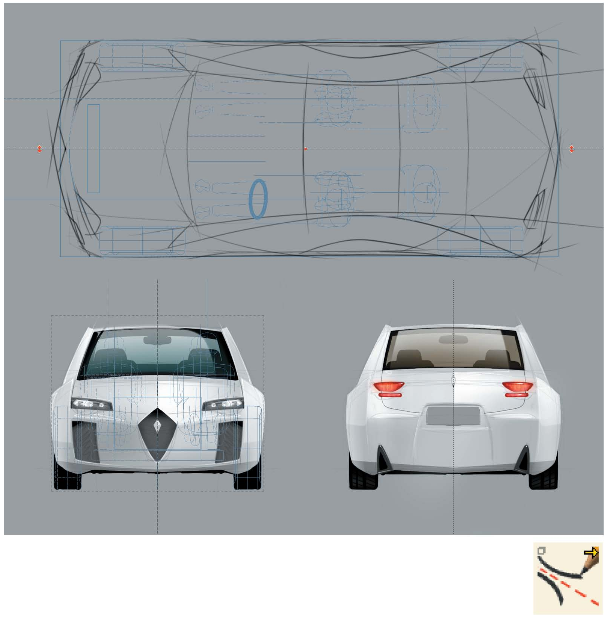
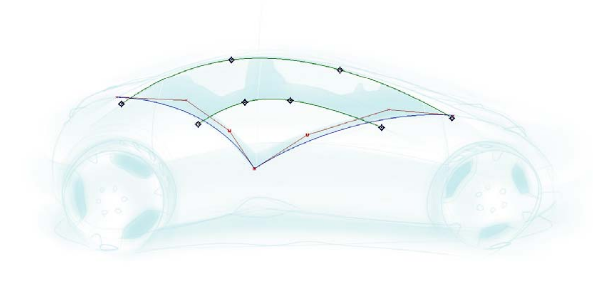
Using 3D Criteria
A big advantage of using StudioTools is the ability to incorporate a three-dimensional package. This can help to make sketches more believable by giving them more realistic proportions and correct perspective.
-
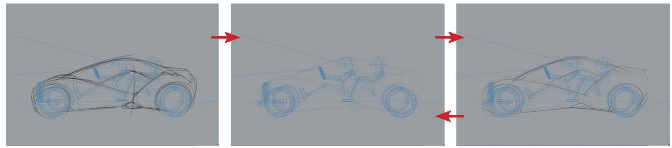
Sketching Iterations
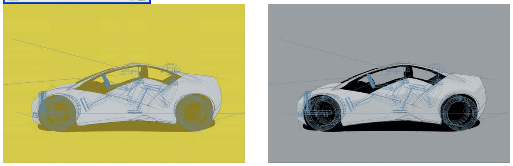
When you start sketching in the perspective view, the software will drop in a Canvas based on your current view. This Canvas will act very similar to a Construction Plane. It will exist in 3D space, so you can manipulate it just like any object. This Canvas will start transparent; it will have no background color layer so you will be able to see your model data through it.
You can make multiple iterations of the base sketch by using layers as overlays. As you can see, it is still possible to cheat the sketch.
-
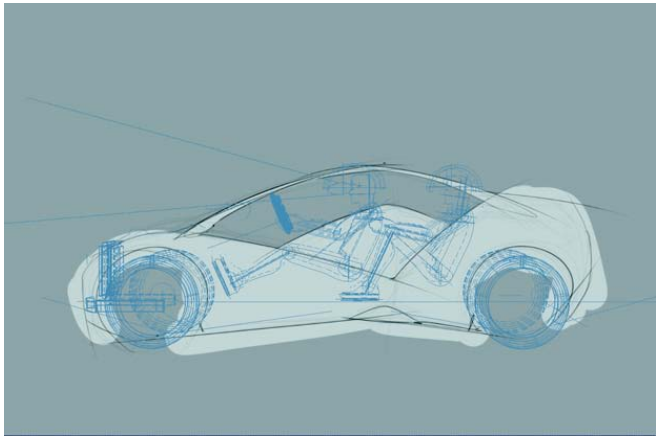
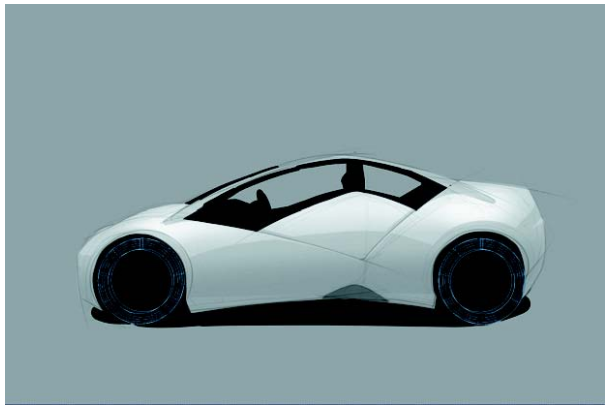
Filling in the Sketch
Here, we have created a new layer underneath the line sketch and painted the body area with a light-gray. Parts of the gray can be erased without affecting the line sketch.
-
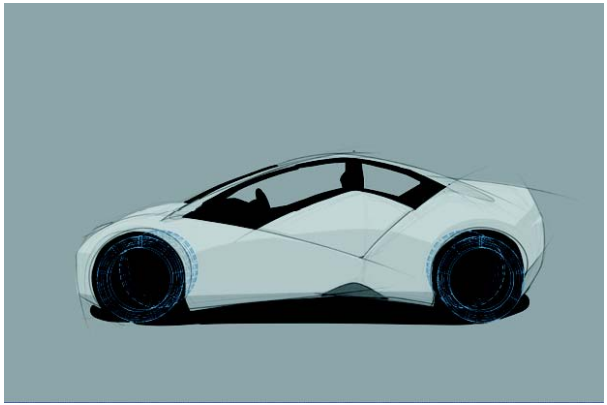
Shadow Areas
Next, we have created another new layer underneath the gray and blocked in the wheel house, ground shadow and interior areas. As you can see, most of the car is already taking shape. It is important to correctly adjust the shapes here to get the desired proportions.
-
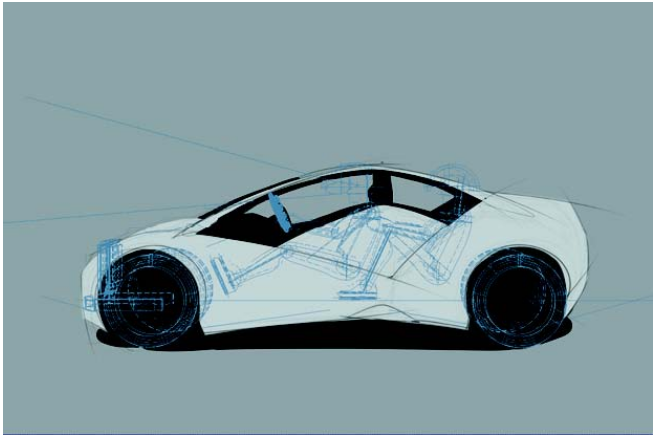
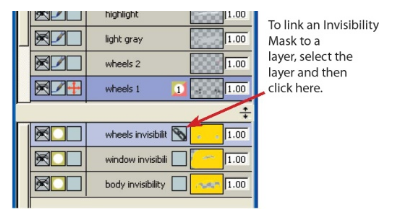
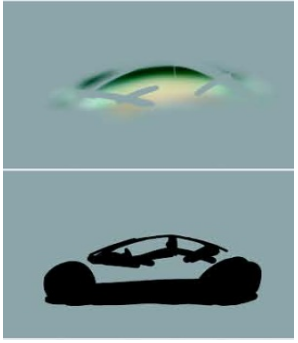
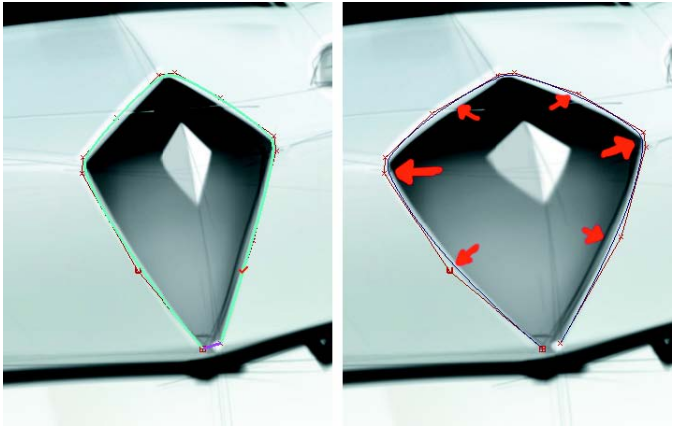
Reflections: Invisibility Masks
To more easily paint the body reflections an Invisibility Mask was created. The light-gray paint layer was copied to an Invisibility Mask, then inverted and linked to a new layer created above the light-gray paint. Medium-gray reflections were then painted on this new layer, using the Invisibility Mask to keep the paint confined to the body of the car.
-
Reusing Invisibility Masks
For secondary reflections, shadows and other details on the body, the same Invisibility Mask was linked to other new layers.
New for v13 is the way Masks work. Different layers may share the same Mask. It is not necessary to recreate or even copy Masks. You can just simply link them to different layers. Making changes to the Mask will affect all layers linked to it.
-
Shading and highlights
Again, the same Invisibility Mask was used on a new layer for body shading and highlights with an airbrush.
-
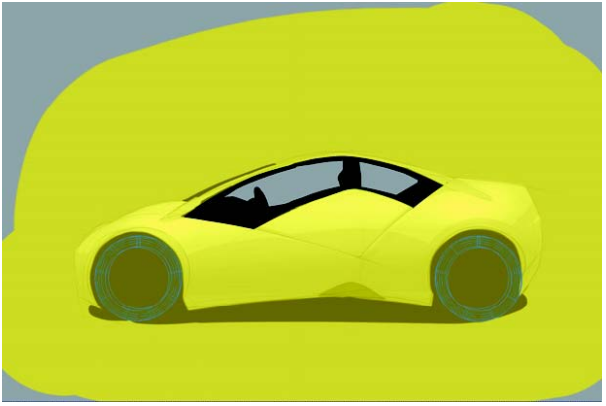
Masking the Window
The same Invisibility Mask technique was used for masking out the windows. In this case, we created a new Invisibility Mask layer just simply painted directly on it with a large solid brush. Normal Masks show up as pink in color while Invisibility Masks show up as yellow.
-
Painting the Windows
Multiple colors brushed on with an airbrush were used to try to give the glass some depth.
Details such as reflections, highlights, and partlines will give the glass some interest and realism. Having some interior indications also help.
-
Blocking in the Tires
A large solid brush was used here to block in the tire highlights. Interactive resizing via a hotkey can make this much easier.
-
Finishing up the Tires
A large solid eraser was used to erase the gray from the center of the wheels. A large soft eraser was then used to erase the sides of the tire leaving just the highlights on the top and bottom edges.

-
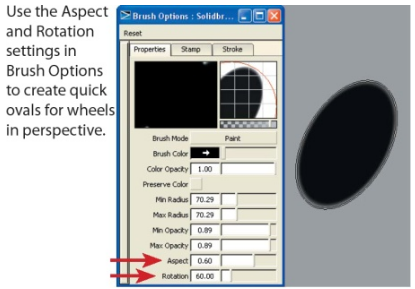
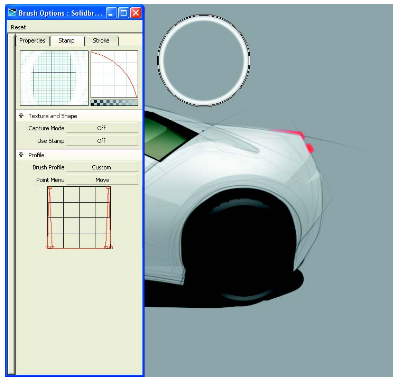
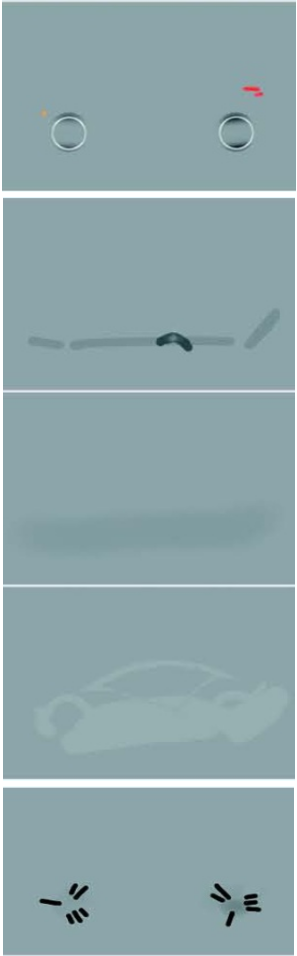
Rims
Depending on the rim design, this part may vary. For creating the edge of the rim, the brush profile of a Hard Solid Brush was custom modified in its Brush Options. The illustration below shows the settings, new profile and brush preview. A new Invisibility Mask was then created in preparation for painting in the rims.
-
Wheel Mask
A new Invisibility Mask was then created in preparation for painting in the rims.
-
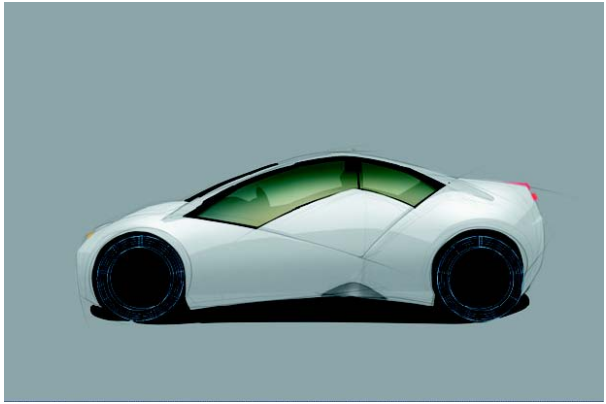
Final Touches
After the rims were done, some door cuts, lamps, highlights and other details were added.
Some kind of background can also help bring out the subject and add depth. You can also include people in the sketch for scale. Don't forget to sign it!
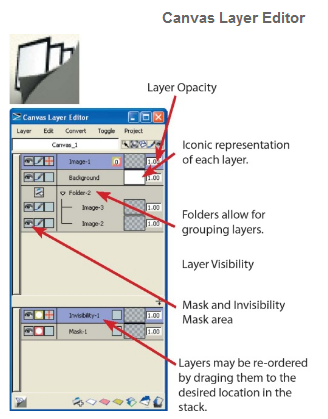
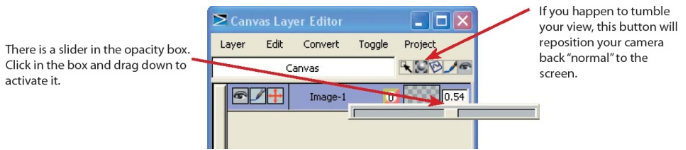
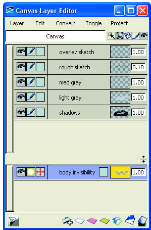
The Layer Stack
Here is a screen shot of the Canvas Layer Editor and a sample of each layer. Many layers were merged and not all are at full opacity.
It is possible to have hundreds of layers, but having more layers means your fi le sizes will be larger and the computer will respond slower. It is recommended to merge layers as much as possible, without compromising flexibility.
All layers and any 3D data will be saved together into one .wire file. Use the Make Canvas Picture function to export a composite image at full resolution.
Advanced Techniques
-
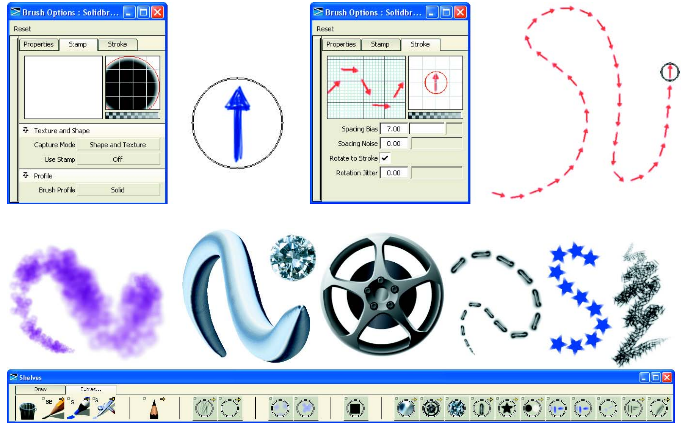
Custom Brush Stamp Textures
Custom brush textures can be easily created by changing the Capture Mode in the Stamp tab of the Brush Options editor. Double-clicking on any of the brush tools will open the editor.
This will allow you to capture the Shape and Texture of any paint that you may have on your Canvas. You can then use this sample to brush with. Controls in the Stroke tab will allow you to control the spacing and rotation of the brush stamps.
The Paint_shelves.scm Scheme from the Alias program directory, contains a few examples of what is possible.
-
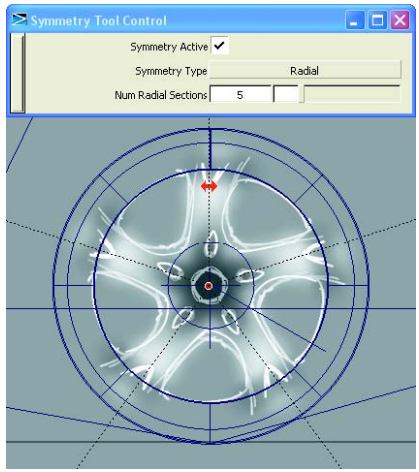
Symmetrical Sketching
The Canvas Brush Symmetry tool allows you to specify mirroring sections across your canvas. The software will mirror your sketch lines across these sections in real-time. Especially useful for symmetrical elevation and wheel sketches.
-
Using Photographs
It's perfectly okay to use photographs to substitute for some parts of the sketch, especially wheels, lights, instrument clusters and other complicated parts.
Images can be dragged directly into StudioTools from Windows Explorer. A new canvas will be created for it, or it will be added to the current canvas as a new layer.
-
Working with Curves
The very same NURBS curves, including Blend Curves, used for modeling in StudioTools is also used for painting. In Paint mode, curves are built in 3D space, but on the same plane as your Canvas. They can be manipulated in the same fashion as any curve in orthographic view.
In the example above, we have used curves to outline the side window area of the sketch. They can then be used to control how paint is applied to the drawing.
-
Sketching with Curves
With the Ctrl and Alt keys held down, your brush cursor will snap to the nearest curve within a tolerance. This allows you to control the length and pressure of your stroke, while maintaining the precision of the curve resulting in a perfectly "sketched" line.
In the Paint Control Panel, you will find an option to snap to the edge of the curve rather than its center.

-
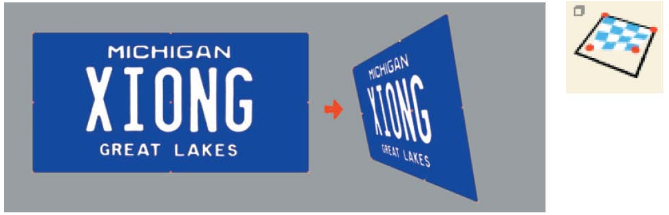
Image Warping Warp Shapes
This powerful tool allows you to use a curve to control how your image changes. In this example, the grille has been widened by drawing a curve around the opening and applying it as a Warp Shape. As the curve shape is then adjusted, the pixels around the curve "warp" with it.
Original Image
Warping Curve Adjustments
Resulting Image
-
Deform Layer
This tool allows you to skew and distort a layer with the option to simulate perspective foreshortening.
-
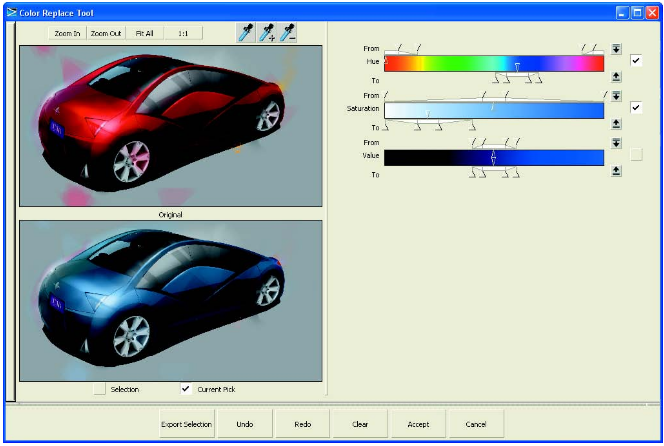
Color Shifting
The Color Replace tool allows you to visually select a range of colors and shift them to another range of colors. There are separate controls for Hue, Saturation and Value.
In this example, we have merged the body of the car onto one layer and changed its color from red to blue. The Saturation of the color has also been reduced to a grayish blue color.
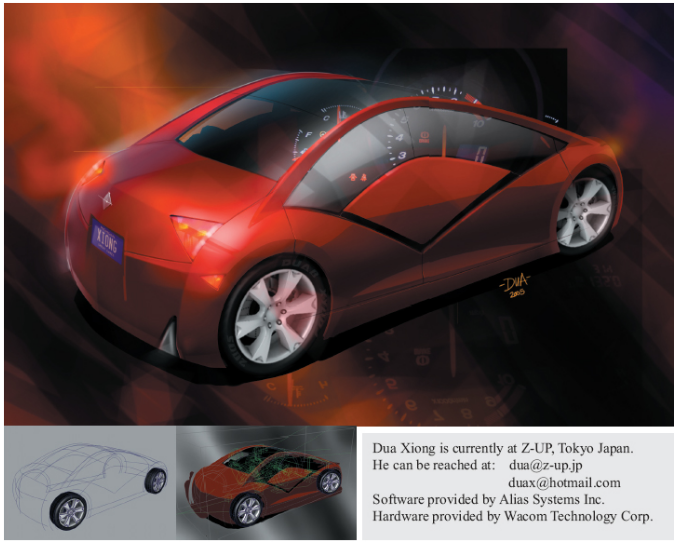
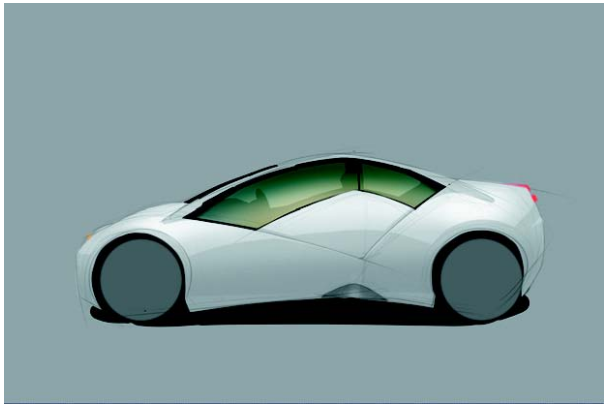
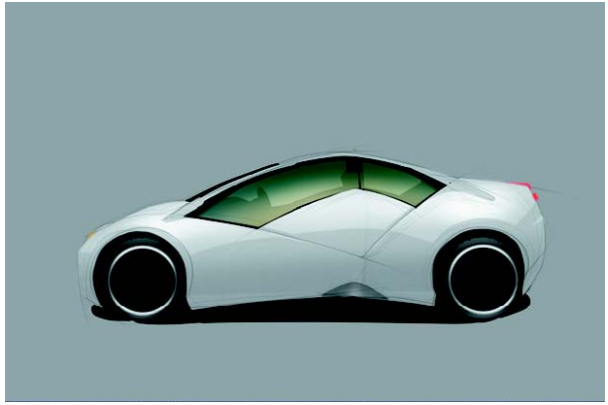
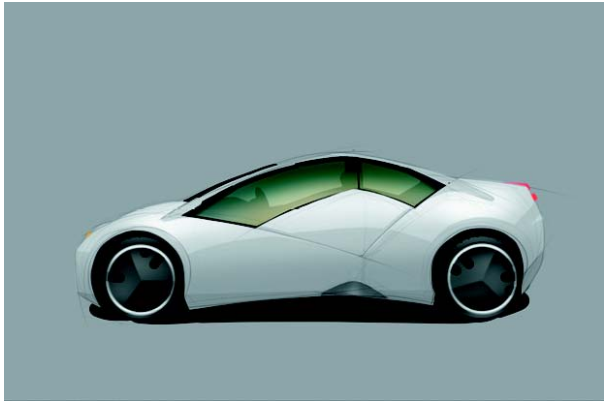
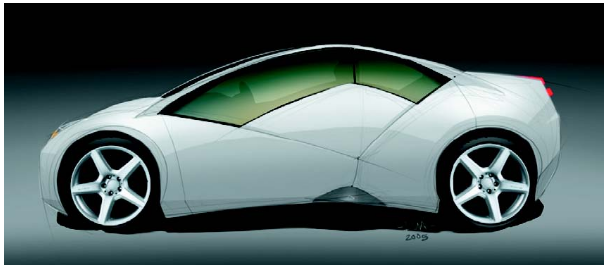
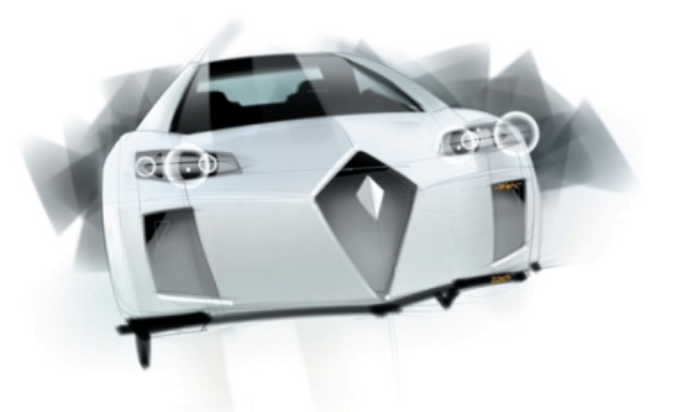
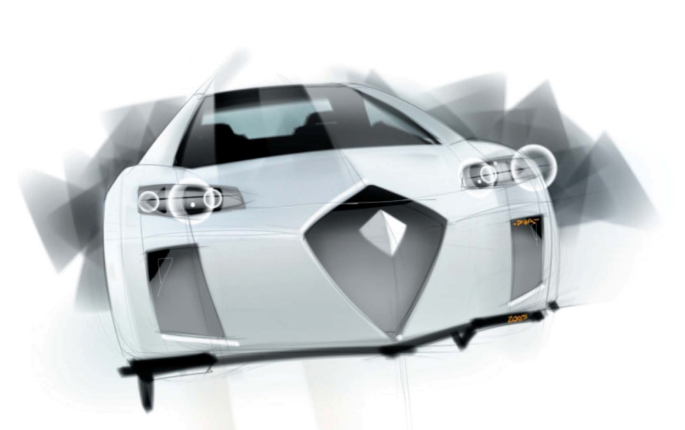
Final Rendering
With this last rendering, we have laid out some simple 3D curves over the package criteria to get a better idea of the vehicle's volume and to help with the drawing. The wheels are actual hardware shaded 3D surfaces.