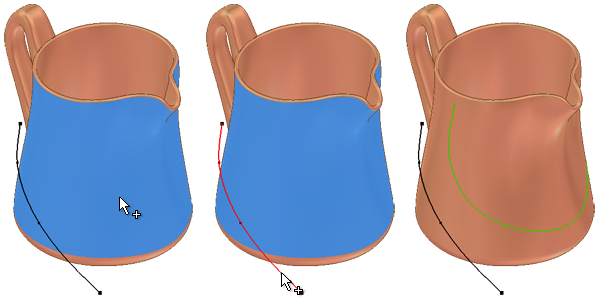
In a 3D sketch, click
3D Sketch tab
 Draw panel
 Project to Surface
to project curves and points (such as 2D or 3D points or curves, work points, and part or surface edges or faces) to a face or set of faces.
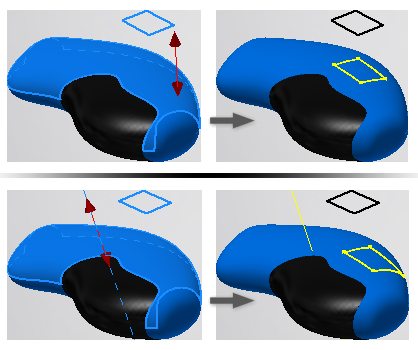
Project curves along a vector

Geometry is projected to a selected face along a selected vector.
You can project 2D or 3D sketch curves or sketch points, work points, and edges and vertices of solids or surfaces. The destination faces can be solid or surface faces, entire surface features, or work planes.
- On the ribbon, click
3D Model tab
 Sketch panel
 Create 3D Sketch
.
 - On the ribbon, click
3D Sketch tab
 Draw panel
 Project to Surface
 .
. - Project along vector is selected in the Output panel.
- The Faces selection is active. In the graphics window, click the face to which you want to project curves. If you prefer, you can also select surface features in the browser or by clicking Select Other.
- In the dialog box, click the Curves selection. In the graphics window, click the curves to project to the selected face. If necessary, hold down CTRL and click again to remove geometry from the selection set.
- In Output panel, click Direction. In the graphics window, click geometry to specify the vector. Note: If you select one or more curves from the same 2D sketch, you do not need to specify a direction vector. The sketch normal direction is used.
- Click Apply and continue to select faces and curves to project. When finished, click OK to quit.
 Show Me how to project a curve along a vector
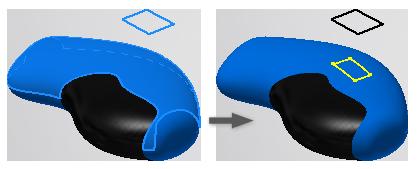
Project curves to the closest point

Geometry is projected to a selected face according to the normal of that face. The destination face determines the direction of the projection.
- On the ribbon, click
3D Model tab
 Sketch panel
 Create 3D Sketch
.
 - On the ribbon, click
3D Sketch tab
 Draw panel
 Project to Surface
 .
. - Project along vector is selected in the Output panel. Click Project to closest point.
- The Faces selection is active. In the graphics window, click the face to which you want to project curves. If you prefer, you can also select surface features in the browser or by clicking Select Other.
- In the dialog box, click the Curves selection. In the graphics window, click the curves to project to the selected face. If necessary, hold down CTRL and click again to remove geometry from the selection set.
- Click Apply and continue to select faces and curves to project. When finished, click OK to quit.
 Show Me how to project a curve normal to a surface
Wrap projected curves to a surface

Wraps one or more 2D curves or points onto a selected planar, cylindrical, or conical face or faces, preserving the curve length. You can use the curve to create sweep paths for geometry such as CAM slots in cylinders.
Edges, vertices, work points, and 3D sketch geometry cannot be projected to a surface.
Like Emboss and Decal features, the sketch plane must be tangential to the wrap face.
- On the ribbon, click
3D Model tab
 Sketch panel
 Create 3D Sketch
.
 - On the ribbon, click
3D Sketch tab
 Draw panel
 Project to Surface
 .
. - Project along vector is selected in the Output panel. Click Wrap to surface.
- The Faces selection is active. In the graphics window, click a planar, cylindrical, or conical face on which you want to wrap curves. If you prefer, you can also select faces in the browser or by clicking Select Other.
- Click the curves to wrap to the selected face. If necessary, hold down CTRL and click again to remove geometry from the selection set. Note: 3D sketch curves and points, model edges, and surface edges cannot be projected.
- Click Apply and continue to select faces and curves to wrap. When finished, click OK to quit.
 Show Me how to wrap a curve to a face
Edit projected curves or points
To modify the selection set, face selection, or projection type:
- In a 3D sketch, right-click a Project to Surface feature, and select Edit Projected Curve.
- In the Project Curves to Surface dialog box, you can:
- Add or remove curves in the selection set. Click curves to add curves or hold down CTRL and click curves to removed from the selection set.
- Add or remove faces from the selection set.
- In the Output box, change the projection type. For vector projections, you can select a different vector.
- When you finish, click OK to quit.
Break link and remove associativity
To remove associativity, right-click a Project to Surface feature in the browser and select Break Link. Curves and points created by the Project to Surface feature are converted to unconstrained sketch geometry. The projection curve feature is deleted from the 3D sketch in the browser.