 |
Construction surfaces provide ways to describe shapes when creating extrude, revolve, sweep and loft parts. For each of these features, you can create a surface instead of a cut, join, or intersection. You can use an open or closed profile to create a surface. Then you can use the surface as a termination face for other features, or a split tool to create a multi-body part. |
Features do not consume surfaces.
In the browser, a surface displays as a suffix to the feature command used to create it (for example, ExtrusionSrf1, SweepSrf1, and so on).
Appearance and visibility of surface
in the Application Options dialog box, Part tab, you can change the appearance of a surface from translucent to opaque. In Construction, select Opaque Surfaces. A newly created surface is opaque, and the same color as a work feature.
By default, before the option is set, surfaces are translucent. To change surface appearance, in the browser, right-click the surface and select Translucent. Select or clear the check mark to switch opacity on and off.
In the graphics window, a surface is translucent by default, like a work plane. You can right-click a surface in the browser or graphics window, and then turn off its visibility.
Modification of shape for surface
|
You can use Fillet and Chamfer commands to modify sharp edges of surfaces. You can edit the profile shape. Expand the surface in the browser, right-click the sketch icon, and then select Edit Sketch. |
 |
|
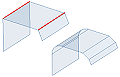
In the part environment, you can use the Stitch command to stitch several edge-matched surfaces together to create a quilt. Unlike the Stitch command in the construction environment, this operation is parametric; changes to the parent surfaces update the quilted surface. |
|
Shapes for surfaces from different feature commands
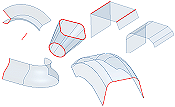 |
Examples of surfaces, clockwise, from the top left corner:
|