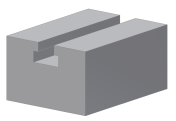
- Set your project to tutorial_files.
- Open iFeatures
 TSlot-begin.ipt.
- Click the + to the left of Extrusion2 in the Model browser to access Sketch2.
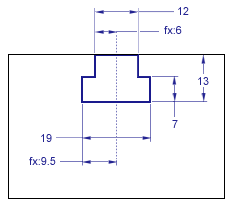
- Double-click Sketch2 (the sketch that created Extrusion2). Use the View Cube or View Face to look at the front of the part, so that the sketch appears as shown:

This sketch contains a fully constrained profile with six dimensions and two collinear constraints. One dimension and one collinear constraint position the T Slot geometry on the face of Extrusion1 and are of no further interest. Two of the dimensions use an equation to position the T Slot width one half of the distance from a vertical construction line. These two equations ensure that any values added will produce a symmetrical slot.
- On the ribbon, click
Sketch tab
 Exit panel
 Finish Sketch
.
 - Click
Manage tab
 Author panel
 Extract iFeature
.
 - In the Model browser, click Extrusion2.
- In the Selected Features browser of the Extract iFeature dialog box, click over d2 [12 mm].
- Now, click
 .
.Notice that the d2 parameter is now listed in the Size Parameters portion of the Extract iFeatures dialog box.
- Repeat the previous steps for parameters d4 [19 mm], d6 [13 mm], and d7 [7 mm].
- Click Save in the Extract iFeatures dialog box.
- In the Save As dialog box, double-click the Slots folder.
- In the File name field, double-click the name iFeature1, and name your first iFeature tutorial_TSlot.
- Click Save in the Save As dialog box.
- A dialog box displays informing you that the selected location is not in the active project. Click Yes to continue the save.
Note: If you find yourself creating numerous iFeatures, consider adding the Catalog location to your active project to eliminate the Click Yes to continue the save prompt.