If your data contains one or more of the following, it is recommended you use Task Scheduler to migrate your data:
- Large assembly files.
- Multiple file dependencies, such as derived parts.
- iParts, iAssemblies.
With Task Scheduler, you can migrate an entire folder structure. This ensures that all your data is migrated.
Please read the following guidelines before you migrate Autodesk Inventor files.
- We strongly recommend that you back up all Autodesk Inventor files before using Task Scheduler. Be sure the backup maintains the original directory structure so that you can easily restore files if necessary. (Include all files used in your designs: part (.ipt), assembly (.iam), presentation (.ipn), drawing (.idw), Microsoft Excel (.xls), iFeatures (.ide), and project (.ipj) files.)
- The following files are skipped during the migration process:
- Read-only files.
- Files previously migrated.
- Files built in non-production versions of Autodesk Inventor. (For example, files created in a Beta version.)
- Corrupt files or files with missing references.
- Autodesk Inventor must be authorized on your system prior to running Task Scheduler.
- If you store your files on a server, you must map the network drive locally before you can access the data from within Task Scheduler. Do not use UNC naming conventions.
Before you begin:
- Make sure your files resolve and open correctly in the existing version of Autodesk Inventor. Repair any resolution and general problems before you proceed. If the red cross (Recover) appears on the Inventor menu bar, the file is corrupted and must be repaired or it will not migrate.
- If you defined one or more custom projects instead of using the Default project, complete the following steps:
- Start your new version of Autodesk Inventor.
- Select Application Options from the Tools tab and Options panel, and then select the File tab.
- Verify that the Projects Folder setting is correct.
- Close the dialog box, and then select Pro from the Get Started tab > Launch Panel . This dialog box should correctly list your projects and confirms that the project file will show up in Task Scheduler
- Close all versions of Autodesk Inventor. (You can use the Windows Task Manager to verify that no versions are running.)
- if you migrate specific files, follow this migration order, since assemblies depend on parts, and drawings can depend on both parts and assemblies.
- Templates
- Styles
- Parts
- Standard parts
- Sub assemblies
- Assemblies
- Presentations
- Drawings
- Task Scheduler support multiple processes to shorten migration time. In the Settings menu, click Multiple Processess… button to open Multi-Process Settings dialog, See figure 1.
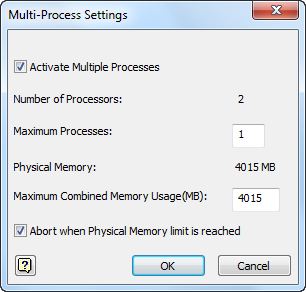
Figure 1
Migration procedure: Complete the following steps to migrate your files using a defined project name.
- Start Task Scheduler. (From the Start menu, navigate to All Programs > Autodesk > Autodesk Inventor <version> > Tools > Task Scheduler.).
- The Task Scheduler window is displayed. Select Migrate Files… from the Create Task pull-down menu to access the Migrate Files sub dialog box. Click the Add Project tool button at the far right as shown in Figure 3.
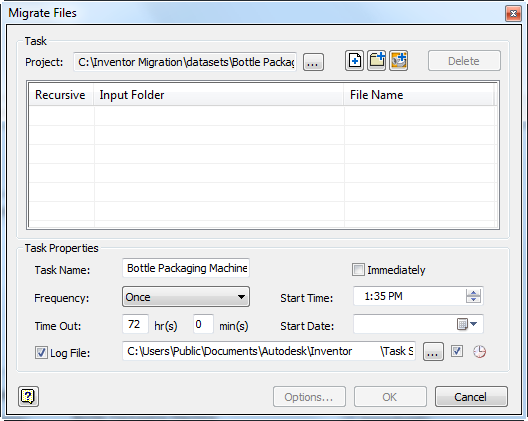
Figure 3
- Each of your defined projects appears in the Project Settings dialog box. Double-clicking the project name you wish to migrate sets it current. You can click [Browse...] button in Project Settings dialog to select your specified project. Click the OK button when you are finished.
- The Migrate Files dialog box displays the selected project folder and project file name. See Figure 4.
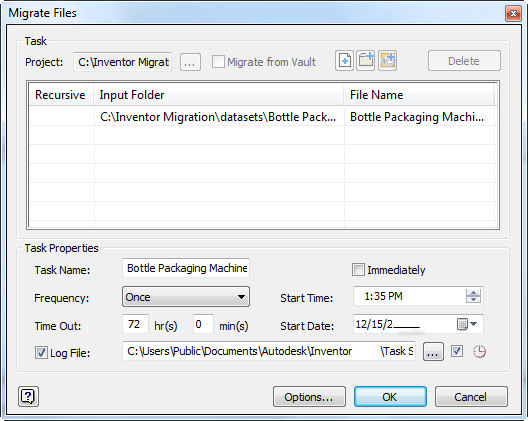
Figure 4
- In Task Properties frame:
- Select the Immediately check box if you want to migrate the project files at once OR
- Observe that you can defer the migration until a later time, such as after-hours when all of the Inventor users have left for the day. Set the desired time and date in the corresponding text boxes.
- Set the Log File name and location.
- There are several options that can be set that apply to all files being migrated. These options are accessed by clicking the Options… button at the bottom of the Migrate Files dialog box. This action displays the Migration Options dialog box shown in Figure 5.
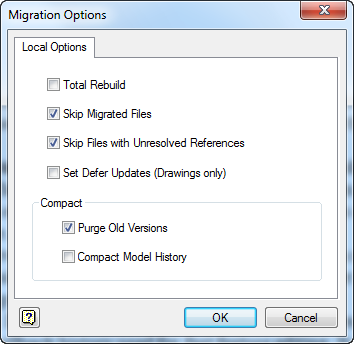
Figure 5
- Each of the migration options are described as follows:
- Total Rebuild: Select this option to improve feature edit performance. This option causes part files (ipt) to be rebuilt using the Rebuild All command within Autodesk Inventor. Total rebuild is usually not used, but if the data being migrated is from a much older release (prior to R5.3), its use is recommended.
- Skip Migrated Files: Active by default, this option ensures that any files already up to date will be skipped by the utility.
- Skip Files with Unresolved References: Also active by default, this option controls how Task Scheduler responds when a file with unresolved references is encountered. This option automatically skips an unresolved file. When inactive, processing stops and the user is given the choice to skip the file or stop the migration process.
- Set Defer Updates (Drawings only): This option controls the defer update setting in a drawing file. The defer update setting keeps a drawing file in a static state. Selecting this option enables the defer update setting and migrates drawing files in a defer update state.
- Purge Old Versions: Active by default, this option keeps file sizes to a minimum by deleting the former versions of the migrated file after Task Scheduler finishes. (Be sure you have a backup of all the versions of the files you need.)
- Compact Model History: Do not select this option when migrating files to a new release because it purges rollback history used for fast feature editing. It should be used only if you are working with extremely large assemblies and experience capacity limitations.
- Click OK.
Migrating Individual Files or Folders
As previously mentioned, if you do not wish to migrate your Inventor files by project you may instead select specific files or all files in a directory including sub-folders. These options are accessed by clicking the appropriate tool button in the Migrate Files dialog box and are described as follows:
- Add files: Selecting this button displays a browser where you can select one or more files to migrate. This is a handy option to use when you wish to quickly migrate a small number of files such as your customized Inventor templates. See Figure 6.
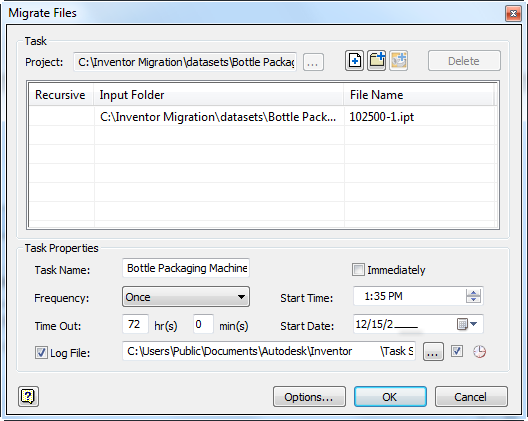
Figure 6
- Add folder: Select this button if you store your files on a single drive under a single top-level folder (perhaps, with subfolders). All files in the directory will migrate in the proper order. the order is part, assembly, drawing. See Figure 7.
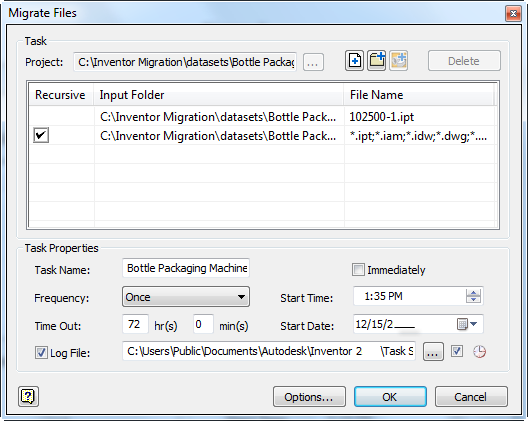
Figure 7
Validating the Migration
Task Scheduler generates a log file that records which files successfully migrated and which did not. The file is in ASCII format (.txt) and is located in C:\My Documents\Inventor <version>\Task Scheduler\Log & Report Files or C:\Users\Public\Documents\Autodesk\Inventor <version>\Task Scheduler Logs & Reports by default.
After the migration is complete, review the migration log to determine if any parts failed to rebuild. You can open the log file and search for the word "failed", or copy the entire text file into Microsoft Excel and sort by column. This will group the files by "Failed" or "Success".
Also you can download the Task Scheduler Error Reporting tool to catalog the errors and export them to excel file. Click here to download and to find out more about the Task Scheduler Error Reporting tool.
You can now easily identify which parts failed and fix as necessary.