Notice that the assembly moves just as it did in the assembly environment. It seems to contradict preceding explanations, however, the motion you see is borrowed from the assembly environment. Even though you are in Dynamic Simulation, you are not yet running a simulation. Since a simulation is not active, the assembly is free to move.
Enter the dynamic simulation environment
- On the ribbon, click
Environments tab
 Begin panel
Dynamic Simulation
.
Begin panel
Dynamic Simulation
. The dynamic simulation environment is activated. If the tutorial dialog box displays, click No.
- In the Simulation Player, click Run
 .
. The Dynamic Simulation browser turns gray and the status slider on the Simulation Player moves, indicating that a simulation is running.
Since we did not create any joints linking the motor to the assembly, and did not specify any driving forces, the assembly does not move.
- If the status slider is still moving, click Stop
 .
. Even though the simulation is not running, the simulation mode is still active. The browser is still grayed.
- Attempt to drag the Bevel Gear component. It does not move.
- On the Simulation Player, click Activate Construction Mode
 .
. It exits the simulation mode and returns to the Dynamic Simulation construction mode. In construction mode, you perform such tasks as creating joints and applying loads.
Automatically convert assembly constraints
- On the ribbon, click
Dynamic Simulation tab
Manage panel
Simulation Settings
.
This dialog box has the Automatically Convert Constraints to Standard Joints option, which automatically translates certain assembly constraints to standard joints.
When you open an assembly created in Autodesk Inventor, constraints are automatically converted to joints by default.
Note: In assemblies created before Autodesk Inventor 2008, Automatically Convert Constraint to Standard Joints is turned off by default. Go into Dynamic Simulation settings and turn on the option. - On the Dynamic Simulation Settings dialog box, click Automatically Convert Constraints to Standard Joints to clear the check box. You can choose to maintain the Standard Joints or delete them.
- Click No and Apply. Note in the browser that the joints are deleted.
- Repeat the process, turning the Automatic Constraint Conversion option back on. The joints are once again created.
- In the Standard Joints folder, notice the standard joints that the software automatically created for you.
If you choose to maintain the Standard Joints, they are converted to manual joints. You can make edits to the joints as appropriate. However, if you turn Automatic Constraint Conversion back on, all manual joints are deleted and replaced by automatically created joints.
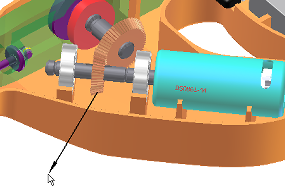
There are two bevel gears in this assembly and they work together to transfer motion from the motor to the mechanism that drives the saw blade. Add that motion transfer by adding a rolling joint.
Add a rolling joint
- In the browser, in the Mobile Groups folder, expand the Motor node to expose the Bevel Gear component.
- Right-click the Bevel Gear node and click Edit. You are placed in the Part modeling mode.
- Right-click the Srf1 node and click Visibility. The Bevel Gear construction surface displays. We use this surface to help define the gear relationship.
- At the right end of the ribbon panel, click Return. You are placed back in the simulation environment.
- On the ribbon, click
Dynamic Simulation tab
Joint panel
Insert Joint
 .
. - In the pull down list, select Rolling: Cone on Cone.
- The Component selector command is active and waiting for input. Select the Pitch Diameter circle at the base of the bevel gear conical surface (1).

- Automatically, Component selector 2 is active and ready for input. Select a conical face of a tooth on Bevel Gear 2. Do not select an involute face. Note: If necessary, expand the Mobile Groups and Cam crank browser nodes to see the gear component.
The new joint is added to the browser below the Standard Joints node.
- Click and drag Bevel Gear 1. You can see it move not only Bevel Gear 2, but the entire Cam crank assembly.