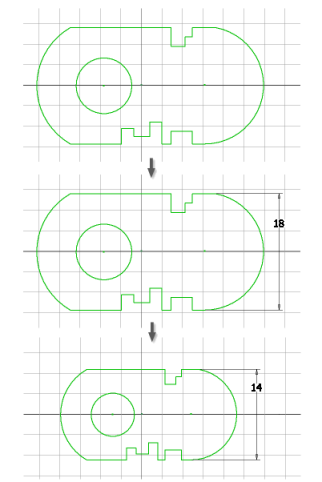
Plan sketches to model efficiently, and to maintain them easily throughout the design process. Add finishing details like fillets, chamfers, and face draft after the overall design of the model is stable.
Shape and size of sketches
- Stabilize sketch shape before size
-
Add constraints, and then add or edit dimensions.
- Accept default dimensions
-
Accept the default size of a sketch, and edit for the precise size after sketch shape is stabilized with constraints. Leave sketch elements undimensioned if they must change size when they are used in adaptive features.
- Stabilize sketches with dimensions
-
To avoid distorting a sketch when changing dimensions, change the small values first, and then change the larger values.
- Dimension large elements before small
-
To avoid distortion as it resizes, dimension the overall length and width of a sketch, but leave smaller elements underconstrained .
- Plan for adaptivity
-
Dimensions constrain sketch size. Omit dimensions on portions of adaptive or other features that can change size.
- Add the first dimension to set the scale of the sketch
-
In the first part sketch, the first dimension sets the scale of the sketch. After you place the second dimension, edits of the first dimension do not change the sketch scale anymore.

Tips for sketches
- Keep sketches simple
-
Combine simple sketches to construct complex shapes. If the design changes, it is easier to modify several simple sketch shapes than one complex shape.
- Repeat simple shapes
-
If a design has repeating elements, sketch one and then copy or arrange it in a pattern as needed. Save sketches as iFeatures so you can use them repeatedly in other parts.
- Draw sketches roughly to size and shape
-
A sketch that approximates the finished size and shape is less likely to distort when you add constraints and dimensions . Use the grid settings to snap to points at specified intervals.
- Sketch to use fewer constraints
-
Sketch profiles with the fewest possible vertices and segments.
- Use closed loops for profiles
-
Sketches for profiles form closed shapes. Trim or extend curves to form a closed loops. Join endpoints by a coincident constraint.
- Use construction geometry where possible
-
Use it to constrain complex sketches, and for curves that are not used in a profile or path, but could help create complex sketches.
- Control default sketch orientation behavior
-
When you create a sketch on a part face, the view reorients so the sketch plane is parallel to the display. When you finish the sketch, the view reorients to enable use of direct manipulation for completing the task. You can change this behavior.
- Remove unneeded geometry
-
Click Undo to remove line segments and arcs one at a time, in reverse order.
- Diagnose sketch errors using the Sketch Doctor
-
Sometimes sketch geometry interferes with creating a feature. For example, you have trouble selecting multiple profiles for an extrusion. Use the Sketch Doctor to diagnose the problem, such as checking for open loops or sketch elements on top of other geometry, then eliminate the duplicates.
- Find snap points
-
When creating geometry, you can snap to a midpoint, center, or intersection. Right-click in the graphics window, and then select a snap location from the menu.