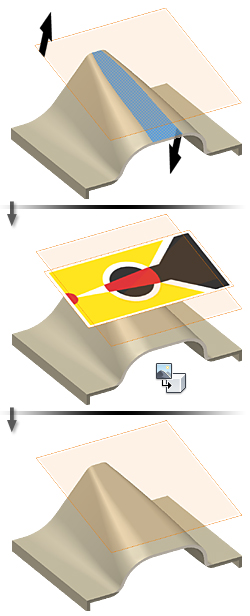
You can place a decal on a model face for uses such as labels, brand-name art, logos, and warranty seals. You insert an image in a sketch, position it using constraints and dimensions, and then apply it as a decal.
Decals are available in part sketches only, not assembly sketches.
Create a thin part (such as a surface), and then add an image to a part sketch to represent the decal. If you prefer, place a decal on a part face.
Size and position of images in decals
You insert an image in a sketch, position it using constraints and dimensions, and then apply it as a decal. You use the Decal command on the 3D Model tab to select the image as the decal.
After you place an image on the sketch plane:
- Click in the center of the image and drag to move it.
- Click a corner of the image and drag to resize it. The image maintains its original aspect ration (relationship of length to width).
- Click an edge to pivot the image.
Use constraints and dimensions to fix the decal position and align it to other geometry.
Decals that conform to face shape
On the Decal dialog box, you can select the Wrap to Face check box when applying a decal on planar faces, cylinders, and conical faces. The decal conforms to the face shape without distortion or projection.
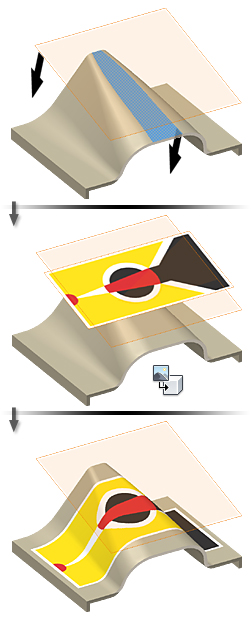
The following image shows decal placement with Wrap To Face and Chain Faces selected.

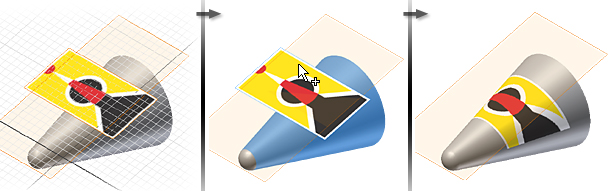
The following image shows decal placement on a cone, with Wrap To Face and Chain Faces selected.

The following image shows decal spanning spline, straight, and arc surfaces with Chain Faces selected.

Tips for creating decals that conform to face shape:
- The sketch plane with the decal image must be tangential or parallel to the face that receives the decal.
- The normal direction for both the sketch plane and the destination face (for the decal) must point in the same direction. Note: If the decal is not visible, the normal direction of the sketch plane is likely different from the face. If the sketch plane with the decal image is a work plane, edit the sketch. Then right-click the work plane and select Flip Normal to reorient the normal direction.
- The face that receives the decal must be equal to or larger than the decal. If smaller, the decal image is cut off.
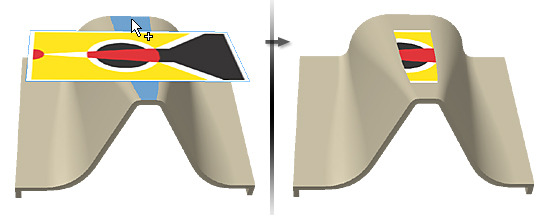
The following image shows the result of unrealistic decal placement.
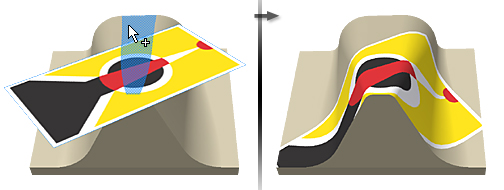
To apply the decal to adjacent faces, select the Chain Faces check box. Avoid positioning the decal image so that it overlaps a corner. The decal is cut off at the edge because it cannot smoothly wrap to both faces.
Decals applied without using Wrap to Face
Clear the Wrap to Face check box to apply a decal on cylindrical, toroidal, and other non-planar faces. The projection is normal to the sketch plane.
The following image shows decal placement with Wrap To Face and Chain Faces not selected.
The following image shows decal placement on a cone, with Wrap To Face and Chain Faces not selected.
When you clear the Wrap to Face check box, the selected faces do not have to be tangent to one another. Their position can be at any angle except normal. An example is a decal applied to a Frisbee face. The face is a cross-section of splines and arcs revolved into a disc shape.
Apply the decal:
- Across a boss or pocket. The decal does not "pour" into the pocket.
- On faces that are not perpendicular. The decal stops when it encounters a perpendicular face.
- On faces where the image is not distorted. For example, avoid sharp changes in angle; the image is projected when the selected face angles.
To apply the decal to adjacent faces, select the Chain Faces check box. Avoid positioning the decal image so that it overlaps a corner. The decal is cut off at the edge because it cannot smoothly wrap to both faces.
Decals created as a part
You can stock decals and assign part numbers. If this action is a requirement, consider creating the decal in its own part file. Then you can insert it into an assembly, and use assembly constraints to position it. For example you can position it across part seams.
Tips for creating a decal as a part:
- Place the decal on a thin part such as a surface so that it does not have thickness. For example, create a surface by extruding a line and placing a sketch on the surface.
- Remember to keep the normal of the decal the same direction as the destination face.
- Use dimensions and the extrusion distance to make the surface the exact size of the decal. If the surface is larger than the decal image, it forms a geometric "border", which makes it more difficult to position the decal.
- Round, oval, or elliptical decals are positioned inside a rectangle. Take the rectangle "border" into consideration when positioning the decal.
The following image shows sketch plane normal direction and projection plane normal direction in agreement.
The following image shows sketch plane normal direction and projection plane normal direction not in agreement.