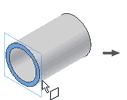
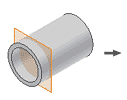
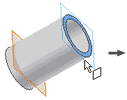
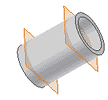
When authoring a tube and pipe iPart or a standard part, you must define the maximum engagement position ( MaxEP ). In addition to entering a precise fixed value or percentage of the nominal size, you can also specify a work plane before authoring, and then use it to define the MaxEP. The maximum engagement position is defined at the intersection of the work plane and the connection axis.
- Open the part file.
-
 On the ribbon, click
3D Model tab
 Work Features panel
 Plane
.
 - Use the existing work plane to create an offset work plane:
- When it is difficult to locate the work plane, highlight any geometry in the part. Right-click and select Select Other to navigate through available geometry. Click the middle green area to set the selection.
- Once the base work plane is selected, drag the cursor to the appropriate position, or use the Offset command to enter a precise value.
- If the base work plane is behind the front part, rotate the part to make it visible.
 To maintain the work plane position proportionally for authoring and publishing, click
3D Model tab
 Parameters panel
 Parameters
to define the offset values using the model parameter equations.


- Save the changes.
You can now use the new work plane to define the MaxEP during authoring.
-
 On the ribbon, click
Manage tab
 Author panel
 Create iPart
to convert the part to an iPart factory.Note: To author and publish a standard part with only one instance to the Content Center, omit this step.
 -
 On the ribbon, click
Manage tab
 Author panel
 Tube and Pipe
.
 - Define appropriate authoring parameters.
- After the connection point and connection axis is defined for a connection number, you can define the engagement information. In the Engagement, Max list, select To Plane/Point.
-
 Click Selection and click the work plane in the Model browser or graphics window.
 - Optionally, to use a work plane to define any other MaxEP of other connections, repeat Steps 7 and 8.
- After completing the required settings, click OK to save the authored part.
-
 On the ribbon, click
Manage tab
 Content Center panel
 Publish Part
.
 - Follow the Publish Guide to publish the part to the Content Center.