To apply materials with the custom Presenter rules
- Open the Presenter window, and click the Rules tab.
- Create a rule called “Color Index 9”, based on the materials by property template:
- From the Rules tab of the Presenter window, click New.
- Enter the rule name “Color Index 9”.
- Choose the Materials by property template.
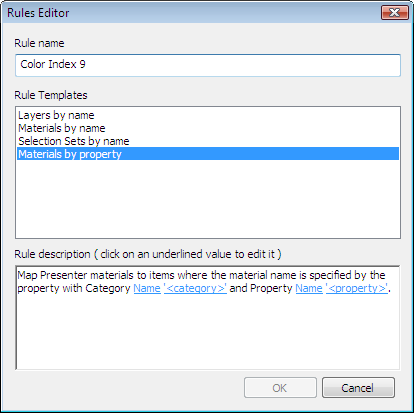
- Click '<category>' and choose Material from the drop-down list and click OK.
- Click '<property>' and choose Name from the drop-down list and click OK.
- Click OK to save the custom rule.
- Create another rule called “Color Index 32” using the same settings as before.
- Set up the necessary materials:
- From the Recommended\Glass archive on the Materials tab, drag the Window Glass material into the palette, press F2, and rename it as “AutoCAD Color Index 9”. Press Enter to save the new name. Note: The name of the Presenter material must match the name of the material saved in the original CAD file. You can view the material properties in the Properties window or on the Properties drop-down option on the Selection Tree.
- From the Recommended\Bricks archive on the Materials tab, drag the Red Brick material into the palette, press F2, and rename it as “AutoCAD Color Index 32”. Press Enter to save the new name.
- From the Recommended\Glass archive on the Materials tab, drag the Window Glass material into the palette, press F2, and rename it as “AutoCAD Color Index 9”. Press Enter to save the new name.
- Click the Rules tab and select the Color Index 9 and Color Index 32 rules.
- Ensure that only Override Any Current Exact Mappings is selected and click Apply, to apply the rules.
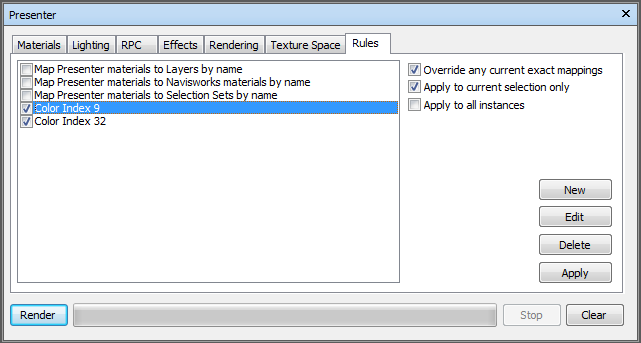
All items within the model scene that have the AutoCAD Color Index 9 and AutoCAD Color Index 32 properties should now have the corresponding Presenter materials applied to them.