Walkthrough: Add Hello World Ribbon Panel
In the Walkthrough: Hello World section you learn how to create an add-in application and invoke it in Revit. You also learn to create a .addin manifest file to register the add-in application as an external tool. Another way to invoke the add-in application in Revit is through a custom ribbon panel.
Create a New Project
Complete the following steps to create a new project:
- Create a C# project in Visual Studio using the Class Library template.
- Type AddPanel as the project name.
- Add references to the RevitAPI.dll and RevitAPIUI.dll using the directions in the previous walkthrough, Walkthrough: Hello World.
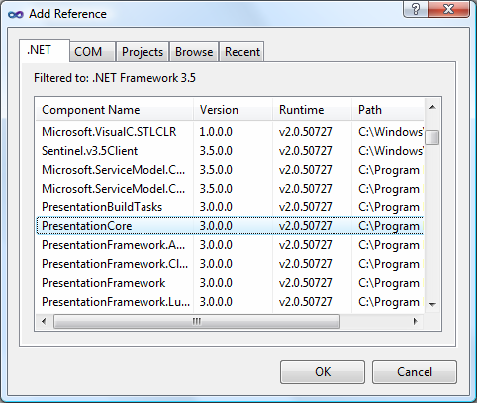
- Add the PresentationCore reference:
- In the Solution Explorer, right-click References to display a context menu.
- From the context menu, click Add Reference. The Add Reference dialog box appears.
- In the Add Reference dialog box, click the .NET Tab.
- From the Component Name list, select PresentationCore.
- Click OK to close the dialog box. PresentationCore appears in the Solution Explorer reference tree.

Figure 8: Add Reference
- Add the WindowsBase reference as well as System.Xaml following similar steps as above.
Change the Class Name
To change the class name, complete the following steps:
- In the class view window, right-click Class1 to display a context menu.
- From the context menu, select Rename and change the class' name to CsAddPanel.
- In the Solution Explorer, right-click the Class1.cs file to display a context.
- From the context menu, select Rename and change the file's name to CsAddPanel.cs.
- Double click CsAddPanel.cs to open it for editing.
Add Code
The Add Panel project is different from Hello World because it is automatically invoked when Revit runs. Use the IExternalApplication interface for this project. The IExternalApplication interface contains two abstract methods, OnStartup() and OnShutdown(). For more information about IExternalApplication, refer to Add-in Integration.
Add the following code to the file:
|
Code Region 2-5: Adding a ribbon panel |
using System;
using System.Reflection;
using Autodesk.Revit.DB;
using Autodesk.Revit.UI;
using System.Windows.Media.Imaging;

namespace Walkthrough
{
   /// <remarks>
   /// This application's main class. The class must be Public.
   /// </remarks>
   public class CsAddPanel : IExternalApplication
   {
      // Both OnStartup and OnShutdown must be implemented as public method
      public Result OnStartup(UIControlledApplication application)
      {
         // Add a new ribbon panel
         RibbonPanel ribbonPanel = application.CreateRibbonPanel("NewRibbonPanel");

         // Create a push button to trigger a command add it to the ribbon panel.
         string thisAssemblyPath = Assembly.GetExecutingAssembly().Location;
         PushButtonData buttonData = new PushButtonData("cmdHelloWorld",
            "Hello World", thisAssemblyPath, "Walkthrough.HelloWorld");

         PushButton pushButton = ribbonPanel.AddItem(buttonData) as PushButton;

         // Optionally, other properties may be assigned to the button
         // a) tool-tip
         pushButton.ToolTip = "Say hello to the entire world.";

         // b) large bitmap
         Uri uriImage = new Uri(@"D:\Sample\HelloWorld\bin\Debug\39-Globe_32x32.png"");
         BitmapImage largeImage = new BitmapImage(uriImage);
         pushButton.LargeImage = largeImage;

         return Result.Succeeded;
      }

      public Result OnShutdown(UIControlledApplication application)
      {
         // nothing to clean up in this simple case
         return Result.Succeeded;
      }
   }
   /// <remarks>
   /// The "HelloWorld" external command. The class must be Public.
   /// </remarks>
   [Autodesk.Revit.Attributes.Transaction(Autodesk.Revit.Attributes.TransactionMode.Manual)]
   public class HelloWorld : IExternalCommand
   {
      // The main Execute method (inherited from IExternalCommand) must be public
      public Autodesk.Revit.UI.Result Execute(ExternalCommandData revit,
          ref string message, ElementSet elements)
      {
         TaskDialog.Show("Revit", "Hello World");
         return Autodesk.Revit.UI.Result.Succeeded;
      }
   }
}
|
Build the Application
After completing the code, build the application. From the Build menu, click Build Solution. Output from the build appears in the Output window indicating that the project compiled without errors. AddPanel.dll is located in the project output directory.
Create the .addin manifest file
To invoke the application in Revit, create a manifest file to register it into Revit.
- Create a new text file using Notepad.
- Add the following text to the file:
Code Region 2-6: Creating a .addin file for the external application
<?xml version="1.0" encoding="utf-8" standalone="no"?> <RevitAddIns> <AddIn Type="Application"> <Assembly>D:\Sample\AddPanel\AddPanel\bin\Debug\AddPanel.dll</Assembly> <AddInId>604b1052-f742-4951-8576-c261d1993108</AddInId> <FullClassName>Walkthrough.CsAddPanel</FullClassName> <VendorId>NAME</VendorId> <VendorDescription>Your Company Information</VendorDescription> </AddIn> </RevitAddIns> - Save the file as HelloWorldRibbon.addin and put it in the following location:
- For Windows XP - C:\Documents and Settings\All Users\Application Data\Autodesk\Revit\Addins\2014\
- For Vista/Windows 7 - C:\ProgramData\Autodesk\Revit\Addins\2014\
Refer to Add-in Integration for more information about .addin manifest files.
Debugging
To begin debugging, build the project, and run Revit. A new ribbon panel appears on the Add-Ins tab named NewRibbonPanel and Hello World appears as the only button on the panel, with a large globe image.

Figure 9: Add a new ribbon panel to Revit
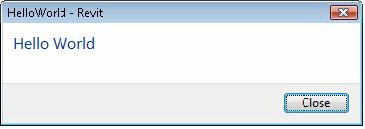
Click Hello World to run the application and display the following dialog box.

Figure 10: Hello World dialog box