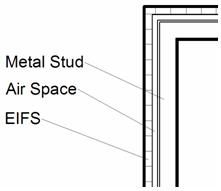
Use a material tag to identify the type of material used for an element or a layer of an element. Revit stores this information in the Description field of the Material Editor. (See Changing Material Identity Data.)
Before using this procedure, load the necessary material tags for those elements that need a tag. You can also keynote materials, see Differences Between Keynoting and Tagging a Material.
- Click Annotate tab
 Tag panel
 (Material Tag).
 - On the Options Bar:
- To set the orientation of the tag, select Vertical or Horizontal.
After you place the tag, you can change its orientation by selecting the tag and pressing Spacebar.
- If you want the tag to have a leader line, select Leader.
- To set the orientation of the tag, select Vertical or Horizontal.
- Highlight the material to tag within the element, and click to place the tag.
You can move the end of the leader to a new material, and the new material will display in the material tag.
Note: You can highlight the material before you select it by moving the cursor over the material. The material must be displayed by setting the detail level to medium or fine. If the material is not visible, the tag will not display properly.

If the material tag displays a question mark (?), the Description field of the Identity tab for the element’s material is blank. You can double-click the question mark and enter a description of the material. Revit automatically completes the Description field with this value.
Related topics