Moving Elements
The ElementTransformUtils class provides two static methods to move one or more elements from one place to another.
Table 19: Move Methods
|
Member |
Description |
|
MoveElement( Document, ElementId, XYZ) |
Move an element in the document by a specified vector. |
|
MoveElements(Document, ICollection<ElementId>, XYZ) |
Move several elements by a set of IDs in the document by a specified vector. |
- The methods cannot move a level-based element up or down from the level. When the element is level-based, you cannot change the Z coordinate value. However, you can place the element at any location in the same level. As well, some level based elements have an offset instance parameter you can use to move them in the Z direction.
For example, if you create a new column at the original location (0, 0, 0) in Level1, and then move it to the new location (10, 20, 30), the column is placed at the location (10, 20, 0) instead of (10, 20, 30).
Code Region 10-1: Using MoveElement()
public void MoveColumn(Autodesk.Revit.DB.Document document, FamilyInstance column) { // get the column current location LocationPoint columnLocation = column.Location as LocationPoint; XYZ oldPlace = columnLocation.Point; // Move the column to new location. XYZ newPlace = new XYZ(10, 20, 30); ElementTransformUtils.MoveElement(document, column.Id, newPlace); // now get the column's new location columnLocation = column.Location as LocationPoint; XYZ newActual = columnLocation.Point; string info = "Original Z location: " + oldPlace.Z + "\nNew Z location: " + newActual.Z; TaskDialog.Show("Revit",info); } - When you move one or more elements, associated elements are moved. For example, if a wall with windows is moved, the windows are also moved.
- Pinned elements cannot be moved.
Another way to move an element in Revit is to use Location and its derivative objects. In the Revit Platform API, the Location object provides the ability to translate and rotate elements. More location information and control is available using the Location object derivatives such as LocationPoint or LocationCurve. If the Location element is downcast to a LocationCurve object or a LocationPoint object, move the curve or the point to a new place directly.
|
Code Region 10-2: Moving using Location |
bool MoveUsingLocationCurve(Autodesk.Revit.ApplicationServices.Application application, Wall wall)
{
        LocationCurve wallLine = wall.Location as LocationCurve;
        XYZ translationVec = new XYZ(10, 20, 0);
        return (wallLine.Move(translationVec));
}
|
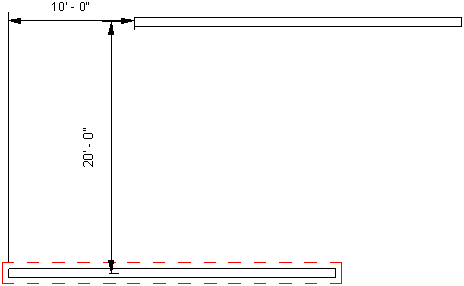
When you move the element, note that the vector (10, 20, 0) is not the destination but the offset. The following picture illustrates the wall position before and after moving.

Figure 30: Move a wall using the LocationCurve
In addition, you can use the LocationCurve Curve property or the LocationPoint Point property to move one element in Revit.
Use the Curve property to move a curve-driven element to any specified position. Many elements are curve-driven, such as walls, beams, and braces. Also use the property to resize the length of the element.
|
Code Region 10-3: Moving using Curve |
void MoveUsingCurveParam(Autodesk.Revit.ApplicationServices.Application application, Wall wall)
{
    LocationCurve wallLine = wall.Location as LocationCurve;
    XYZ p1 = XYZ.Zero;
    XYZ p2 = new XYZ(10, 20, 0);
    Line newWallLine = Line.CreateBound(p1, p2);

    // Change the wall line to a new line.
    wallLine.Curve = newWallLine;
}
|
You can also get or set a curve-based element's join properties with the LocationCurve.JoinType property.
Use the LocationPoint Point property to set the element's physical location.
|
Code Region 10-4: Moving using Point |
void LocationMove(FamilyInstance column)
{
        LocationPoint columnPoint = column.Location as LocationPoint;
        if (null != columnPoint)
        {
                XYZ newLocation = new XYZ(10, 20, 0);
                // Move the column to the new location
                columnPoint.Point = newLocation;
        }
}
|