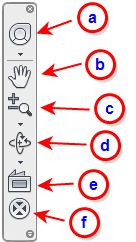
By default, the navigation bar appears on the right side of the graphics window. To activate a navigation action, click a button on the bar. Some of the buttons have additional tools in a sub-menu. To access these, click the small arrow below the button.
These are the buttons on the Simulation CFD Navigation bar:

- Steering Wheels: Collection of "wheel" tools that provide on-model navigation capabilities. For more information about Steering Wheels, click here.
- Pan: Moves the view parallel to the screen.
- Zoom: Set of tools to increase or decrease the magnification of the current view.
- Orbit: Set of tools that rotate the current view.
- Look At: View faces of a model from a selected plane.
- Center: Change the center of rotation by clicking a point on the model. The model moves so that the selected point is at the center of the screen.
Modify the position and orientation of Navigation Bar
The default location of the navigation bar is in the upper, right corner of the graphics window. You can change its position with the Customize menu. To open the Customize menu, click the small arrow in the lower, right corner of the navigation bar:

There are several ways to control the Navigation bar position and orientation:
- To tie the Navigation bar and the ViewCube together, select Link to Viewcube from the Docking positions menu. To change the on-screen position, select one of the locations from the Docking positions menu.
- To position the Navigation bar independently of the ViewCube, deselect Link to Viewcube from the Docking positions menu. Drag the top edge of the bar to any edge of the graphics window. The Navigation bar appears horizontally when docked to either the top or bottom edges.
Customize the Navigation Bar
To exclude or include specific navigation commands on the navigation bar, deselect or select them from the Customize menu.
Note: You cannot change the position of the navigation commands on the navigation bar, only the visibility.