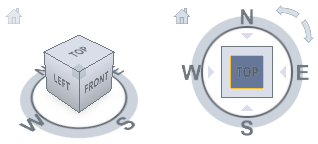
Control the ViewCube Appearance
The ViewCube tool displays as either inactive or active. When inactive, it appears partially transparent by default so that it does not obscure the view of the model. When active, it is opaque and may obscure the view of the objects in the graphics window.
These are some of the most commonly used ViewCube appearance tools:
- Right-click the ViewCube, and click Properties.
- In the ViewCube Properties dialog box, select one of the available positions from the On-screen Position drop-down list.
- Click OK.
To control the position of the ViewCube
- Right-click the ViewCube, and click Properties.
- In the ViewCube Properties dialog box, select an option from the ViewCube Size drop-down list.
- Click OK.
To control the size of the ViewCube
- Right-click the ViewCube, and click Properties.
- In the ViewCube Properties dialog box, select an option from the Inactive Opacity drop-down list.
- Click OK.
To control the inactive opacity of the ViewCube
The Compass
The compass appears below the ViewCube tool and indicates the cardinal directions for your model. To rotate the model, click a cardinal direction letter on the compass.
To interactively rotate the model around the pivot point, click and drag one of the cardinal direction letters or the compass ring.

- Right-click the ViewCube, and click Properties.
- In the ViewCube Properties dialog box, under Compass, select Show the Compass.
The compass is displayed beneath the ViewCube and indicates the direction of North for the model.
- Click OK.
To display the compass below the ViewCube
For additional ways to control the ViewCube appearance and behavior, please see the following topics: