Autodesk Simulation Moldflow provides easy-to-use tools that simulates the injection molding process, which allows the user to optimize the part, mold, and tool designs long before manufacturing begins. By using a digital prototype to simulate the injection molding process, you can reduce the number of physical prototypes required to perfect a design and get your products to market faster.
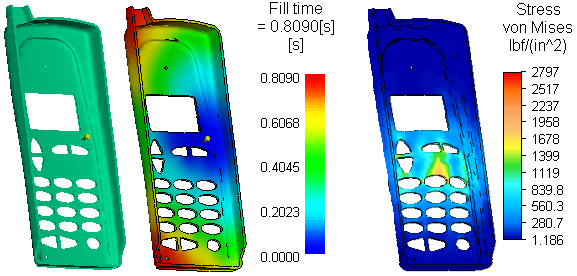
Because injection molding can result in materials that are anisotropic in nature (different properties in different directions) and with varying orientation of the fibers throughout the part, performing a Moldflow analysis and incorporating the results in the Simulation Mechanical stress analysis will provide a more accurate simulation.
Limitations
The following items are not considered in the Simulation Mechanical analysis when using results from Moldflow:
- Residual stress from Moldflow Adviser analyses. The parts are assumed to start with 0 initial stress. Moldflow Insight results, however, do provide residual stresses.
- Nonlinear material properties. The material is assumed to be elastic.
- In Mechanical Event Simulation, small strains are assumed; that is, the direction of the material axes is not updated throughout the analysis due to the deformation (strain) of the elements. The material directions are updated based on rigid body motion.
Use Simulation Moldflow Results
The general workflow in Simulation Mechanical is as follows:
- Create the model as usual - mesh, loads, boundary conditions, and so forth.
Important: Each part within a Simulation Moldflow model must consist of a single contiguous volume. Multiple parts (assemblies) are allowed as long as each individual part consists of a single volume. Though Simulation Mechanical and many CAD applications allow a part to consist of multiple volumes, this practice must be avoided to ensure interoperability with Simulation Moldflow. Avoid using symmetry models. Although this technique is commonly used for stress analysis, the injection molding process is rarely symmetrical in nature. The plastic parts need to use one of the following supported element types:
Analysis Type Brick elements Tetrahedral elements Linear yes no MES/Nonlinear yes yes - For parts that correspond to the plastic part(s) to be analyzed in Moldflow, set the Element Definition: Material Model to Moldflow. This is an anisotropic material model.
- Select a material as usual. When the material model is set to Moldflow, the library will automatically show the Autodesk Simulation Plastics Library. A different library cannot be chosen, and a custom material cannot be entered. Note: The homogeneous isotropic properties from the library are shown. The analysis will get the actual anisotropic properties from Moldflow.
- Perform an Analysis
 Analysis Check Model.
 - Export the model to Moldflow using
 Export Moldflow Adviser or Moldflow Insight. This will display a Browse For Folder dialog; select a folder where the Moldflow project will be created. Each Moldflow part in the Autodesk Simulation will create a different Moldflow study within the Moldflow project. Optionally, activate the Start Autodesk Moldflow after exporting checkbox if ready to run Moldflow. Note:
- Autodesk Moldflow Insight performs various analyses, including both residual stress and coefficient of thermal expansion (CTE).
- Autodesk Moldflow Adviser performs a subset of the analyses available with Moldflow Insight. Adviser also supports CTE, but does not support residual stress.
The Moldflow project is located in a folder underneath the user-selected folder. The folder and project names default to name of the Autodesk Simulation model. The default name for each study is the Autodesk Simulation part number and part name. Spaces, dashes, and other special characters in the names are changed to underscores (_) in the Moldflow name.
In Autodesk Moldflow:
- If Moldflow was not started when the model was exported from Simulation Mechanical, start Moldflow.
- Open the project and make any changes as desired to the setup. Then, perform a Fill+Pack analysis on each study (each part from Simulation Mechanical). Refer to the Simulation Moldflow help documentation for instructions.
- Review the results, as usual.
In Simulation Mechanical:
- If any Moldflow results are in a study different than the one to which the Autodesk Simulation model was exported, browse for the location:
- Click Moldflow Study Manager.
- Click the cell showing the Associated Moldflow Study File for the part .
- Click the
 browse button.
 - Select the appropriate file and click Open.
- Click OK to close the Study Manager.
- Click
- Start the analysis (Analysis Analysis Run Simulation). If the material was changed in Moldflow, the new material will show in Autodesk Simulation after the stress analysis is performed.
- Review the results, as usual. Note that results related to the Moldflow analysis, including the orientation of the fibers, must be viewed in Moldflow.
Hints and Tips
- Moldflow generates its own mesh based on the outside surface mesh from the part in Autodesk Simulation. Therefore, all curved surfaces are approximated as faceted faces - the finer the mesh, the more accurate the approximation of the curved surface. This may affect how fine you make the mesh density to satisfy the needs of the injection model.
- Once the Moldflow results are computed, the Autodesk Simulation model can be analyzed multiple times to test different boundary conditions, loads, and so on. In theory, the mesh can be changed in Autodesk Simulation without needing to export the revised model to Moldflow. The only time that the model needs to be exported to Moldflow is if the position or shape of the plastic parts change.
- Moldflow does not need to be installed on the same computer as Simulation Mechanical. The user can export the model to the local computer, copy the exported project files to a computer with Moldflow, run the Moldflow analysis, and copy the project files (and results) back to the Simulation Mechanical computer.
- Remember that the material properties shown in Autodesk Simulation, when selecting or modifying the materials for each part, and the properties in the Report are generalized isotropic properties. Use these as a reference only. The actual material properties - which may be different at each element - are derived from the Moldflow analysis.
If the stress model is archived (see the page Opening Models: Archives), keep in mind that the Moldflow results are in a separate model and therefore are not included in the stress model archive. The Moldflow results should be exported to a ZIP archive separately.