Create a blank Fusion model and assign it a name. Create three blank components within the model and specify a name for each of these.
- From the Windows Start Menu, start Inventor Fusion (Start
 All Programs Autodesk Inventor Fusion 20xx).
 - If the Welcome to Inventor Fusion window appears, click the
 New icon within this window. Otherwise, in the Quick Access Toolbar (QAT), click New. A blank model will be created.
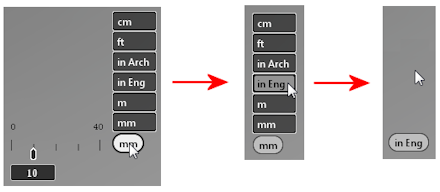
 - Place the mouse cursor over the model units indicator near the lower right corner of the Fusion window.
- A list of available length units will appear.
- Click in Eng to select English inch (Engineering) units.
- At the top of the browser, near the upper left corner of the display window, select the default model name text (Document1) and change it to Circuit Board. Tip: Double-click the heading to enter text editing mode. The whole model name should be selected (highlighted). If not, click and drag to select the whole model name. Finally, type the new name to replace the selected text and hit Enter.
- Create and name three components within the model assembly, as follows:
- Right-click the Circuit Board heading at the top of the browser and select New Component. Do this three times to create three Component subheadings.
- In the same way that the model was renamed in step 4, rename the first component to Board.
- Rename the second component to Chip.
- Rename the third component to Edge Connectors.
- In the QAT, click
 Save.
Save. - Navigate to the folder where you want your CAD model and subsequent Autodesk Simulation tutorial model to be located. Notice that the model already has the default name, Circuit Board.dwg.
- Click the Save button.