Autodesk® ViewCube® navigation tool provides visual feedback of the current orientation of a model. You can use the ViewCube to adjust the viewpoint of the model.
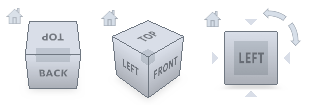
The ViewCube tool is a persistent, clickable and draggable interface that you use to switch between standard and isometric views of your model. When you display the ViewCube tool, it is shown in one of the corners of the window over the model in an inactive state. The ViewCube tool provides visual feedback about the current viewpoint of the model as view changes occur. When the cursor is positioned over the ViewCube tool, it becomes active. You can drag or click the ViewCube, switch to one of the available preset views, roll the current view, or change to the Home view of the model.
Control Appearance of ViewCube
The ViewCube tool is displayed in one of two states: inactive and active. When the ViewCube tool is inactive, it appears partially transparent by default so that it does not obscure the view of the model. When active, it is opaque and may obscure the view of the objects in the current view of the model.
In addition to controlling the inactive opacity level of the ViewCube tool, you can also control the following properties for the ViewCube tool:
- Size
- Position
- Default orientation
- Compass display
Use the Compass
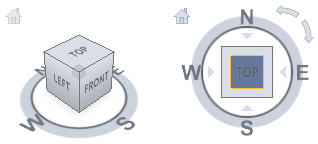
The compass is displayed below the ViewCube tool and indicates which direction North is defined for the model. You can click a cardinal direction letter on the compass to rotate the model, or you can click and drag one of the cardinal direction letters or the compass ring to interactively rotate the model around the pivot point.
Drag or Click the ViewCube Tool
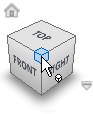
When you drag or click the ViewCube tool, the view of the model reorients around a pivot point. The pivot point is displayed at the center of the object that was last selected before using the ViewCube tool.
Control the ViewCube
- Right-click the ViewCube, and click Properties.
- In the ViewCube Properties dialog box, select one of the available positions from the On-screen Position drop-down list.
- Click OK.
To control the position of ViewCube
- Right-click the ViewCube, and click Properties.
- In the ViewCube Properties dialog box, select an option from the ViewCube Size drop-down list.
- Click OK.
To control the size of ViewCube
- Right-click the ViewCube, and click Properties.
- In the ViewCube Properties dialog box, select an option from the Inactive Opacity drop-down list.
- Click OK.
To control the inactive opacity of ViewCube
- Right-click the ViewCube, and click Properties.
- In the ViewCube Properties dialog box, under Compass, select Show the Compass.
The compass is displayed beneath the ViewCube and indicates the direction of North for the model.
- Click OK.
To display the compass below ViewCube
ViewCube Menu
Use the ViewCube menu to restore and define the Home view of a model, switch between view projection modes, and change the interactive behavior and appearance of the ViewCube. To display the ViewCube menu, do one of the following:
- Right-click on the compass, Home icon, or the main area of the ViewCube.
- Click the context menu button located near the ViewCube.
The ViewCube menu has the following options:
ViewCube
| Home | The default view of the model. You can change the default view using Set current view as home. You can navigate to the Home position by selecting this option from the context menu or by clicking the Home icon displayed just above the ViewCube. |
|
Orthographic |
A display mode where all points of a model are projected along parallel lines to the screen. |
|
Perspective |
A display mode where a model is displayed in three-point perspective, very similar to the way objects in the real world are perceived by the human eye. |
|
Lock to selection |
The center and distance does not change regardless of whether objects are selected or deselected. |
|
Set current view as Home |
Defines the current view as the default view:
|
|
Set current view as Front view |
Set the ViewCube orientation relative to the model by aligning the current view to look at the FRONT of the model, then use Set current view as with the appropriate selection. The ViewCube Bottom view determines the orientation of the model ground plane. Redefining the ViewCube affects the model ground plane, ground shadows, and ground reflections. |
|
Reset Front |
Rests the front view to the default setting. |
|
Properties |
Opens the ViewCube Properties dialog box. |
|
Help Topics |
Launches the online Help system and displays the topic on the ViewCube. |
ViewCube Properties
 |
Sets the preferences for working with the ViewCube. |
|
Access: |
Click |


Application Options
|
Set preferences for the display of the ViewCube |
|
|
Show the ViewCube |
When the check box is enabled, the ViewCube displays in the graphics window by default. |
|
On-screen Position |
The ViewCube can be placed in any corner of the screen by selecting one of the items in the On-screen Position combo box control: Top Right, Bottom Right, Top Left, or Bottom Left. |
|
ViewCube Size |
Sets the ViewCube size to Tiny, Small, Normal, or Large. |
|
Inactive Opacity |
When the cursor is in the vicinity of the ViewCube, the cube and all the additional controls are displayed, fully opaque. When the cursor is distant from the ViewCube, the ViewCube may be displayed at reduced opacity. Specifies the opacity display when the cursor is distant (inactive) from the ViewCube. |
|
Keep scene upright |
When clicking on edges, corners, or faces of the ViewCube, the orientation algorithm normally attempts to turn the viewpoint so that upside-down orientations of the scene are avoided. |
Drag the ViewCube
Snap to closest view: While being dragged, the ViewCube and the scene rotate like an arcball. If Snap to closest view is selected, the viewpoint snaps to one of the fixed views when it is angularly close to one of the fixed views.
Click the ViewCube
|
Set preferences for clicking on the ViewCube. |
|
|
Fit-to-View on view change |
If selected, clicking the ViewCube rotates around the center of the scene and zooms out to fit the scene into the viewport. When dragging the ViewCube, the view changes to look at the scene center prior to the drag (but does not zoom) and continues to use that as the pivot point while dragging. If not selected, clicking or dragging the ViewCube rotates around the current pivot point and does not zoom in or out. |
|
Use animated transitions when switching views |
An animated transition displays when you click on a section of the ViewCube to help visualize the spatial relationship between the current viewpoint and the selected viewpoint. Note: When navigating about 3D scenes that contain vast amounts of geometry, the application frame rate can drop significantly and make it difficult for the system to smoothly animate a viewpoint transition.
|
Compass
|
Set preferences for the display of the Compass. By default, the display is off. |
|
|
Show the Compass |
Sets the preference for the display of the Compass. |
|
Angle of North |
Sets the angle between the ViewCube FRONT face and the Compass direction North. |