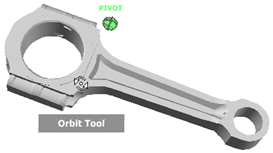
You use the Orbit tool to change the orientation of a model. The cursor changes to the Orbit cursor. As you drag the cursor, the model rotates around a pivot point while the view remains fixed.
Specify Pivot Points
The pivot point is the base point used when rotating the model with the Orbit tool. You can specify the pivot point in the following ways.
When in the orbit command, right-click the display area to show a context menu.
- If within snap distance of a vertex, the context menu includes Rotate on Vertex. This defines the selected vertex as the rotation center.
- Select Rotate on Model Center to rotate about the center of the bounding box that encloses the model.
- Select Specify Center of Rotation to access a dialog where you enter the X, Y, and Z coordinates of the appropriate rotation point.
Otherwise, the model rotates about the pivot point you set with the zoom tool.
Maintain Rotation Direction
By default, the Orbit Tool does not constrain the axis of rotation. You can control how the model orbits around the pivot point by choosing one of the following:
- If you want the model to rotate about one of the global axes, hold down the X, Y, or Z key. Keep the key pressed down while you rotate the model.
- Use the arrow keys on the keyboard to rotate the model in uniform increments. Press the right and left arrow keys to rotate the model about the vertical axis on the screen. Press the up and down arrow keys to rotate the model about the horizontal axis on the screen. Hold the S key and press arrow keys to rotate the model about the axis normal to the screen. Hold the X, Y, or Z key and press any arrow key to rotate about the respective axis. Each time you press an arrow key, the view rotates by the amount specified in the Rotation Increment field in the Graphics tab of the Tools: Options dialog.
- From the Navigation Bar, choose Orbit (Constrained). This allows you to rotate the model about the model's vertical axis. (The vertical is based on the definition of the Front view.)
Tip:
- When a model is rotated, the following options control whether the shaded model is shown or just the wire frame. (The wire frame display is faster.)
- For the FEA Editor environment, use the

 Options FEA Editor tab and choose the option in the When model is moving section.
 - For the Results environment, use the Results Options View No Shading When Moving Model command.
- For the FEA Editor environment, use the