The Vault client and the add-in clients each have an options page to help you customize your Vault experience. Refer to the section for your client for more information.
Vault Client Options
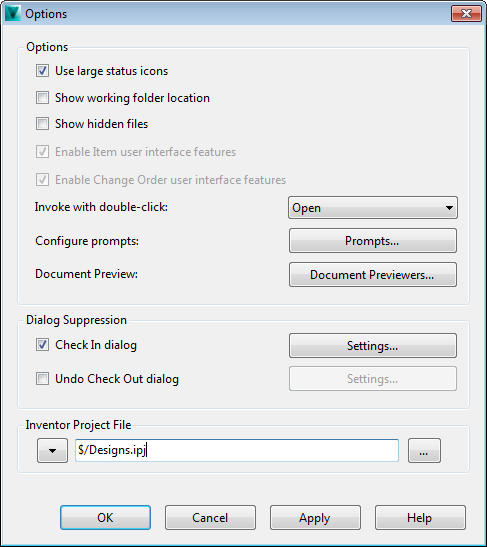
The Options dialog box in the Vault stand-alone client allows you to customize as well as streamline your workflow by suppressing certain dialog boxes and prompts.
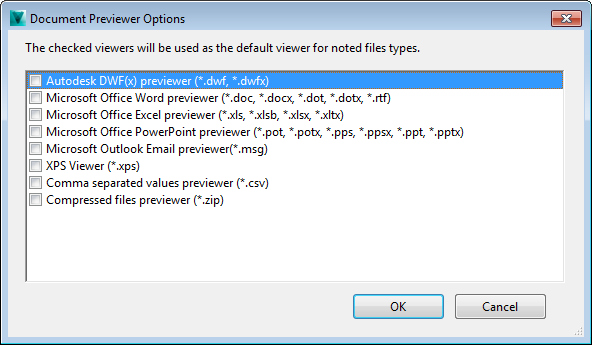
You can also enable the document previewer. The document previewer allows you to preview a document in the preview pane without launching the application associated with the document.
Access the Options Dialog
- From within Autodesk Vault, select .

Options Dialog Details
- Use large status icons
- By default, small icons are used to indicate status. Turn on the Use large status icons check box to display large icons. Note: The Vault client must be restarted to see the large status icons.
- Show working folder location
- By default, the location of the working folder is not displayed. Turn on the Show working folder location in title bar check box to display the location of the working folder in the interface.
- Show hidden files
- You can choose whether or not to display the automatically generated .dwf files. By default, they are hidden in the file list. Turn on the Show hidden files check box to display the hidden files in the file list.
- Enable Items user interface features
- If the administrator has authorized overrides, you can enable the Items interface by selecting the Enable item user interface features check box.
- Enable Change Order user interface features
- If the administrator has authorized overrides, you can enable the Change Orders interface by selecting the Enable change order user interface features check box.
- Invoke with double-click
- Configure the default behavior for double-clicking a file with the Invoke with double-click setting. When you double-click a file in the vault, the default action is to display the read-only file in a new window. If Open is selected as the default, the file is checked out of the vault and opened in the associated application for editing. To change the default action, select an action from the drop-down list. Note: Inventor .dwg files are opened in Inventor for editing. If Inventor is not installed, the .dwg file is opened in AutoCAD.
When you double-click a component in Product View, the default action is performed on the associated file.
- Configure Prompts
- You can specify the default response for common dialogs so that every time certain dialogs are displayed, your preferred response is the default selection. You can also specify which commands are automatically performed without prompting you for input, reducing the number of times you need to directly interact with the vault.
- Document Preview
- A list of applications installed on your current system are listed in the Document Previewer Options dialog. Here you can enable certain applications for previewing documents in the Preview Pane.

By default, the Autodesk Vault preview carousel view is used.
- Check In dialog
-
The Check In dialog has settings associated with it. You can specify default values for the dialog and choose whether or not the dialog actively prompts you while working with files in a vault.
- Undo Check Out dialog
-
The Undo Check Out dialog has settings associated with it. You can specify default values for the dialog and choose whether or not the dialog actively prompts you while working with files in a vault.
- Inventor Project File Field
- When working with Autodesk Inventor files in Vault, Inventor project files are involved in path change operations for Inventor files (such as renaming a file, moving a file, copy design or replace). You can select whether to use the default Inventor Project File configured by your Administrator, or if you want to use the last Vault controlled project file checked into the Vault with the Inventor Vault add-in.
Vault Add-in Options
There are several ways to streamline your vault workflow. You can specify the default response for common dialogs so that every time certain dialogs are displayed, your preferred response is the default selection. You can also specify which commands are automatically performed without prompting you for input, reducing the number of times you need to directly interact with the vault.
Application settings and dialog suppression options vary, depending on the add-in. Refer to the section for your particular add-in for more information about the settings available.
AutoCAD Vault Add-in
Access Application Options
- Click Options on the Vault ribbon.
Edit Options
- By default, small icons are used to indicate status. Turn on the Use large status icons check box to display large icons.
- Turn on Ignore AutoCAD View only changes to manipulate the view in the drawing file through panning, zooming, and so on, without being prompted to check out the drawing files.
- Click Prompts to manage the default responses to prompts and the frequency with which you are prompted during your work session.
Inventor Vault Add-in
Access Vault Options
- Select Vault Options from the Autodesk Vault ribbon.
Options
- By default, small icons are used to indicate status. Turn on the Use large status icons check box to display large icons.
- Select the Generate file numbers for drawing and presentation files if you want Vault to automatically create a number for these files. Note: A file numbering scheme must already be defined by your administrator. Refer to Manage Numbering Schemes for more information.
- Click Prompts to manage the default responses to prompts and the frequency with which you are prompted during your work session.
Dialog Suppression
- Turn on the check box next to a dialog box name to suppress that dialog.
- Click Settings to specify whether or not to include child and parent files when the dialog is suppressed, and .dwf attachment options.
- Click OK.
Revit Vault Add-in
To best use the Vault Revit Add-in, folder mappings should be configured to at least the top level folder of the Revit projects, Revit Server, or Revit Central file locations. The folder mapping capability provides an easy and flexible way to map multiple folder structures between Vault and the Revit Server to help streamline collaboration.
To optimize collaboration, configure sharing and mapping options in Revit.
Access the Vault Options Dialog
- Click Options on the Vault Ribbon tab to launch the Vault Options dialog.
Autodesk Vault Office
The following dialog boxes can be suppressed, making your vault experience more transparent within your everyday tasks:
- Check In
- Check In dialog on close
Each dialog has settings associated with it. You can specify default values for these dialogs and choose whether or not the dialogs actively prompt you while working with files in a vault.
Set Application Options
Access Application Options
- Select Options from the Autodesk Vault ribbon.
Prompts
- Click Prompts to manage the default responses to prompts and the frequency with which you are prompted during your work session.
Dialog Suppression
- Turn on the check box next to a dialog box name to suppress that dialog.
- Click Settings to specify which options to use for the corresponding dialog when it is suppressed.
- Click OK.
Other Vault Add-ins
Depending on your particular add-in, one or more of the following dialog boxes can be suppressed, making your vault experience more transparent with your everyday tasks:
- Check In
- Undo Check Out
- Check In dialog on file close
- Check Out dialog on file open
Each dialog has settings associated with it. You can specify default values for these dialogs and choose whether or not the dialogs actively prompt you while working with files in a vault.
Access Vault Application Settings
- Select Vault Options from the Autodesk Vault ribbon.
Or select
Options
- By default, small icons are used to indicate status. Turn on the Use large status icons check box to display large icons.
- Click Prompts to manage the default responses to prompts and the frequency with which you are prompted during your work session.