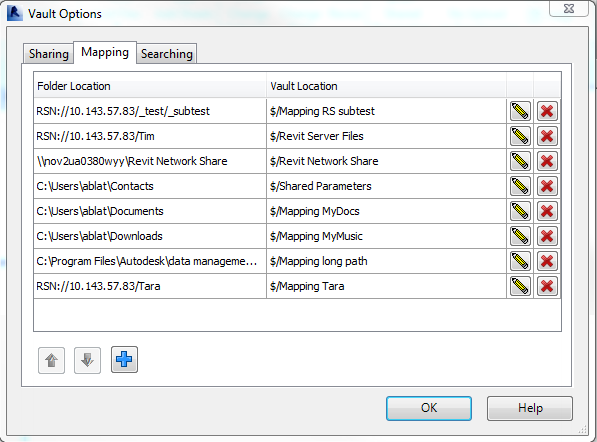
Map any local, network, or Revit server folder to any Vault folder on the Mapping tab of the Vault Options dialog.

Create a New Mapping
- Click Options on the Vault Ribbon tab to launch the Vault Options dialog.
- Selecting the Mapping tab.
- Click Add
 to launch the Create Mapping wizard.
 - Select whether you want to map a local folder or Revit Server folder to a folder in Vault.
- Enter the path for the folder or click the ellipses to browse for the folder location. Tip: If you want to map to a network shared folder (\\), enter the beginning of the network path in the browse field (e.g., \\network879). This way, you do not have to manually navigate to the network directory which can be time-consuming, depending on the size of the network and speed of your connection.
- If browsing, select the folder that you want to map. Note: If you choose to map to a Revit Server folder, the Next button is disabled until a valid folder is selected.
- Click Next.
The Create Mapping wizard validates the specified path.
- On the Select the Vault folder screen of the Create Mapping wizard, enter the path or click the ellipses (...) to browse to the Vault folder to which you will map your file system or Revit Server folder.
- Click next to validate the mapping.
If the mapping is valid, a confirmation displays showing the new mapping configuration.
If the mapping is not valid, an error message displays and the wizard displays the attempted settings. An error may occur if one or both of the folders being mapped are already part of an existing mapping configuration. Modify your mapping settings and click Next to validate the changes.
- Click Finish to close the wizard.
- Click OK on the Vault Options dialog to save your mapping changes. Important: If you do not click OK on the Vault Options dialog, your mapping changes are not saved.
Edit a Mapping
- Click Options on the Vault Ribbon tab to launch the Vault Options dialog.
- Selecting the Mapping tab.
- Click Edit
 to launch the Edit Mapping wizard.
 - If needed, modify the path of the folder being mapped on the Select folder to be mapped screen of the wizard.
- Click Next.
- If needed, modify the path of the Vault folder to which the file system or Revit Server folder is being mapped.
- Click next to validate the mapping.
If the mapping is valid, a confirmation displays showing the new mapping configuration.
If the mapping is not valid, an error message displays and the wizard displays the attempted settings. An error may occur if one or both of the folders being mapped are already part of an existing mapping configuration. Modify your mapping settings and click Next to validate the changes.
- Click Finish to close the wizard.
- Click OK on the Vault Options dialog to save your mapping changes. Important: If you do not click OK on the Vault Options dialog, your mapping changes are not saved.
Delete a Mapping
- Click Options on the Vault Ribbon tab to launch the Vault Options dialog.
- Selecting the Mapping tab.
- Select a mapping in the Mapping grid and click Delete
 .
. - Click Yes on the verification prompt to confirm that the mapping should be deleted.
- Click OK on the Vault Options dialog to save your mapping changes. Important: If you do not click OK on the Vault Options dialog, your mapping changes are not saved.
Reorder Mappings
- Click Options on the Vault Ribbon tab to launch the Vault Options dialog.
- Selecting the Mapping tab.
- Select one or more mappings and use the Move arrows
 to arrange the mapping in the preferred order.
 - Click OK on the Vault Options dialog to save your mapping changes. Important: If you do not click OK on the Vault Options dialog, your mapping changes are not saved.
Mappings are listed in order of priority.