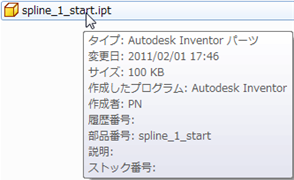
Inventor のファイルの名前にカーソルを合わせると、情報チップにそのファイルのプロパティが表示されます。

InfoTip.config という名前の .xml 設定ファイルが、情報チップの内容をコントロールします。設定ファイルの要素をカスタマイズして、情報チップに表示する情報をコントロールできます。設定ファイルは、次の場所にあります。
Windows 7 および Windows 8: C:¥ProgramData¥Autodesk¥Autodesk Inventor 2014¥InfoTip.config
Windows 7 および Windows 8 では、情報チップの内容がキャッシュされます。構成ファイルの更新内容を有効にするには、Windows システムを再起動するか、infotip.dll をレジストリに再登録する必要があります。infotip.dll をレジストリに登録するには、コマンド ラインで次のコマンドを実行します。
regsvr32 /u "C:¥Program Files¥Autodesk¥Inventor 2014¥Bin¥InfoTip.dll"
regsvr32 "C:¥Program Files¥Autodesk¥Inventor 2014¥Bin¥InfoTip.dll"
InfoTip.config ファイル全体を削除した場合は、その後 Inventor のファイルにカーソルを合わせたときに、新しい設定ファイルが生成され、表示されます。新しいファイルには、既定の設定が含まれます。
既定の設定
Inventor のファイルの名前にはじめてカーソルを合わせたときに、InfoTip.config ファイルが生成されます。次に示すように既定の設定には、[iProperty]ダイアログ ボックスでサポートされるプロパティのすべての項目が含まれます。
<PropertySetInformation>
<SummaryInformation>
<Property id="2" name="Title" exclude="yes"/>
<Property id="3" name="Subject" exclude="yes"/>
<Property id="4" name="Author" exclude="no"/>
<Property id="5" name="Keywords" exclude="yes"/>
<Property id="6" name="Comments" exclude="yes"/>
<Property id="9" name="Revision Number" exclude="no"/>
</SummaryInformation>
<DocumentSummaryInformation>
<Property id="2" name="Category" exclude="yes"/>
<Property id="14" name="Manager" exclude="yes"/>
<Property id="15" name="Company" exclude="yes"/>
</DocumentSummaryInformation>
<DesignTracking>
<Property id="4" name="Creation Date" exclude="yes"/>
<Property id="5" name="Part Number" exclude="no"/>
<Property id="7" name="Project" exclude="yes"/>
<Property id="9" name="Cost Center" exclude="yes"/>
<Property id="10" name="Checked By" exclude="yes"/>
<Property id="11" name="Checked Date" exclude="yes"/>
<Property id="12" name="Eng. Approved By" exclude="yes"/>
<Property id="13" name="Eng. Approved Date" exclude="yes"/>
<Property id="17" name="Status" exclude="yes"/>
<Property id="23" name="Web Link" exclude="yes"/>
<Property id="29" name="Description" exclude="no"/>
<Property id="30" name="Vendor" exclude="yes"/>
<Property id="34" name="Mfg. Approved By" exclude="yes"/>
<Property id="35" name="Mfg. Approved Date" exclude="yes"/>
<Property id="36" name="Estimated Cost" exclude="yes"/>
<Property id="40" name="Design State" exclude="yes"/>
<Property id="41" name="Designer" exclude="yes"/>
<Property id="42" name="Engineer" exclude="yes"/>
<Property id="43" name="Authority" exclude="yes"/>
<Property id="55" name="Stock Number" exclude="no"/>
<Property id="67" name="Last Update With" exclude="yes"/>
</DesignTracking>
<DesignTrackingControl>
<Property id="5" name="Reserved By" exclude="no"/>
<Property id="6" name="Reserved Date" exclude="yes"/>
<Property id="8" name="Unreserved Date" exclude="yes"/>
</DesignTrackingControl>
</PropertySetInformation>
カスタム設定
設定ファイルでは、プロパティ要素の追加や削除、要素の属性の変更を行うことができます。プロパティ要素の各属性の意味を理解してから、情報チップのカスタマイズを開始してください。例を示します。
<Property id="8" name="Unreserved Date" exclude="yes"/>
- ID
-
各プロパティに一意の内部 ID を割り当てます。
- name
-
情報チップに表示するプロパティ名を設定します。この名前を変更できます。
- exclude
-
プロパティを情報チップに表示するかどうかをコントロールします。「Yes」は情報チップの表示をオフにします。