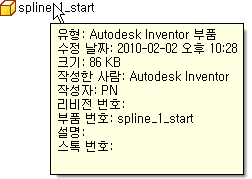
Inventor 파일 이름에 커서를 올려 놓으면 정보 팁에 해당 파일의 특성이 표시됩니다.
InfoTip.config라는 .xml 구성 파일에서 정보 팁의 컨텐츠가 제어됩니다. 구성 파일에서 요소를 사용자화하여 정보 팁에 표시되는 정보를 제어할 수 있습니다. 구성 파일의 위치는 다음과 같습니다.
Windows 7 및 Windows 8: C:₩ProgramData₩Autodesk₩Autodesk Inventor 2013₩InfoTip.config
Windows 7 및 Windows 8에서는 정보 팁의 컨텐츠가 캐시됩니다. 구성 파일 업데이트를 적용하려면 Windows 시스템을 다시 시작하거나 infotip.dll을 다시 등록해야 합니다. infotip.dll을 등록하려면 명령행에서 다음 명령을 실행합니다.
regsvr32 /u "C:₩Program Files₩Autodesk₩Inventor 2013₩Bin₩InfoTip.dll"
regsvr32 "C:₩Program Files₩Autodesk₩Inventor 2013₩Bin₩InfoTip.dll"
전체 InfoTip.config 파일을 삭제하는 경우 다음에 Inventor 파일 위에 커서를 놓으면 새 InfoTip.config 파일이 생성되어 표시됩니다. 새 파일에 기본 구성이 포함됩니다.
기본 구성
처음으로 Inventor 파일 이름 위에 커서를 놓을 때 InfoTip.config 파일이 생성됩니다. 기본 구성에는 다음과 같이 iProperties 대화상자에서 지원되는 모든 특성 항목이 포함됩니다.
<PropertySetInformation>
<SummaryInformation>
<Property id="2" name="Title" exclude="yes"/>
<Property id="3" name="Subject" exclude="yes"/>
<Property id="4" name="Author" exclude="no"/>
<Property id="5" name="Keywords" exclude="yes"/>
<Property id="6" name="Comments" exclude="yes"/>
<Property id="9" name="Revision Number" exclude="no"/>
</SummaryInformation>
<DocumentSummaryInformation>
<Property id="2" name="Category" exclude="yes"/>
<Property id="14" name="Manager" exclude="yes"/>
<Property id="15" name="Company" exclude="yes"/>
</DocumentSummaryInformation>
<DesignTracking>
<Property id="4" name="Creation Date" exclude="yes"/>
<Property id="5" name="Part Number" exclude="no"/>
<Property id="7" name="Project" exclude="yes"/>
<Property id="9" name="Cost Center" exclude="yes"/>
<Property id="10" name="Checked By" exclude="yes"/>
<Property id="11" name="Checked Date" exclude="yes"/>
<Property id="12" name="Eng. Approved By" exclude="yes"/>
<Property id="13" name="Eng. Approved Date" exclude="yes"/>
<Property id="17" name="Status" exclude="yes"/>
<Property id="23" name="Web Link" exclude="yes"/>
<Property id="29" name="Description" exclude="no"/>
<Property id="30" name="Vendor" exclude="yes"/>
<Property id="34" name="Mfg. Approved By" exclude="yes"/>
<Property id="35" name="Mfg. Approved Date" exclude="yes"/>
<Property id="36" name="Estimated Cost" exclude="yes"/>
<Property id="40" name="Design State" exclude="yes"/>
<Property id="41" name="Designer" exclude="yes"/>
<Property id="42" name="Engineer" exclude="yes"/>
<Property id="43" name="Authority" exclude="yes"/>
<Property id="55" name="Stock Number" exclude="no"/>
<Property id="67" name="Last Update With" exclude="yes"/>
</DesignTracking>
<DesignTrackingControl>
<Property id="5" name="Reserved By" exclude="no"/>
<Property id="6" name="Reserved Date" exclude="yes"/>
<Property id="8" name="Unreserved Date" exclude="yes"/>
</DesignTrackingControl>
</PropertySetInformation>
사용자 구성
구성 파일에서 특성 요소를 추가 또는 삭제하고 요소의 속성을 변경할 수 있습니다. 정보 팁을 사용자화하기 전에 특성 요소에 있는 각 속성의 의미를 알아야 합니다. 예를 들어 다음 특성 요소에 있는 속성의 의미를 살펴봅니다.
<Property id="8" name="예약해제 날짜" exclude="yes"/>
- id
-
각 특성의 고유 내부 ID를 지정합니다.
- name
-
정보 팁에 표시되는 특성 이름을 설정합니다. 이 이름은 변경할 수 있습니다.
- exclude
-
특성을 정보 팁에 표시할지를 제어합니다. "Yes"로 설정되면 정보 팁에 해당 특성이 표시되지 않습니다.