Applied IK requires you bind one or more parts of your IK structure to animated follow objects. Once bound, you can select any object in your kinematic chain and click Apply IK. This calculates the IK solution for each frame of the animation and places transform keys for every object in the IK chain.
The Apply IK method of animation works best when you want objects in the kinematic chain to match the motions of other objects exactly.
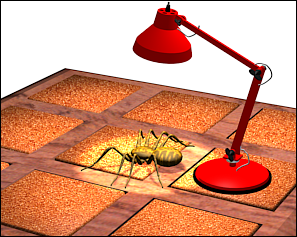
Example of Applied IK

IK structure

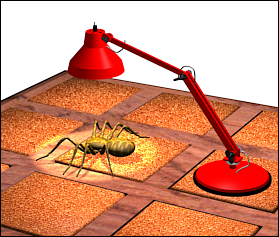
Animating the lamp with applied IK
The illustration demonstrates how an applied IK animation works. Just as in the example in Animating with Interactive IK, the figure shows an IK lamp structure with its head positioned over a spider. To maintain the offset distance between the lamp head and spider, the actual end effector is an invisible Dummy helper object, placed within the spider and linked to the lamp head as a child. The spider moves in a straight line over 100 frames.
To bind the end effector to the spider, click Bind, and then drag a line between the two. Once the end effector is bound to the spider, it will try to match the location of its pivot point with the pivot point of the spider.
Select the end effector and click Apply IK. 3ds Max matches the end effector with the box and calculates the IK solution for every frame. Playback of the animation shows that the end effector perfectly follows the box.
Clearing Keys from Previous Animation
If you have animated any members of the IK chain interactively, or run Apply IK previously, the existing animation keys will affect the new IK solution. Sometimes that is exactly what you want. You can use manual animation to subtly nudge the IK solution toward a particular result. However, it is more likely that you want to remove old keys in order to begin the IK calculations with a clean slate.
The Clear Keys option in the Inverse Kinematics rollout controls whether or not old move and rotate animation keys are removed.
Constraining the IK Solution to Specific Frames
You use the Start and End fields in the Inverse Kinematics rollout to set the range of frames used to calculate the applied IK solution. Using these fields, you can restrict IK solutions to specific frames and solve for different solutions in different time segments.
You can set the Start and End fields to include frames outside of the active time segment.
You can also constrain an IK solution to frames where a key exists for an end effector. This is useful if you want to animate a hierarchy using end effectors but do not want keys generated on every frame.
Turn on Apply Only To Keys to constrain the IK solution to frames with end effector keys.
Watching Progress of the IK Solution
Normally, Apply IK calculates all frames before updating the viewports. To watch the progress of Apply IK frame by frame, turn on Update Viewports on the Inverse Kinematics rollout.
Updating the viewports greatly slows down the Apply IK process but it can help you troubleshoot complex animations.