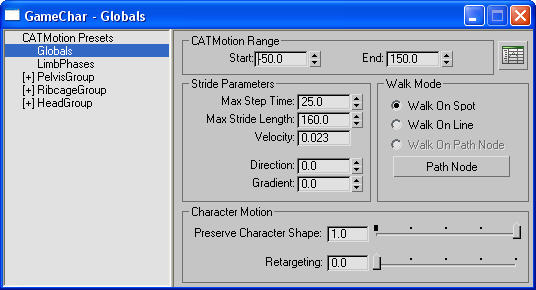
The Globals panel holds the master settings for the current CATMotion layer.
Interface

[hierarchy]
The layer hierarchy is in a window at the left of the dialog.
CATMotion Range group
- Start/End
- The frame range that the CATMotion system uses to calculate its motion and generate footprints. Note: The Start frame defines when CATMotion starts calculating all the curves. This means if you set Start to 0 and a key of a curve in CATMotion is at frame 0, the timeline represents this key at frame 0, too. So setting Start to 0 makes it easier to edit a walk cycle or to create a new walk cycle from scratch.
Also, if several characters are walking in a scene with identical walk cycles, you can quickly offset the walk sequences for different characters by changing the Start values in CATMotion slightly, so the characters are not walking in lockstep.
Stride Parameters group
- Max Step Time
- The maximum time a step can take, in frames.
- Max Stride Length
- The maximum distance of a stride, measured in CATUnits.
- Velocity
- The current velocity of the character based on the Max Step Time and Max Stride Length values. If the rig uses a Path Node, the velocity value displays the actual velocity at which the character moves.
As the Path Node changes speed, the rig automatically varies the stride length, but it does not exceed the specified Max Step Time and Max Stride Length values.
- Direction
- When Walk Mode is set to Walk On Spot or Walk On Line, this value defines the direction in which the character moves. It does not change the direction that the character is facing.
This setting is useful for prototyping cycles that are walking sideways or backwards. For example, if you specify a value of 90 degrees, the character moves sideways, and a value of 180 means the character walks backwards.
If you are defining a cycle for a character walking backwards, start by setting Direction to 180 so you can see what your character looks like whn walking backwards. This allows you to see potential problems with the walk cycle.
- Gradient
- When Walk Mode is set to Walk On Spot or Walk On Line, this value defines the gradient of an imaginary slope on which character is walking. It does not change the direction that the character is facing.
Walk Mode group
Choose the option that determines whether and how the character moves through the scene when walking.
- Walk On Spot The character walks without changing location. This mode is useful for examining the walk cycle in isolation, without any additional motion.
- Walk On Line The character walks in the direction specified by the Direction value and at the angle specified by the Gradient value.
- Walk on Path Node The character follows a scene object and uses it to drive the animation of the rig. Available only after you specify a Path Node using the Path Node button (see following).
- Path Node
- Click to specify a Path Node object; select the object using any standard method. After you specify the object, the Path Node object name appears on the button. To use the Path Node, choose Walk On Path Node if necessary (see preceding). Tip: You can use any object, such as a Point or Dummy helper, as a Path Node. Also, you can animate the Path Node using any standard method, such as keyframing or by assigning it to a Path constraint. You can even drive the Path Node with a script or with a Delegate helper from the character studio Crowd system.
In some cases, after choosing the Walk On Path Node option, you might find it necessary to rotate the Path Node object to establish the proper orientation for the rig.
Character Motion group
- Preserve Character Shape
- Controls how the rig aligns itself to the motion of the Path Node; that is, along its direction. In general, this is applicable only when the rig has a horizontal spine, such as a quadruped.
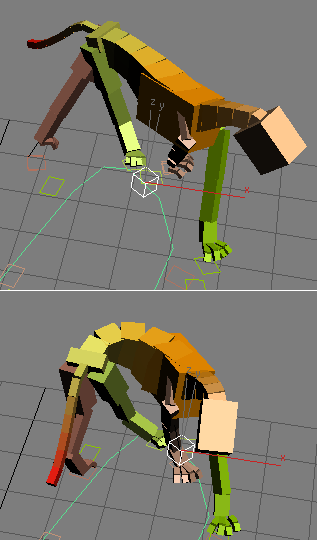
When the Preserve Character Shape value is 0.0, the spine keeps to the trajectory of the Path Node. When going around tight corners this can lead to unusual but possibly interesting results.
When the Preserve Character Shape value is 1.0, the spine holds its shape.

Top: Preserve Character Shape=1.0
Bottom: Preserve Character Shape=0.0
It can be useful to animate the Preserve Character Shape value.
- Retargeting
- Blends legged motion from IK, at 0.0, to full retargeting at 1.0.