The controls on the Interpolation rollout of the Sweep modifier work exactly as they do for any other spline. However, the controls affect only the built-in section you've chosen, not the spline that the section is swept along.

In general, all spline curves are divided into small straight lines that approximate a true curve. The number of divisions between each vertex on the spline are called steps. The more steps used, the smoother the curve appears.
- Steps
- Sets the number of divisions, or steps, 3ds Max uses between each built-in section's vertices. Splines with tight curves require many steps to look smooth while gentle curves require fewer steps. Range=0 to 100.

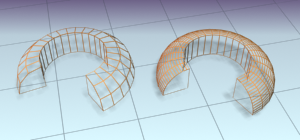
Left: The quarter-round section is set to zero steps.
Right: The same section on the right is set to four steps.
Spline steps can be either adaptive or manually specified. The method used is set by the state of the Adaptive switch. The main use for manual interpolation is to create splines for morphing or other operations where you must have exact control over the number of vertices created.
- Optimize
- When on, removes unneeded steps from straight segments in the spline. Default=on. Note: Optimize is not available when Adaptive is on.

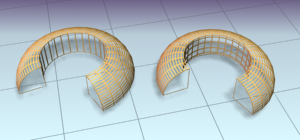
Left: Optimize is on for the left-hand sweep.
Right: Optimize is off for the right-hand sweep.
- Adaptive
-
When on, automatically sets the number of steps for each spline to produce a smooth curve. Straight segments always receive 0 steps. When off, enables manual interpolation control using Optimize and Steps. Default=off.