![]()
![]()
The Window/Crossing Selection toggle switches between window and crossing modes when you select by region.
-
Main Toolbar >
 Crossing selection or
  Window selection (Window/Crossing toggle)
- In Crossing mode, you select all objects or sub-objects within the region, plus any objects or sub-objects crossing the boundaries of the region.
- In Window mode, you select only the objects or sub-objects within the selection.
Tip: If you're making sub-object selections of faces and you select more faces than you want, make sure you're in Window mode.
The Selection Region flyout on the toolbar allows you to create different-shaped selection boundaries.
3ds Max automatically saves the Window/Crossing setting in the 3dsmax.ini file.
Note: You can automatically switch between Window and Crossing Region Selection based on cursor movement direction. To set this up, choose Customize  Preferences and on the General tab in the Scene Selection group turn on Auto Window/Crossing Selection by Direction.
Preferences and on the General tab in the Scene Selection group turn on Auto Window/Crossing Selection by Direction. Crossing Selection
The default Crossing option selects objects within the selection region or crossed by the border of the region.
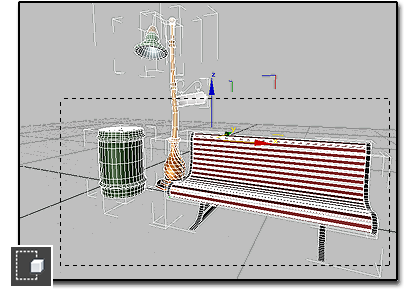
Select Region Crossing selects objects within the window and also objects it crosses: the trash can, bench, and streetlight.
To select objects within and crossed by a selection region:
- Do one of the following:
- Using the standard menu system, choose Edit Selection Region Crossing.
- Click the Window/Crossing selection toggle to display the Crossing icon.
- Using the standard menu system, choose Edit
- On the main toolbar, click the Selection Region flyout and choose a method:
 (Rectangular),
  (Circular),
  (Fence), or
  (Lasso). Note: This setting also applies to
 (Paint Selection Region), but in this case the boundary is that of the brush, not the region. In other words, when painting a region in Crossing mode, the brush selects every object or sub-object it touches or encompasses.
 - Drag to specify the region and select the objects.
Window Selection
The Window option selects objects entirely within the selection region.
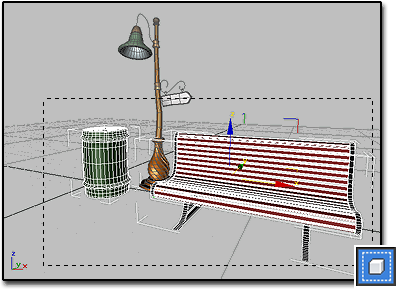
Select Region Window selects only those objects completely inside the window: the trash can and bench.
To select objects within a selection region:
- Do one of the following:
- Using the standard menu system, choose Edit Selection Region Window.
- Click the Window/Crossing selection toggle to display the Window icon.
- Using the standard menu system, choose Edit
- On the main toolbar, click the Selection Region flyout and choose a method: (Rectangular), (Circular), (Fence), or (Lasso). Note: This setting also applies to (Paint Selection Region), but in this case the boundary is that of the brush, not the region. In other words, when painting a selection region, the brush must completely encompass an object or sub-object to select it.
- Drag to specify the region and select the objects.