Viewports are openings into the three-dimensional space of your scene, like windows looking into an enclosed garden or atrium. But viewports are more than passive observation points. While creating a scene, you can use them as dynamic and flexible tools to understand and modify the 3D relationships among objects.

The 3ds Max main window, with a docked toolbar and viewport layout displaying multiple views.
At times you might want to look at your scene through a large, undivided viewport, giving you a "picture-window" view of the world you’re creating. Often you use multiple viewports, each set to a different orientation.
If you want to move an object horizontally in the world space, you might do this in a top viewport, looking directly down on the object as you move it. At the same time, you could be watching a shaded perspective viewport to see when the object you’re moving slides behind another. Using the two windows together, you can get exactly the position and alignment you want.
You also have pan and zoom features available in either view, as well as grid alignment. With a few mouse clicks or keystrokes, you can reach any level of detail you need for the next step in your work.
It's important to note that, by default, no cameras exist in the 3ds Max; the viewports in a new scene show "free-floating" views. However, you can place cameras in your scene and set viewports to look through their lenses. Then, when you move a camera, the viewport automatically tracks the change. Incidentally, you can do the same thing with spotlights.
In addition to geometry, viewports can display other views such as Track View and Schematic View, which display the structure of the scene and the animation. Viewports can be extended to display other tools such as the MAXScript Listener and the Asset Browser. For interactive rendering, the viewport can display the ActiveShade window.
Active Viewport
One viewport, marked with a highlighted border, is always active. The active viewport is where commands and other actions take effect. Only one viewport can be in the active state at a time. If other viewports are visible, they are set for observation only; unless disabled, they simultaneously track actions taken in the active viewport.
To switch the active viewport, click a viewport that is not active. You can use the  (left),
  (middle), or
  (right) mouse button to do this.
 when you switch viewports. Left-click
  can also select objects, which might not be what you want to do.
 The navigation button  (Maximize Viewport Toggle), at the lower right of the 3ds Max window, maximizes the active viewport so it occupies all the viewport area. When a viewport is maximized, clicking the same toggle displays all viewports once again. The default keyboard shortcut for Maximize Viewport is
  +W.
+W.
When viewports are not maximized, pressing  (the Windows logo button, sometimes labeled "Start") +
  cycles the active viewport. When one viewport is maximized, pressing
  +
+ displays the available viewports, and you can press
  +
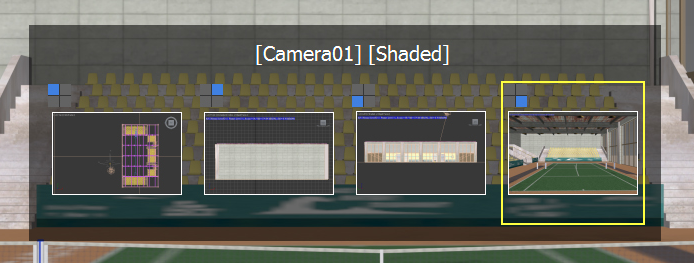
+ to cycle among them: When you release the keyboard buttons, the viewport you chose becomes the maximized viewport.

Overlay thumbnails for switching the maximized viewport
Saving the Active Viewport
You can save the view in any active viewport and later restore it with the Views menu's Save Active View and Restore Active View commands. One view can be saved for each of the following view types: Top, Bottom, Left, Right, Front, Back, Orthographic, Perspective.
For example, while in the Front view, you choose Save Active Front View, and then zoom and pan that view. You then activate the Top viewport, choose Save Active Top View, and then click Zoom Extents. You return to the Front view, and choose Restore Active Front View to return to its original zoom and pan. At any time, you can activate the Top viewport, and then choose Restore Active Top View to restore its saved view.