Point-cloud objects do not, by default, respond to scene lighting. To cause the object to respond to lighting, follow this procedure.
Procedure
To use the Autodesk Point Cloud material in Slate Material Editor:
- Make sure the active renderer is NVIDIA mental ray.
- Follow this procedure to add a point-cloud object to your scene.
- Press the M key to open the Slate Material Editor.
- Scroll the Material/Map Browser on the left side of the editor to the Scene Materials section, near the bottom.
One of the items in this section is the Autodesk Point Cloud material.
- Drag the Autodesk Point Cloud material from the browser into the View window, then double-click the node.
The node appears in the View window. Linked to it is the Gradient Ramp map that is a default component of this material. This map comes into play when you set the object's Color Channel to Elevation Ramp or Intensity Ramp.
- Double-click either node to edit its settings on the right side of the Editor window.
Interface
Color Intensity rollout

- Multiplier
- Specifies the overall brightness of the point-cloud object. Lower values produce a darker surface, while higher values produce a brighter surface. Default=1.0. Note: The results of this setting appear in rendered output only, not in the viewports.

Adjusting the Multiplier value
1: Multiplier=0.1
2: Multiplier=1.0 (the default)
3: Multiplier=10.0
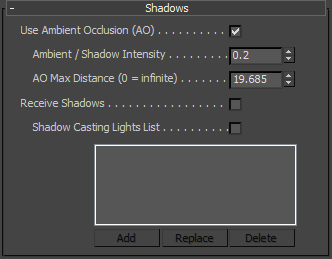
Shadows rollout

- Use Ambient Occlusion (AO)
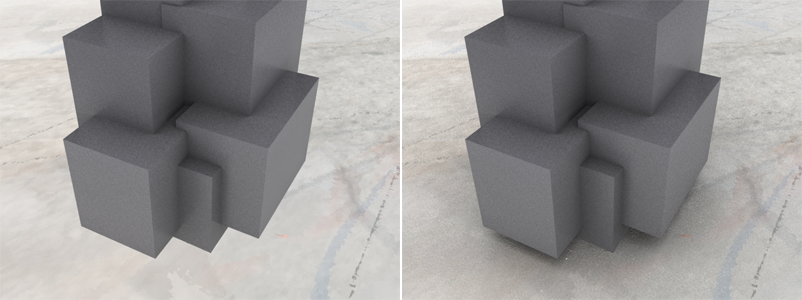
- When on, causes shadowing to appear in small crevices where real-world light would not reach.
In the following illustration, a 3D object was placed atop a flat point-cloud object and rendered with ambient occlusion off, then on. The resulting shadowing under the 3D object makes it appear to be much more a part of the scene.

Left: Use Ambient Occlusion off
.Right: Use Ambient Occlusion on
- Ambient / Shadow Intensity
- The amount of environmental light in the scene, which in a practical sense is how dark the shadows are. Default=0.2.
The units value for this setting depends on the lighting unit. If you use the mr Photographic Exposure Control, and set Physical Scale to Physical Units (cd/m 2 ), this value will be in physical values, and might need to be in the hundreds (or thousands for an outdoor shot lit by mental ray Sun & Sky). However, if you don’t use the exposure control, or set it Physical Scale to Unitless, this parameter is in a "traditional" unit space where 0 is black and 1 is white.
Note: This "ambient" light is affected by ambient occlusion, so it is darkened by the occlusion at contact points and in areas hidden under objects. - AO Max Distance
- The extent of the shadowing caused by ambient occlusion. When set to 0, the shadowing extends throughout the entire scene.
- Receive Shadows
- When on, objects between the point-cloud object and any shadow-casting lights cast shadows on the point-cloud object. To permit only certain lights to cast shadows on the point-cloud object, use the Shadow Casting Lights List controls (see following).
- Shadow Casting Lights List
- When on and Receive Shadows is also on, only lights in the list can cast shadows on the point-cloud object. When off, and Receive Shadows is on, all shadow-casting lights in the scene can cast shadows on the point-cloud object.
The list includes these controls:
- Add To cause a light to cast shadows on the point-cloud object, click Add and then select the light. Repeat for each light to add to the list.
- Replace To replace a light in the list with another in the scene, first highlight the light to replace in the list, then click Replace and select the replacement light.
- Delete To prevent a light from casting shadows on the point-cloud object, highlight its name in the list and then click Delete.