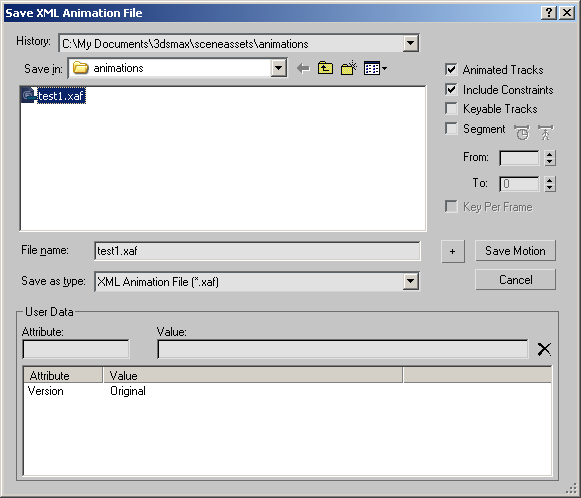
Save Animation lets you store animation from your scene to disk in the XML Animation File (XAF) format. The XAF file format lets you save and load animation for any number of objects separately from the actual scene.
For a procedure that outlines the basic method of saving and loading animation, see To use the Save Animation and Load Animation commands.
Interface
To use Save Animation, select the objects from which to save animation data, and then choose Save Animation from the Animation menu. Settings in the Save XML Animation dialog apply only to objects that are selected when you save the animation.

- File controls
- The controls in the upper-left corner of the dialog are standard file-browsing controls.
- Animated Tracks
- Saves only animated tracks. This is on by default, and should generally be left on.
- Include Constraints
- When on, includes motion derived from constraints. Available only when Animated Tracks is on. Default=on.
For example, if an object rotates because a LookAt constraint is applied to its Rotation track, then when you save its animation with Include Constraints on, 3ds Max generates rotation keys based on the constrained motion. It does not save the actual constraint. When off, animation accomplished only by constraints, such as the Link constraint, is not saved.
Note: This doesn't apply to constraints such as the Path constraint. Because this constraint assigns the animation directly to the constrained object, rather than deriving it from the constraining object, Save Animation saves path-constrained animation even if Include Constraints is off. - Keyable Tracks
- When on, saves only keyable tracks with controllers, as defined in Track View. Turning this on allows keyless animation tracks to be saved. Default=off.
If both Animated Tracks and Keyable Tracks are on, any tracks that contain animation but are not keyable won't be saved. You can use this option to avoid saving tracks that aren't relevant to the scene into which you're loading the animation. For example, if you want to save constraint data, but not data from a LookAt constraint (because LookAt tends to be specific to the scene), you can turn off Keyable for the LookAt track, and then save with Keyable Tracks on.
Note: Animated Tracks overrides Keyable Tracks. If a track is keyable but doesn't contain any animation data, and Animated Tracks is on, the track won't be saved even if Keyable Tracks is on.Note: Tracks without controllers, such as nonanimated creation-parameter tracks, won't be saved even if Keyable Tracks is on. To save a nonanimated creation-parameter track, add a controller, turn off Animated Tracks, and turn on Keyable Tracks. - Segment
- Lets you save a specific frame range, as opposed to the entire animation. Default=off.
 Active Time Range Click to set the From and To fields to the active time range. Available only when Segment is on.
  Objects Time Range Click to set the From and To fields to the time range that corresponds to the keys of the currently selected objects. Available only when Segment is on.
 - From Sets the starting frame for the range to save. Available only when Segment is on.
- From/To Sets the ending frame for the range to save. Available only when Segment is on.
- Key Per Frame
- Saves an animation key per frame, thus “baking” the animation to keyframes.
This can be useful if you are applying a procedural animation to an object that won't be participating in a procedural animation in the target scene.
- +
- Increments the number at the end of the file name and saves the animation file with the new name. If the file name doesn't currently end with a number of two or more digits, clicking + appends “01” to the file name (before the extension), and then saves the file.
- Save
- Saves the animation using the current file name.
- Cancel
-
Closes the dialog without saving any animation.
User Data group
These controls let you enter user attributes and names. This could simply be notes about the animation file, or they could be actual data for use by custom plug-ins and utilities.
To enter user data, type a value in the Attribute field, press  and type a value in the Value field, and then press
  to add the attribute and value to the list below. These values are saved with the XAF file and can be viewed with the Load Animation dialog.
- Attribute
- Enter an attribute name.
- Value
- Enter an attribute value. This can be any combination of alphanumeric characters. To add the attribute and value to the file, press
 while the cursor is in this field.
  Delete User Data
- Deletes the highlighted attribute from the list along with its corresponding value.
- Attribute list
- Shows all attributes and values in the file. To change a value, click the corresponding attribute in the list to highlight it and place it in the Attribute and Value fields, edit the Value field, and then press
 . You can also edit the Attribute field, but this creates a new entry.
 To remove an attribute, highlight its name in the list and then click Delete User Data.