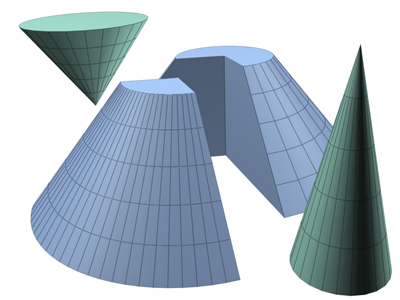
The Cone button on the Creation command panel lets you produce round cones, either upright or inverted.

Examples of cones
Procedures
To create a cone:
- On the Create menu choose Standard Primitives
 Cone.
Cone. - In any viewport, drag to define a radius for the base of the cone, then release to set it.
- Move to up or down to define a height, either positive or negative, then click to set it.
- Move to define a radius for the other end of the cone. Decrease this radius to 0 for a pointed cone.
- Click to set the second radius and create the cone.
Interface
Creation Method rollout
- Edge
-
Draws a cone from edge to edge. You can change the center location by moving the mouse.
- Center
-
Draws a cone from the center out.
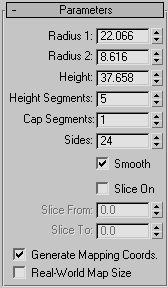
Parameters rollout

The defaults produce a smooth, round cone of 24 sides with five height segments, one cap segment, and the pivot point at the center of the base. For improved rendering of smoothly shaded cones, particularly those with pointed tips, increase the number of height segments.
- Radius 1, Radius 2
-
Set the first and second radii for the cone. The minimum value for both is 0.0. If you enter a negative value, 3ds Max converts it to 0.0. You can combine these settings to create pointed and flat-topped cones, upright or inverted. The following combinations assume a positive height:
Radius Combinations Effect Radius 2 is 0 Creates a pointed cone Radius 1 is 0 Creates an inverted pointed cone Radius 1 is larger than Radius 2 Creates a flat-topped cone Radius 2 is larger than Radius 1 Creates an inverted flat-topped cone If Radius 1 and 2 are the same, a cylinder is created. If the two radius settings are close in size, the effect is similar to applying a Taper modifier to a cylinder.

Effect of Radius settings
- Height
-
Sets dimension along the central axis. Negative values create the cone below the construction plane.
- Height Segments
-
Sets the number of divisions along the cone's major axis.
- Cap Segments
-
Sets the number of concentric divisions around the center of the cone's top and bottom.
- Sides
-
Sets the number of sides around the cone. Higher numbers shade and render as true circles with Smooth selected. Lower numbers create regular polygonal objects with Smooth off.
- Smooth
-
Blends the faces of the cone, creating a smooth appearance in rendered views.
- Slice On
-
Enables the Slice function. Default=off.
When you create a slice and then turn off Slice On, the complete cone reappears. You can use this checkbox to switch between the two topologies.
- Slice From, Slice To
-
Sets the number of degrees around the local Z axis from a zero point at the local X axis.
For both settings, positive values move the end of the slice counterclockwise; negative values move it clockwise. Either setting can be made first. When the ends meet, the whole cone reappears.
- Generate Mapping Coords
-
Generates coordinates for applying mapped materials to the cone. Default=on.
- Real-World Map Size
-
Controls the scaling method used for texture mapped materials that are applied to the object. The scaling values are controlled by the Use Real-World Scale settings found in the applied material's Coordinates rollout. Default=off.