![]()
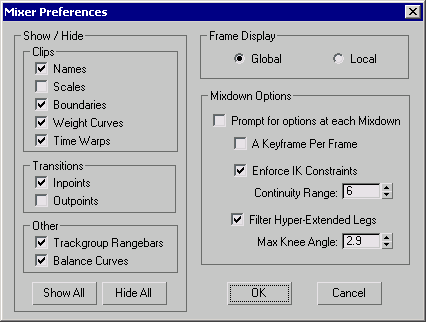
The Motion Mixer Preferences dialog lets you make changes to display settings for clips, transitions and frames. It is similar to the way you can Hide By Category on the Display panel. You can also specify mixdown options from this dialog.
The settings on the Motion Mixer Preference dialog are saved in the biped.ini file, as well as with the MAX file.
Interface

Show / Hide group
- Clips
- These settings affect how clips appear in the Motion Mixer tracks.
- Names When turned off, clip names do not appear on the colored clip bars in the Motion Mixer. Default=On.
- Scales Displays the clip scale. Since clips can be resized by using tools like Move Clips, displaying the scales quickly lets you know if a clip is two times its original length or half its length. Default=Off.
- Boundaries Turns on and off the frame numbers at the start and end of the colored clip bars. Default=On.
- Weight Curves Toggles the display of the weighting line. It doesn't matter if the Weight button is active or not. Default=On.
- Time Warps If a time warp has been added to a clip, this switch toggles the display of the warp on the colored clip bar. Default=On.
- Transitions
-
The two settings affect how transitions appear in the Motion Mixer tracks.
- Inpoints Toggles the beginning transition frame on the transition clip bar. Default=On.
- Outpoints Displays the end transition frame on the transition clip bar. Default=Off.
- Other
-
These settings indicate if range bars and balance curves appear in the Motion Mixer tracks.
- Trackgroup Rangebars Hides the gray range bar that appears along the top of each trackgroup. Default=On.
- Balance Curves Displays the Balance Curves track. Default=On.
- Show All
- Turns on all the checkboxes in the Show / Hide group.
- Hide All
- Turns off all the checkboxes in the Show / Hide group.
Frame Display group
These settings affect how clip boundaries and transition in/outpoints appear in the Motion Mixer.
- Global Displays clip start and end frames as frame numbers. Inpoints and outpoints of transitions display the frame at which transitions start and end. Default=On.
- Local Clip boundary values are displayed as actual lengths in frames. Along with the start and end frame number of the transition, additional values tell you by how much the transition overlaps each motion clip.
Mixdown Options group
These settings affect how transitions between biped object clips appear in the Motion Mixer tracks.
- Prompt For Options At Each Mixdown When turned on, the Mixdown Options dialog is displayed when you choose Compute Mixdown from the Mix menu in the Motion Mixer. Default=On.
- A Keyframe Per Frame When turned on, a keyframe is generated for each frame of animation when the mixdown is computed. Default=Off.
- Enforce IK Constraints When a transition occurs between two clips where the same foot or feet are planted with footsteps or planted keys, this option forces the foot/feet to stay planted during the transition. Default=On.
- Continuity Range Sets an additional transition time after the actual transition, giving the foot time to get from its planted position to its keyframed location in the next clip. Range=0 to 100; Default=6.
- Filter Hyper–Extended Legs Prevents a leg from straightening during a transition. This can occur when the COM moves in such a way that the foot can't reach its planted position unless the leg goes completely straight. This option corrects the problem by raising the biped's heel off the ground so the knee can bend. Default=On.
- Max Knee Angle Sets the maximum angle that can be reached between the thigh and calf before the heel comes off the ground. An angle of 180 indicates a perfectly straight leg. A value of 160 or 170 indicates a slightly bent leg.