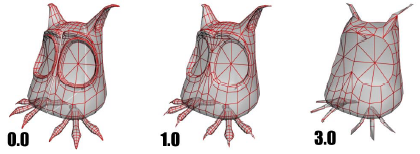
The Vertex Weld modifier behaves like the Weld feature in editable poly and similar objects by combining all vertices within a specified distance from each other into a single vertex. Vertex Weld is useful for cleaning up meshes that contain clusters of vertices within small areas.

The results of using different Vertex Weld threshold settings
The new vertex is automatically placed at the average position of the combined vertices. Because the original vertices are removed, some associated faces and edges are usually removed as well. Also, welded vertices need not belong to the same element, so welding can result in combining elements within an object.
Procedures
Example: To apply the Vertex Weld modifier to a mesh:
- Create a box with Length, Width, and Height set to 40.
- Right-click the box and choose Convert to
 Convert to Editable Poly.
 - Go to the Polygon sub-object level and select polygon 6. Tip: To see which polygon is selected, watch the readout at the bottom of the Selection rollout.
- Press
 to delete polygon 6.
 By deleting the polygon, you create an open mesh.
- Apply a Turn To Poly modifier, and set the Selection Level to Object.
- Apply a Mirror modifier, and set Mirror Axis to X.
- Turn on Copy, and set Offset to –40.
The reflection of the box shares a common seam but the vertices along the seam are not welded.
- Apply a Vertex Weld modifier to cement the two boxes into one element.
Interface

- Threshold
-
The distance, in scene units, within which vertices are automatically combined. Vertices farther apart than this value are not welded. Default=0.1
Note: A higher Threshold setting results in welding more vertices, thus removing smaller faces and details. If the threshold is set too high, the mesh will begin to deform.
A threshold setting of 5.5 removes all detail, making the model unrecognizable.