The Assign Vertex Colors utility assigns vertex colors based on the material assigned to the object and the lighting in the scene. The utility applies a VertexPaint Modifier to the object when Assign To Selected is clicked. Once the VertexPaint modifier has been applied to the object, go to the Modify panel or click Edit to access the VertexPaint tools.
The Assign Vertex Colors utility supports light inclusion or exclusion when using the Scene Lights option.
All of the commands found within the Assign Vertex Color utility are also available from the Modify panel when a VertexPaint modifier has been applied to an object.
Vertex Colors and Radiosity
The Vertex Colors utility supports radiosity. If you use radiosity with assigned vertex colors, be sure to turn on the option Re-Use Direct Illumination From Radiosity Solution. This option is in the Rendering Parameters rollout. See Radiosity Controls. When this option is on, the renderer simply displays the vertex colors assigned by the radiosity solution: strictly speaking, it is not rendering at all.
The additional option Render Direct Illumination, also on the Rendering Parameters rollout, causes direct lighting not to be saved in the corresponding mesh. This corresponds to the options Radiosity, Render Direct Illumination, in which case Assign Vertex Colors gets indirect illumination from the radiosity mesh but renders direct illumination separately; or Radiosity, Indirect Illumination Only, in which case Assign Vertex Colors doesn't apply direct illumination to vertices at all.
Procedures
To use the Assign Vertex Colors utility:
- Assign materials to the objects you want to affect. These can be mapped or unmapped materials.
- Light the objects.
- Select the objects you want to affect.
- Open the Object Properties dialog for each object, click to turn off the By Layer button, turn on Vertex Channel Display, and click OK.
- Expand the Display Properties rollout in the Display panel and turn on Vertex Colors.
- Access the Assign Vertex Colors utility.
- Choose one of the Light Model options.
- Choose one of the Color Assignment choices.
- Click Assign to Selected.
VertexPaint modifiers are applied to the selected objects, and the vertex colors for the objects are taken from their materials and from the lighting in the scene, depending on the options you choose under Light Model.
Changing the material or the lighting in the scene won’t change the vertex colors. To do this, click the Update All button.
Note: The new vertex colors are stored in the Vertex Paint modifier. If you want to access them, go to the Modify panel and access the parameters in the rollouts there. You can also use the tools found in the Vertex Paint floating dialog to create layers, paint, blur or adjust color. The Vertex Paint floater launches when you go to the Modify panel and the object is selected.
Example: To use the Assign Vertex Colors utility on a specific object:
- Create a sphere with 24 segments.
- Apply a mapped material to the sphere, and turn on Show Map In Viewports.
The mapped sphere is displayed in the viewport.
- Apply a mapped material to the sphere. Note: Choose a simple, well-defined map with large, easily-distinguished areas.
- Open the Object Properties dialog for the sphere, and if the button on the right side of the Display Properties group reads “By Layer,” click it so it says “By Object.” Also in the Display Properties group, turn on Vertex Channel Display and click OK.
- The sphere turns white because you're now displaying its vertex colors, and they're all white as a default.
- With the sphere selected, open the Assign Vertex Colors utility.
- Choose Shaded and turn on Use Maps.
- Turn on Mapping.
- Click Assign To Selected.
A blurred version of the mapping appears on the sphere. The vertices are now colored based on the material and the lighting in the scene. The mapping is blurred because the resolution of the mesh at 24 segments is much lower than the pixel resolution of the map.
- Go to the
 Modify panel and note the VertexPaint modifier.
 - Move down in the stack to the creation parameters, click Yes at the warning prompt, and increase the Segments to 70.
The new vertices shift the already assigned vertices.
- Return to the VertexPaint level of the stack, and click Assign in the Assign Vertex Colors rollout. Had we returned to the Utilities panel, we would have added another Vertex Paint modifier to the stack; clicking Assign in the VertexPaint Modifier only updates that modifier. Tip: Vertex colors will only show up in a rendered scene if you assign the Vertex Color map to the diffuse channel. However, if you do this, you can't properly update your vertex colors with the Assign Vertex Colors utility. The solution is to assign a Blend material to your object. Assign the straight diffuse bitmap to Material 1, and the Vertex Color map to Material 2 of the Blend. Switch to 100 percent of Material 2 when rendering, and 100 percent of Material 1 when updating the vertex colors.
Interface

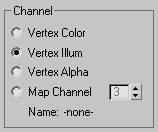
Channel group
Here you'll find tools to choose which channel type the vertex color utility will assign. If you choose map channel, you can also specify the map channel ID number.

- Vertex Color Choose this to assign a vertex color layer.
- Vertex Illum Choose this to assign a vertex lighting layer.
- Vertex Alpha Choose this to assign a vertex transparency layer.
- Map Channel Choose this to assign a specifically numbered map channel.
- Map channel spinner
-
Use this to define the channel number. Available only when Map Channel is chosen.
- Name
- If a channel has a name defined, it will appear here. Channels can be named using the Channel Info Utility. Note: Although the Color, Illum, and Alpha channels have specific names, in fact 3ds Max does not enforce what kind of data is saved in them, and any of the three channels can contain four-channel (RGBA) vertex color data.
Light Model group
Provides options that let you specify how the surface of the object appears to be illuminated.

- Lighting + Diffuse Uses the current scene lighting and materials to affect the vertex colors.
- Lighting Only Uses only lighting to assign vertex colors, ignoring material properties.
When this option is chosen, Shadows and Mapping are disabled on the Rendering Options rollout.
- Diffuse Uses the material's diffuse color, ignoring the lighting.
Color Assignment group
Lets you specify how colors are interpolated across surfaces.

- Color by Face (The default.) Colors are interpolated between the center of each face.
Color By Face samples fewer points, so it is the quicker method. On the other hand, results are less accurate.
- Color by Vertex Colors are interpolated between vertices.
For each face, this method uses three points instead of one, so it is slower but usually more accurate. An exception can occur when an object's shadow falls between two vertices: In such a case, the object should occlude lighting, but because only vertices are taken into account, the shadow is not calculated and a “light leak” occurs.
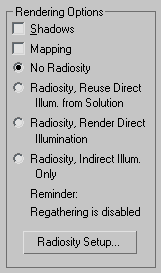
Rendering Options group
The options in this group let you choose whether to include shadows, texture maps, or a radiosity solution in vertex colors.

- Shadows
- When on, shadows are used when the vertices are shaded. Default=off. Tip: You can soften the shadow edge by using the VertexPaint modifier's Paint or Blur tools.
- Mapping
- When on, texture maps are used when the vertices are shaded. Default=off.
[radiosity options]
The radio buttons specify how to use radiosity data.
- No Radiosity (The default.) Do not use the radiosity solution when assigning vertex colors. Note: This option is the only one available unless a radiosity solution is present in the scene.
- Radiosity, Reuse Direct Illum. from Solution Includes radiosity in the vertex color assignments, and uses the direct illumination from the solution.
This is comparable to the choice Re-Use Direct Illumination From Radiosity Solution on the Rendering Parameters rollout.
This choice disables the Shadows toggle, because shadows don't need to be recomputed.
- Radiosity, Render Direct Illumination Includes radiosity in the vertex color assignments, but uses a separate pass to render direct illumination.
This is comparable to the choice Render Direct Illumination on the Rendering Parameters rollout.
- Radiosity, Indirect Illum. Only Includes only indirect illumination from the radiosity solution in the vertex color assignments.
This choice disables the Shadows toggle, because shadows don't need to be recomputed.
- Reminder field
- Displays a message that says whether regathering is enabled or disabled. Regathering provides the most accurate radiosity results, but it can add considerable time to radiosity calculations.
- Radiosity Setup
- Click to display the Advanced Lighting panel of the Render Setup dialog, where you can set up and generate a radiosity solution.
If the mental ray renderer is the active renderer, this button is not available.
- Assign to Selected
- Assigns vertex colors to the selected objects based on the assigned material, and the choices specified in the preceding group boxes. Assign to Selected creates a VertexPaint modifier and adds it to the stack of the selected objects.
- Edit
- Click to display the VertexPaint Paintbox, the floating dialog that holds the vertex painting tools.
This button is unavailable if you haven't yet clicked Assign To Selected.