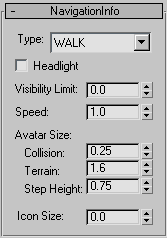
The NavInfo helper lets you create a VRML97 NavigationInfo node. This tells the browser how to navigate around the VRML97 world.
Procedures
To create a NavInfo helper:
- Add a NavInfo helper by clicking the NavInfo button and then click-dragging in the Top viewport to create its icon.
- Use the controls to adjust the behavior of the helper.
Interface

The NavigationInfo rollout contains the following options:
- Type
-
Specifies the type of movement (Walk, Examine, Fly, and None) for navigating the world. Implementation of these movement types may vary from browser to browser.
- Headlight
-
Places a directional light at the viewpoint. The light always points in the direction the user is looking.
Tip: Don’t use this option if you have lights in the scene. - Visibility Limit
-
Sets the far clipping plane. Any geometry beyond this point is invisible. The smaller this value is, the closer the clipping plane is to the camera. The larger this value is, the more of your scene is visible to the camera. A value of 0 turns off the effect, making everything in the scene visible. Use this option to show just part of large scenes.
- Speed
-
Determines the speed of navigation in units per second. Use this option to allow the user to travel faster, if you’re building a large world (like a cityscape), and slower, if you’re building a small world (like a room).
- Avatar Size
-
Specifies the user's physical dimensions in the world, to detect collision distance and follow terrain.
- Collision
-
Specifies the allowable distance between the user's position and any collision geometry before a collision is detected. For example, you can set this so that a collision is detected one unit in front of a wall.
- Terrain
-
Specifies the height above the surface to maintain when following terrain.
- Step Height
-
Specifies the highest object that can be "stepped over." If an object like a staircase has steps that are lower than this value, the user can go up.
- Icon Size
-
Adjusts the size of the helper object in the viewports.