Volume Light provides light effects based on the interaction of lights with atmosphere (fog, smoke, and so on).
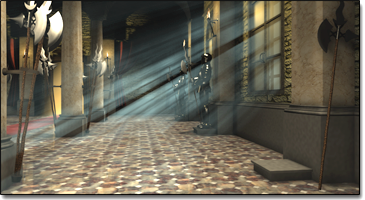
Volumetric light used in a complex environment with shadows and noise.
This plug-in provides effects such as radial glows for omni lights, conical glows for spotlights, and parallel beams of fog for directional lights. Objects within the light volume can cast shadows within the spotlight's cone, if using shadow maps as a shadow generator.

A simplified example where the light cone is clearly visible on the right.
Volume Light renders only in Camera and Perspective views. Orthographic or User views don’t render Volume Light effects.
Procedures
To use Volume Light:
- Create a scene with lights.
- Create a Camera or Perspective view of your scene. Tip: Avoid making the view axis parallel to the cone of a spotlight. This tends to create only a washed-out scene, possibly with rendering artifacts.
- Choose Rendering
 Environment.
 - On the Environment panel, under Atmosphere , click Add.
The Add Atmospheric Effect dialog is displayed.
- Choose Volume Light, and then click OK.
- Click Pick Light, and then select a light in a viewport to add the light to the list of volume lights.
You can also use the Pick Object dialog to select multiple lights from a list. Click Pick Light, and then press H to open the dialog.
- Set the parameters for volume light.
To add a light to the list:
- Click Pick Light.
- Click the light in a viewport.
To remove a light from the list:
- Open the list of volume lights.
- Choose the light you want to remove the volume light effect from.
- Click Remove Light.
To assign volume light to a light through the Modify panel:
- Open the
 Modify panel of a light.
 - Open the Atmospheres & Effects rollout.
- Click Add.
- Select Volume Light from the Add Atmosphere or Effect dialog and click OK.
- Highlight Volume Light from the Atmospheres & Effects list and click setup to adjust the Volume Light parameters. Note: Volume Lights don’t support negative multiplier values.
Interface
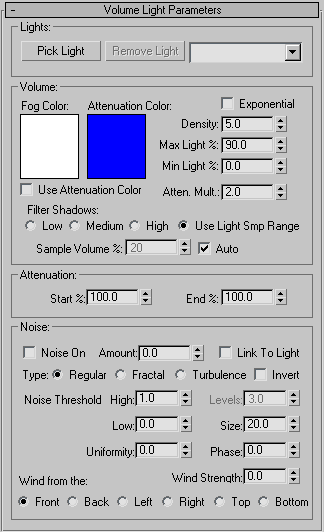
Lights group
- Pick Light
- Click the light that you want to enable for volume light in any viewport.
You can pick multiple lights. Click Pick Light and then press H. This opens the Pick Object dialog, which lets you choose multiple lights from a list.
- Remove Light
- Deletes a light from the list.
- [lights drop-down list]
- Shows the lights you have picked.
Volume group
- Fog Color
- Sets the color for the fog that makes up the volume of the light. Click the color swatch, and then choose the color you want in the Color Selector.
You can animate the color effect by changing the fog color at a nonzero frame with the Auto Key button on.
Unlike the other fog effects, this fog color combines with the color of the light. Possibly the best effect is to use white fog and then color it with a colored light.
- Attenuation Color
- Attenuates volume light over distance. The volume light ramps from the Fog Color to the Attenuation color over the light's Near and Far attenuation distances. Clicking the color swatch displays a color selector so you can change the attenuation color.
Attenuation Color interacts with Fog Color. For example, if your fog color is red and your attenuation color is green, in the rendering your fog will shade to purple. Typically the attenuation color should be very dark and neutral—black is a good choice.
- Use Attenuation Color
- Makes attenuation color active.
- Exponential
- Increases density exponentially with distance. When turned off, density increases linearly with distance. Activate this checkbox only when you want to render transparent objects in volume fog.
- Density
- Sets the density of the fog. The denser the fog, the more the light reflects off it inside the volume. Densities of 2 to 6 percent probably make the most realistic fog volumes.
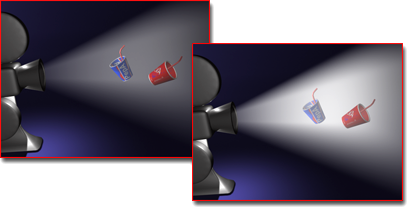
Left: Original scene
Right: Increasing the density
- Max Light %
- Represents the maximum glow effect that you can achieve (defaults to 90 percent). By turning this down, you can limit the brightness of the glow so that it doesn't get denser and denser as it gets farther away from the light and "whites out." Note: When your scene includes transparent objects inside a volume light, set Max Light to 100 percent.
- Min Light %
- Similar to an ambient light setting. If Min Light% is greater than 0, areas outside the light volume will glow also. Note that this means areas of open space (where the light ray can travel forever) will end up the same as the fog color (just as with normal fog).
Without objects behind the fog, the scene will always be as bright as the fog color if the Min Light% is greater than 0 (no matter what the actual value is). This is because the fog goes to infinity and is accumulated infinitely. If you're going to use min light% values greater than 0, you should make sure that you enclose your scene by geometry.
- Atten. Mult. [Attenuation Multiplier]
- Adjusts the effect of the attenuation color.
- Filter Shadows
- Allows you to get better quality volume-light rendering by increasing the sampling rate (at the cost of some increased rendering time). These are the options:
- Low The image buffer is not filtered but directly sampled instead. This option is fine for 8-bit images, AVI files, and so on.
- Medium Adjacent pixels are sampled and averaged. This produces a very significant improvement in cases where you’re getting banding types of artifacts. It is slower than Low.
- High Adjacent pixels and the diagonal pixels are sampled, and each are given different weights. This is the slowest method and provides somewhat better quality than Medium.
- Use Light Smp Range Blurs the shadows cast in the volume based on the Sample Range value in the light's shadow parameters. Because increasing the Smp Range value blurs the shadow cast by the light, this makes shadows in the fog better match cast shadows, and helps prevent aliasing in the fog shadows. Tip: With the Use Light Smp Range option, the higher the light's Smp Range value, the slower the rendering. However, with this option you can usually get good results with a lower Sample Volume % setting (such as 4), which reduces rendering time.
- Sample Volume %
- Controls the rate at which the volume is sampled. Ranges 1 through 10,000 (where 1 is the lowest quality and 10,000 is the highest quality).
- Auto
- Controls the Sample Volume % parameter automatically and disables the spinner (this is the default). The preset sampling rates are as follows:
low=8; medium=25; high=50
Because the parameter ranges up to 100 there's still room to set it higher. Increasing the Sample Volume % parameter definitely slows things down, but in some cases you may want to increase it (for extremely high sample quality).
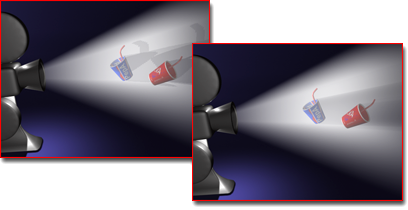
Left: Original scene
Right: Increasing sample volume to improve quality
Attenuation group
The controls in this group are contingent upon the settings of the Start Range and End Range attenuation parameters for the individual light.
- Start %
- Sets the start attenuation of the light effect, relative to the actual light parameter's attenuation. It defaults to 100 percent, which means that it starts attenuating at the Start Range point. When you reduce this parameter, it starts attenuating the light at a reduced percentage of the actual Start Range value that is, closer to the light itself.
Because you usually want a smooth falloff, you can keep this value at 0, and no matter what the light's actual Start Range, you'll always get a smooth glow without hotspots.
- End %
- Sets the end attenuation of the lighting effect, relative to the actual light parameter's attenuation. By setting this lower than 100 percent, you can have a glowing attenuating light that casts light much farther than it actually glows. Default=100.
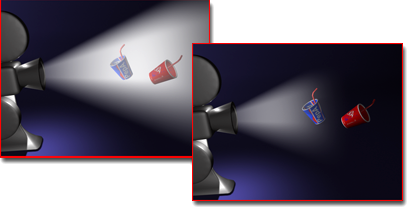
Left: Original scene
Right: Attenuation limits the range of the light.
Noise group
- Noise On
- Turns the noise on and off. When noise is on there is a slight increase in render time.
- Amount
- The percentage of noise applied to the fog. If the amount is 0, there is no noise. If the amount is 1, the fog becomes pure noise.

Left: Original scene
Right: Noise added
- Link To Light
- Links the noise effect to its light object, rather than to world coordinates.
Usually you want noise to look like fog or dust motes in the atmosphere, in which case, as the light moves, the noise should remain with the world coordinates. For certain special effects, however, you might want the noise linked to the light's coordinates. In these cases, turn on Link to Light.
- Type
- Choose one of three types of noise to apply.
- Regular The standard noise pattern.
- Fractal An iterative fractal noise pattern.
- Turbulence An iterative turbulence pattern.
Invert Reverses the noise effect. Dense fog becomes translucent and vice versa.
- Noise Threshold
- Limits the noise effect. When the noise value is above the Low threshold and below the High threshold, the dynamic range stretches to fill 0-1. This makes for a smaller discontinuity (first order instead of 0 order) at the threshold transition and thus produces less potential aliasing.
- High Sets the high threshold. Range=0 to 1.0.
- Low Sets the low threshold. Range=0 to 1.0.
- Uniformity
- Acts like a high-pass filter: the smaller the value, the more the volume is transparent with discrete blobs of smoke. By around -0.3 or so your image begins to look like specks of dust. Because the fog becomes thinner as this parameter gets smaller, you'll probably need to increase the density or the volume will start to disappear. Range=–1 to 1
- Levels
- Sets the number of times the noise is iteratively applied. This parameter is animatable. Enabled only for Fractal noise or Turbulence. Range=1 to 6, including fractional values.
- Size
- Determines the size of the tendrils of smoke or fog. Smaller values give smaller tendrils.
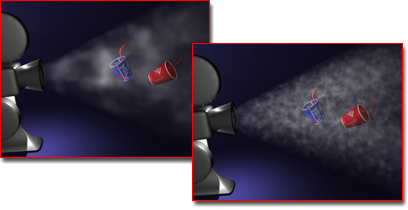
Left: Volume light with noise
Right: Reducing the size value
- Phase
- Controls the speed of the wind. If you have Wind Strength also set to greater than 0, the fog volume animates in accordance with the wind direction. With no Wind Strength, the fog churns in place. Because there's an animation track for phase, you can use the Function Curve editor to define precisely how you want your wind "gusts" to happen.
- Wind Strength
- Controls how fast the smoke moves away from the wind direction, relative to phase. As mentioned above, if the phase is not animated then the smoke won’t move, regardless of the wind strength. By having the phase animate slowly with a large wind strength, the fog moves more than it churns.
- Wind from the
- Defines the direction the wind is coming from.