After the part and material have been created, a composite layup section can be created.
The composite layup editor is used to create plies and assign materials and orientations to these plies.
- Switch to the Property module.
- From the main toolbar, select or click on the Create Composite Layup icon
 in the toolbar.
 - Specify an initial ply count of 8, and choose Solid for the element type. Click Continue.
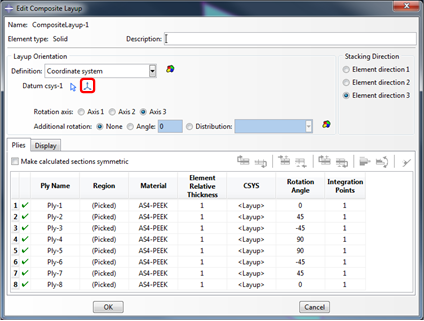
- In the dialog box that appears, choose Coordinate system from the Definition drop-down list.
- A datum coordinate system needs to be created to orient the plies. In the Layup Orientation box, click the Create button that lies inside the red box highlighted in the picture below.
- In the dialog box that appears, name the coordinate system CompositeOrientation. Accept the default rectangular type, and click Continue.
- Enter 0,0,0 as the coordinates for the origin, 0,1,0 as the X-axis coordinates, and -1,0,0 as the X-Y plane point coordinates. To submit a coordinate, press the Enter button on your keyboard instead of clicking the Create Datum button. Click Cancel when prompted to create another datum system.
- The Edit Composite Layup dialog box will reappear. Click on the Select button. From the viewport, click the Datum CSYS List... button and select CompositeOrientation from the dialog box that appears. Click OK.
- In the dialog box that reappears, select the plate from the viewport as the Region, AS4-PEEK as the Material, and 1 as the Element Relative Thickness.
- Tip: to edit all plies at once, right-click on the Region, Material, and Element Relative Thickness buttons and select the Edit option (the option at the top of the menu).
- Enter the Rotation Angle for Ply-1 thru Ply-8 as 0, 45, -45, 90, 90, -45, 45, 0, respectively. The dialog box should appear as shown below.
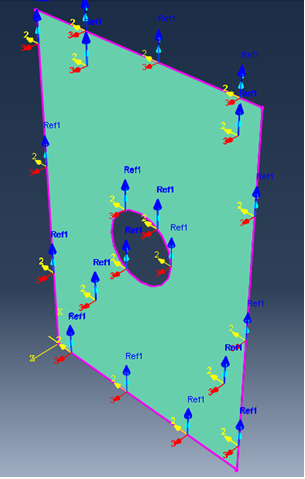
- Click on the Rotation Angle entry for Ply-1. The orientation of Ply-1 is now shown relative to the plate in the viewport. Check to make sure that Ply-1 has the orientation shown in the picture below.
The 1-axis in the figure below represents the fiber direction since 1 was specified as the fiber direction in the Create Composite Material plug-in. If "2" was specified as the fiber direction, then the 2-axis would represent the fiber direction.
- Click OK.