In this exercise, you will create a label style that displays user-defined property information for a point.
This exercise continues from Exercise 1: Creating User-Defined Properties.
Create a label style that displays user-defined property information
- Open Points-4b.dwg, which is located in the tutorials drawings folder.
- In Toolspace, on the Settings tab, expand the Point collection. Expand the Label Styles collection.
- Under Label Styles, right-click Standard. Click .
- In the Label Style Composer, on the Information tab, for Name, enter Manhole UDP.
- On the Layout tab, in the Preview list on the upper right side of the tab, select Point Label Style.
Now, any edits you make to the point label style will be displayed in the preview pane.
- Click
 to create a text component for the label.
 - For the new text component, specify the following parameters:
- Name: Invert In
- Anchor Component: Point Description
- Anchor Point: Bottom Left
- TextAttachment: Top Left
- Under Text, for Contents, click the default value. Click
 .
. - In the Text Component Editor – Contents dialog box, on the Properties tab, specify the following parameters:
- Properties: MH_Pipe In Invert
- Precision: 0.01
- Click
 .
. - In the text editing window, delete the text “Label Text” from the label. Enter Invert In: before the property field, which is enclosed in angle brackets(<>). The text in the editor should look like this:

- Click OK.
-
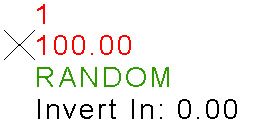
In the preview pane, your label should look like this:

- Click OK.
To continue this tutorial, go to Exercise 3: Assigning User-Defined Properties to Points.