In this exercise, you will set up a folder in which to store objects that are referenced through data shortcuts.
The data shortcut folder contains all the source drawings and data shortcut objects in a project.
Access the project management tools in Prospector
- Open drawing Project Management-1.dwg, which is available in the tutorials drawings folder.
This drawing contains an existing ground surface, alignments that represent intersecting road centerlines, and parcel objects that represent property boundaries. In the following exercises, you will create data shortcuts to the surface and alignments in this drawing, and then reference them in a new drawing.

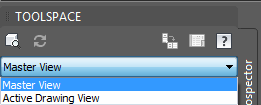
- In Toolspace, on the Prospector tab, select the Master View.

Set the working folder
- Right-click the
 Data Shortcuts collection. Click Set Working Folder.
 The working folder is the parent folder where you save project folders. For this exercise, you will specify a folder on your hard drive as your working folder.
- In the Browse For Folder dialog box, navigate to the Civil 3D Projects folder . Click OK.
Create a data shortcuts project
- Right-click the
 Data Shortcuts collection. Click New Data Shortcuts Project Folder.
 - In the New Data Shortcut Folder dialog box, select the Use Project Template check box.
- Under Project Templates Folder, click
 .
. - In the Browse For Folder dialog box, navigate to the Civil 3D Projects folder.
- In the Browse For Folder dialog box, select the Civil 3D Project Templates folder. Click OK.
- In the New Data Shortcuts Folder dialog box, specify the following parameters:
- Name: Tutorial Data Shortcuts Project
- Use Project Template: Selected
- Project Template: select _Sample Project
Notice that the folder you specified in Step 5 is displayed in the Working Folder field.
- Click OK.
- Using Windows Explorer, navigate to the Civil 3D Projects folder. Examine the folder structure in the Tutorial Data Shortcuts Project folder.
The folder structure provides separate locations for data shortcuts, source drawings, and other data. You will save project objects in these folders in the next exercise.
This is a typical structure for an AutoCAD Civil 3D project. Folders are provided for many of the document types that are typical of a civil engineering project.
To continue this tutorial, go to Exercise 2: Creating and Exporting Data Shortcuts.