In this exercise, you will use label sets to apply several types of labels to an alignment.
You can automatically add labels as you create objects, such as points, alignments, or parcels. Labeling an object automatically is an efficient way to annotate common elements, such as alignment stations or parcel areas, as they are created.
In this exercise, you will specify a label set to apply as you create an alignment from a polyline. Both the newly created alignment and its labels will reside in the current drawing. Next, you will learn how to modify the properties of the label set after the alignment has been created. Finally, you will learn how to apply a label set to an alignment that exists in an externally referenced drawing.
Create a label set for a new alignment
- Click tab
 panel
panel  drop-down
 . On the command line, enter X to select the Xref option.
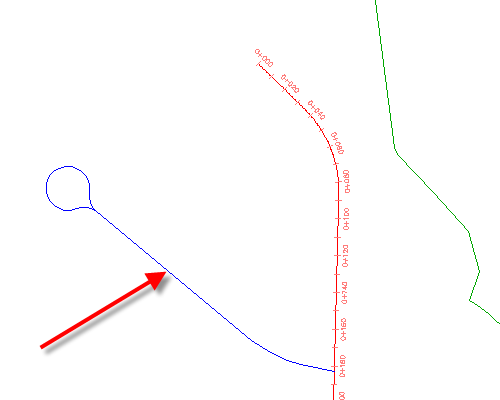
 - Click the blue polyline on the west side of the site.

Polyline in the externally referenced drawing
- Press Enter twice.
- In the Create Alignment - From Polyline dialog box, for Name, enter West Street. For Alignment Style, ensure that Proposed is selected. Examine the contents of the Alignment Label Set list.
When you create an object, its Create dialog box typically has style selector lists for both the object and the labels. The style selector lists identify the object styles and label styles that are available in the current drawing for that object type. When you create an alignment, profile, or section, you select a label set, which applies a preset style to each of the various labels types that are in the set. You will examine an example of a label set in the following steps. Notice that there is a _No Labels selection. This selection is an empty label set that does not display any labels along the alignment.
Tip:If you do not want to annotate objects that do not use label sets, you can create a label style that has the visibility of all of its components turned off.
- From the Alignment Label Set list, select
Major Minor And Geometry Points
. Click the arrow next to
 . Select
  Copy Current Selection.
 The Alignment Label Set dialog box displays information about how the Major Minor and Geometry Points label set is configured. You will use this label set as a basis to create a new label set.
The Information tab displays the label set name, description, and the date when it was created or modified.
The Labels tab specifies the label types that are defined in the label set, as well as the label styles that are used by each type. In this example, you use the label set to apply label styles to the geometry points and major and minor stations of an alignment.
Note:Label sets for profiles and sections are constructed in the same manner, using a similar dialog box.
- In the Alignment Label Set dialog box, on the Information tab, for Name, enter Major-Minor Stations And Start-End Points.
- On the Labels tab, in the Geometry Points row, in the Style column, click

- In the Pick Label Style dialog box, select Alignment Start. Click OK.
- In the Alignment Label Set dialog box, in the Geometry Points row, in the Geometry Points To Label column, click
 .
. - In the Geometry Points dialog box, click
 to clear all check boxes. Select the Alignment Beginning check box. Click OK.
 You can use geometry point label types to label a selection of geometry points using a combination of styles that you specify. In steps 8 and 9, you applied a geometry point label style to the alignment starting station. In the following steps, you will create another instance of the Geometry Points label type that applies a different style to the alignment ending station.
Tip:To remove a label type from the label set, select the type and click
 .
. - In the Alignment Label Set dialog box, on the Labels tab, specify the following parameters:
- Type: Geometry Points
- Geometry Point Label Style: Alignment End
- Click Add.
- In the Geometry Points dialog box, click
 to clear all check boxes. Select the Alignment End check box. Click OK.
 - In the Alignment Label Set dialog box, click OK.
- In the Create Alignment - From Polyline dialog box, under Conversion Options, clear the Add Curves Between Tangents check box. Click OK.
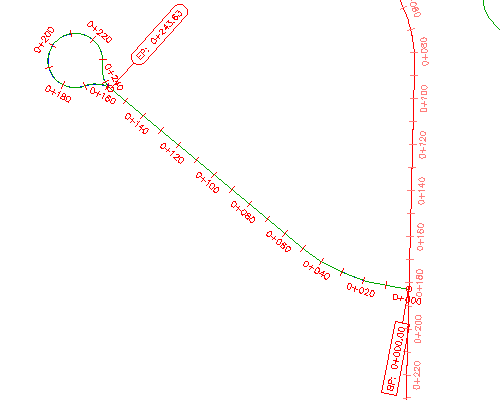
- Zoom in to the area surrounding the new alignment and examine the labels that were automatically placed along the alignment. Note:
If the EP: 0+243.63 label is adjacent to the intersecting alignment, click tab
 panel
panel 
 . Click the alignment. Click OK to acknowledge the warning about alignment properties that are affected by the command.
 When the alignment is created, it is green. The green color is controlled by the alignment style that you specified in step 3. Notice that the new red labels are a brighter than the labels that were brought in with the externally referenced objects. The color tones are different so that you can easily identify where the labels reside: bright labels are in the current drawing, and light labels are in the externally referenced drawings.
Note: Warning symbols (not shown in the following illustrations) are created in the drawing to indicate where tangency has been violated. For more information, see To Check for Tangency Between Alignment Entities.
Label set applied to a newly created alignment
This exercise uses Labels-1a.dwg with the modifications you made in the previous exercise, or you can open Labels-2a.dwg from the tutorials drawings folder.
Modify the label set of an existing alignment
- In the drawing, select the West Street alignment. Right-click. Click Edit Alignment Labels.
- In the Alignment Labels dialog box, specify the following parameters:
- Type: Geometry Points
- Geometry Points Label Style: Perpendicular With Tick And Line
- Click Add.
- In the Geometry Points dialog box, click
 to clear all check boxes. Select the following check boxes:
 - Tangent-Tangent Intersect
- Tangent-Curve Intersect
- Curve-Tangent Intersect
- Click OK to close the Geometry Points and Alignment Label Set dialog boxes.
- Press Esc to deselect the alignment.

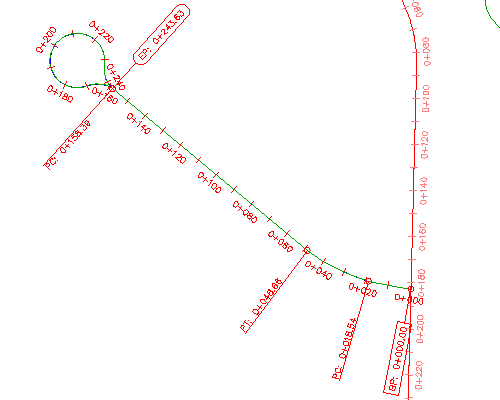
Alignment with modified label set
Note:In the previous image, the EP: 0+243.63 and PC: 0+158.39 labels are shown on opposite sides of the alignment for clarity. You will learn to flip labels to the opposite side of an alignment in a later exercise.
Changes that you make to the alignment label set after the alignment has been created will not be applied to the original label set. To edit the original label set, in Toolspace, on the Settings tab, expand Alignment Label Styles
 Label Sets. Right-click the appropriate label set. Click Edit.
Add labels to an alignment in a referenced drawing
- Click tab
 panel
panel  menu
menu 

 . Click the Main Street alignment, which is the long alignment in the middle of the site.
 Because this alignment exists in an externally referenced drawing, the table in the Alignment Labels dialog box is empty. Only labels that are created in the current drawing can be modified in the current drawing. Labels that were created in an externally referenced drawing must be modified in the source drawing.
- In the Alignment Labels dialog box, specify the following parameters:
- Type: Geometry Points
- Geometry Point Label Style: Perpendicular With Tick And Line
- Click Add. Note:
The Import Label Set button applies a label set that exists in the current drawing.
- In the Geometry Points dialog box, click OK.
- In the Alignment Labels dialog box, specify the following parameters:
- Type: Design Speeds
- Design Speed Label Style: Station Over Speed
- Click Add.
- Click OK.
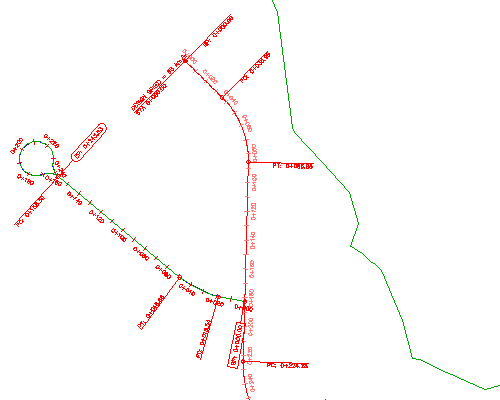
On the Main Street alignment, labels are displayed at each station at which a new design speed is applied, and at each geometry point. These label objects reside in the current drawing and annotate the alignment in the externally referenced drawing.

Labels added to an alignment in an externally referenced drawing
To continue this tutorial, go to Exercise 2: Manually Labeling Objects.