Modeling a part involves configuring a variety of part features.
In Part Builder, the term model refers to the graphical representation of a part. A model consists of various features that have specific relationships to each other and that define the behavior of the part. Some features require that you create simple shapes or points, while others require an extrusion or path. Some features represent visible geometry, and some help you to position geometry precisely on a part. You can modify features to refine and improve your parts over time. You change features by modifying their size and shape or by flipping or moving them. To effectively model a part, it is important to understand how each feature relates to the other features of modeling.
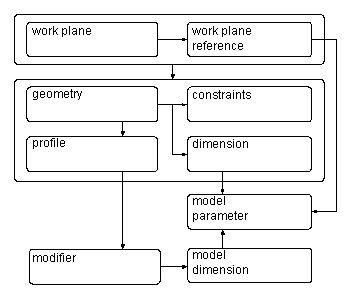
The following illustration shows the features that make up the model. Arrows indicate the direction of the relationship between features. For example, modifying geometry affects a profile, which affects a modifier, and so on. Refer to this illustration as you learn more about each feature to help you understand the relationships between features.

To model a part, you must first define work planes on which to create the geometry of your model. You can then create profiles and apply modifiers to define the shape and default size of the part. To avoid distortion in the model, start with the larger features, which have more impact on the overall size of the part, and then add the smaller features.
Modeling any part typically involves adding a profile, geometry, dimensions, and constraints. You may need to add extrusions, but these are typically used for more complex structure shapes.
For a simple cylindrical structure part, the profile is circular, the geometry is typically fixed center, and an example of a constraint is concentric. Dimension parameters define various diameters for the shape. For example, a dimension parameter named BdyD1 is used to define the diameter for the body of a simple cylindrical structure.
Keep the following tips in mind as you model the part:
- Use work planes to control the UCS orientation. Using the AutoCAD UCS command does not associate the current plane with your part.
- Use the AutoCAD Point Style command to increase point sizes. It is recommended to use an absolute point size.
- Use a minimum number of points. Reusing points is less confusing and helps in constraining the model.
- Use both constraints and dimensions. Some constraint combinations may distort unconstrained features of the model. If so, delete the last constraint and consider using a dimension or a different constraint combination.
- Use Part Builder dimensions. AutoCAD dimensions are not parametric and therefore cannot control the size, shape, or position of part content.
- Dimension large features before small features. To minimize distortion, define larger features that have an overall bearing on the model. Dimensioning small features first may restrict overall size. Delete or undo a dimension if the model shape is distorted.
- Define shape before size. If you apply constraints before dimensions, your model shape is less likely to become distorted.
- Determine model dependencies before applying constraints. A single constraint can often be used to define more than one feature’s shape. Therefore, analyze the model design to help identify necessary constraints.
- Add constraints as needed to define the model shape. Because constraints often restrict more than one feature, use fewer constraints to avoid distorted models.
- When using calculated values for model parameters, be aware that calculated values are not available in the part Add Size dialog box.