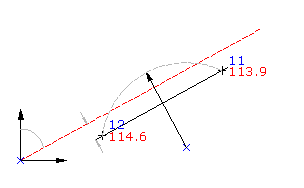
Creates a point at the intersection of a direction (line) and distance (circle).
Specify values by picking points in the drawing, using transparent commands, or entering values at the command line.

- Select settings and create styles, layers, point groups, and description keys.
-


 .
.
- Specify the radial point by doing one of the following:
- Pick a point in the drawing.
- Use Transparent commands to specify the point.
- Specify the radius by doing one of the following:
- Enter a radius value.
- Pick a point in the drawing.
- Use Transparent commands to specify the radius.
- Specify the start point by doing one of the following:
- Pick a point in the drawing.
- Use Transparent commands to specify the point.
- Specify the direction from the start point by doing one of the following:
- Pick a point in the drawing.
- Use Transparent commands to define the point.
- Enter Z, and then enter the azimuth of the direction line.
- Enter B, and then specify the quadrant and the bearing.
- Specify the offset distance by doing one of the following:
- Enter a distance.
- Pick a point in the drawing.
- Use Transparent commands to specify a point to define the offset.
In the drawing, an X marks each intersection point. If only one intersection is located then the point is automatically created.
- Specify the intersection point by doing one of the following:
- Click near the X on which you want to create the point.
- Enter A to place points at both intersections.
- Enter a description, or press Enter to skip the description.
- Enter an elevation for the point, or press Enter to skip the elevation.
Note: Many factors affect how the point is displayed. For more information, see To Control the Appearance of Points in a Drawing.